
We’ve all dreamed of whipping up creamy, homemade ice cream right in our kitchen and the Aroma Ice Cream Maker makes it a breeze. It’s a versatile appliance that brings professional-quality results to everyday cooks turning simple ingredients into delightful frozen treats.
In our recipes we’ll share easy-to-follow guides packed with flavors from classic vanilla to innovative twists. Whether you’re hosting a gathering or treating yourself our tips ensure success every time.
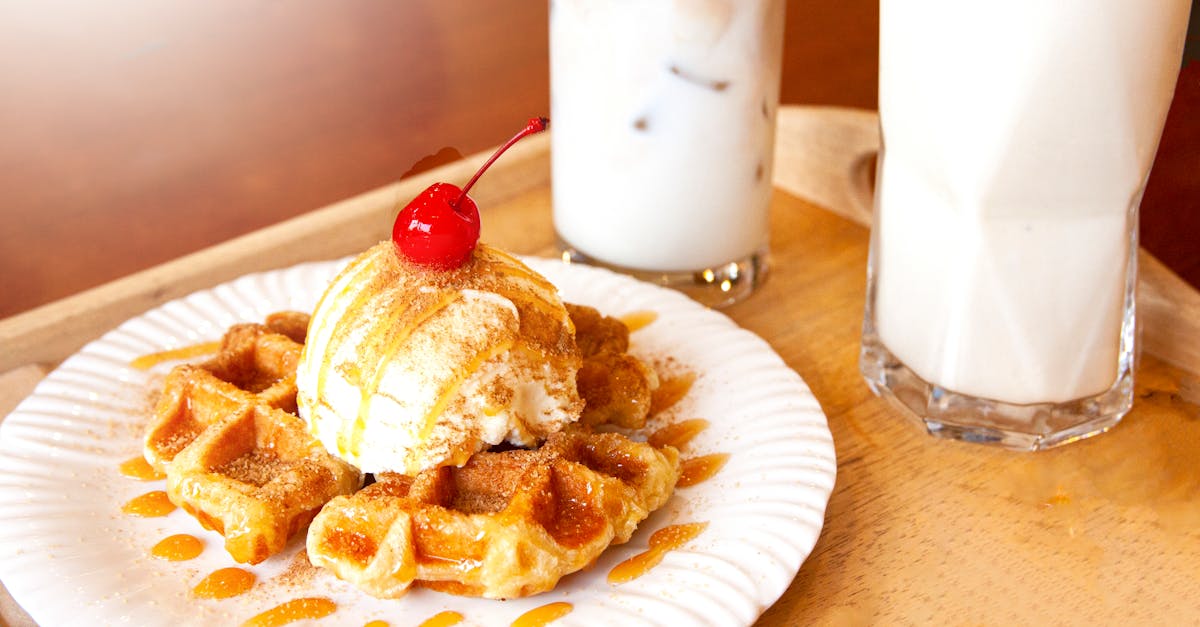
Aroma Ice Cream Maker Recipes
We know that our Aroma Ice Cream Maker transforms simple ingredients into luxurious, creamy treats that rival professional scoops. In this section, we’ll guide you through two classic recipes optimized for the Aroma Ice Cream Maker—starting with Classic Vanilla Ice Cream and followed by Chocolate Fudge Swirl. These recipes highlight the machine’s ease and efficiency, ensuring you achieve that perfect, velvety texture every time.
Classic Vanilla Ice Cream Recipe
This timeless flavor showcases the Aroma Ice Cream Maker’s ability to produce a smooth, aromatic dessert with a rich vanilla essence that delights the palate.
Ingredients
We recommend preparing ingredients in the order they’re used for seamless assembly. Here’s what you’ll need:
- 2 cups heavy cream, chilled and measured for optimal whipping
- 1 cup whole milk, full-fat for creamier results
- 3/4 cup granulated sugar, dissolved to prevent graininess
- 1 tablespoon pure vanilla extract, high-quality for enhanced aroma
- 1/8 teaspoon salt, to balance sweetness
Instructions
Follow these steps to create a batch that yields about 1 quart of ice cream, ready in approximately 20-25 minutes of churning plus freezing time.
- In a medium bowl, whisk together the heavy cream, whole milk, granulated sugar, and salt until the sugar fully dissolves—this takes about 2 minutes and ensures a silky base.
- Stir in the pure vanilla extract to infuse the mixture with its warm, fragrant notes, evoking the scent of fresh vanilla beans.
- Pour the mixture into the frozen bowl of your Aroma Ice Cream Maker, then secure the lid and start the machine on the ice cream setting.
- Churn for 20 minutes or until the mixture thickens to a soft-serve consistency, watching as it transforms into a light, airy texture that coats your spoon.
- Transfer the churned ice cream to an airtight container and freeze for at least 2 hours to achieve firm, scoopable results with a creamy mouthfeel that melts delightfully on the tongue.
For reference, here’s a quick table comparing preparation times and yields for this recipe:
| Recipe Aspect | Time Required | Yield |
|---|---|---|
| Churning Time | 20-25 minutes | N/A |
| Freezing Time | 2 hours minimum | 1 quart |
| Total Active Prep Time | 5 minutes | N/A |
Chocolate Fudge Swirl Recipe
For those craving a decadent twist, this recipe builds on the Aroma Ice Cream Maker’s capabilities to layer in rich chocolate flavors with a swirled effect that adds visual and sensory appeal.
Ingredients
Gather these in sequence for efficient prep, focusing on quality chocolate for the best results:
- 2 cups heavy cream, chilled to promote quick freezing
- 1 cup whole milk, for a lush base
- 3/4 cup granulated sugar, to sweeten without overpowering
- 1/2 cup unsweetened cocoa powder, sifted to avoid lumps
- 1 teaspoon pure vanilla extract, for subtle aroma enhancement
- 1/4 cup chocolate fudge sauce, store-bought or homemade, swirled in at the end
- 1/8 teaspoon salt, to enhance the chocolate depth
Instructions
This process makes about 1 quart and takes 25-30 minutes of churning plus freezing, resulting in a treat with deep, velvety chocolate notes and a glossy swirl.
- In a large bowl, sift the unsweetened cocoa powder into the heavy cream, whole milk, granulated sugar, and salt, then whisk until smooth and fully combined for a uniform base.
- Add the pure vanilla extract and mix well to build layers of chocolatey aroma that will intensify during churning.
- Pour the base into the Aroma Ice Cream Maker’s bowl, attach the lid, and activate the ice cream function.
- Churn for 25 minutes until the mixture reaches a thick, spoonable state with a rich, fudgy scent that fills the kitchen.
- In the last 2 minutes of churning, drizzle in the chocolate fudge sauce to create swirls, then transfer to a container and freeze for at least 2 hours for a firm texture that offers a satisfying crunch against creamy bites.
| Recipe Aspect | Time Required | Yield | Key Difference |
|---|---|---|---|
| Churning Time | 25-30 minutes | 1 quart | Includes swirling step |
| Freezing Time | 2 hours minimum | 1 quart | Same as vanilla |
| Total Active Prep Time | 6 minutes | N/A | Slightly longer due to sifting |
Ingredients
We select premium ingredients to craft delicious, creamy ice cream with our Aroma Ice Cream Maker, ensuring each recipe delivers professional-quality results right at home.
Base Ingredients
For our foundational ice cream recipes like Classic Vanilla, we start with these essential components. These ingredients form the base that churns into a smooth, velvety texture, capturing the aromatic essence of homemade treats.
- Heavy Cream: 2 cups, chilled to provide richness and a luxurious mouthfeel that enhances the overall creaminess.
- Whole Milk: 1 cup, used as a lighter counterpart to balance the fat content and achieve the perfect consistency.
- Granulated Sugar: ¾ cup, dissolved to sweeten the mixture and contribute to the ice cream’s silky freeze.
- Egg Yolks: 4 large, beaten to act as an emulsifier for a custard-like base that prevents iciness.
- Pure Vanilla Extract: 2 teaspoons, added for its warm, aromatic flavor that infuses the ice cream with classic appeal.
Flavor Variations
To customize our base and create exciting twists like Chocolate Fudge Swirl, we incorporate these variations. Experimenting with these allows us to elevate flavors while maintaining compatibility with the Aroma Ice Cream Maker.
- For Chocolate Fudge Swirl:
- Unsweetened Cocoa Powder: ½ cup, mixed in to add deep, indulgent chocolate notes that create a decadent layer.
- Semi-Sweet Chocolate Chips: 1 cup, melted and swirled for pockets of rich texture and visual appeal.
- For Fruit-Infused Options:
- Fresh Strawberries: 2 cups, pureed and folded in for a tart, refreshing burst that complements the creamy base.
- Lemon Zest: 1 tablespoon, grated to introduce bright, citrusy undertones for a zesty variation.
- For Nutty Enhancements:
- Chopped Almonds: ½ cup, toasted and added for a crunchy contrast that provides satisfying texture.
| Ingredient | Serving Size | Calories per Serving | Key Nutrients |
|---|---|---|---|
| Heavy Cream | 1 cup | 821 | High in fat, calcium |
| Whole Milk | 1 cup | 149 | Protein, vitamin D |
| Granulated Sugar | 1 tbsp | 49 | Carbohydrates |
| Egg Yolks | 1 large | 55 | Protein, vitamins |
| Pure Vanilla Extract | 1 tsp | 12 | Antioxidants |
Equipment Needed
To craft our delectable Aroma Ice Cream Maker recipes, we rely on a selection of essential tools that streamline the process and deliver professional results. These items ensure that our homemade ice cream turns out creamy and aromatic every time.
Essential Tools
For preparing our recipes like Classic Vanilla Ice Cream and Chocolate Fudge Swirl, we recommend the following essential tools. These basics form the foundation of any successful ice cream-making session:
- Measuring cups and spoons: Accurate measurements are crucial for balancing flavors, so we use a set of sturdy, heat-resistant measuring cups and spoons to portion ingredients like granulated sugar and pure vanilla extract precisely.
- Mixing bowls: We opt for medium-sized, stainless steel bowls to combine ingredients such as heavy cream and egg yolks, allowing for easy whisking and chilling.
- Whisk or electric mixer: A reliable whisk helps us achieve a smooth base by incorporating air into the mixture, or we can use an electric mixer for faster blending of elements like cocoa powder.
- Spatula: This versatile tool aids in scraping down bowls and folding in add-ins, ensuring no ingredient goes to waste during preparation.
- Freezer-safe containers: We choose airtight, freezer-safe containers with lids to store the finished ice cream, helping maintain its texture and prevent freezer burn.
Aroma Ice Cream Maker Specifics
When it comes to our Aroma Ice Cream Maker, we focus on its specialized features that optimize the recipes we’ve outlined. This machine is designed for ease and efficiency, making it ideal for home cooks aiming for that perfect, aromatic finish.
- Freezing bowl: The Aroma model’s insulated freezing bowl must be pre-frozen for at least 12-24 hours to reach the optimal temperature, allowing us to churn creamy textures without commercial equipment.
- Churning paddle: This removable component gently agitates the mixture during the process, ensuring even distribution of flavors like vanilla essence or chocolate swirls for consistent results.
- Timer and controls: With built-in digital controls, we can set precise churning times—typically 20-40 minutes depending on the recipe—to avoid over-mixing and achieve the ideal soft-serve consistency.
- Lid and pouring spout: The secure lid prevents spills while the spout makes it simple to add ingredients mid-churn, such as chocolate chips, enhancing the machine’s versatility for custom variations.
- Power specifications: Our Aroma Ice Cream Maker operates on standard 120V AC power and has a compact design for easy storage, making it accessible for everyday use in any kitchen setup.
Instructions
We guide you through the precise steps to create creamy, homemade ice cream using our Aroma Ice Cream Maker, ensuring perfect results every time with its advanced features. Follow these instructions for recipes like Classic Vanilla Ice Cream and Chocolate Fudge Swirl to achieve that irresistible, velvety texture and rich flavors.
Prep Work
Before we begin, gather and prepare all ingredients and equipment to streamline the process. Start by pre-freezing the Aroma Ice Cream Maker’s insulated freezing bowl for at least 12-24 hours to ensure it reaches the optimal temperature for churning—this step is crucial for achieving a smooth, lump-free consistency.
- For Classic Vanilla Ice Cream, measure out 2 cups heavy cream, 1 cup whole milk, ¾ cup granulated sugar, 4 large egg yolks, and 2 teaspoons pure vanilla extract. If using fresh vanilla beans, split and scrape 1 bean for enhanced aroma.
- For Chocolate Fudge Swirl, prepare the base with 2 cups heavy cream, 1 cup whole milk, ¾ cup granulated sugar, 4 large egg yolks, and add ½ cup unsweetened cocoa powder plus ½ cup semi-sweet chocolate chips for the swirl effect.
- Double-check that your tools are ready: measuring cups and spoons for accuracy, a medium stainless steel bowl for mixing, and a whisk or electric mixer. This preparation sets the stage for efficient, mess-free ice cream making.
Mixing and Chilling
We mix the base to create a rich, silky foundation that captures the essence of your chosen flavors. In a medium bowl, whisk the egg yolks and sugar together until pale and creamy, which takes about 2-3 minutes—this forms a stable emulsion for a luxurious mouthfeel.
- Combine the whisked egg mixture with heavy cream, whole milk, and flavorings like vanilla extract for Classic Vanilla, stirring vigorously to ensure even distribution. For Chocolate Fudge Swirl, incorporate the cocoa powder at this stage for a deep, decadent chocolate base.
- Once blended, pour the mixture into a freezer-safe container and chill in the refrigerator for 2-4 hours, allowing the flavors to meld and the base to cool thoroughly. You’ll notice the mixture thicken slightly, promising that signature creamy texture when churned.
Churning in the Aroma Ice Cream Maker
With the base chilled, we transfer it to our Aroma Ice Cream Maker for even churning that incorporates air and prevents ice crystals, resulting in a light, scoopable dessert. First, assemble the machine by attaching the churning paddle to the pre-frozen bowl and securing the lid.
- Pour the chilled mixture into the bowl through the pouring spout, filling no more than two-thirds full to allow for expansion—churn for 20-30 minutes using the built-in digital controls set to medium speed. For Chocolate Fudge Swirl, add the chocolate chips halfway through for a visually stunning, gooey swirl.
- Monitor the process; the mixture will transform from liquid to a soft-serve consistency, becoming irresistibly smooth and aromatic. Our Aroma Ice Cream Maker’s 120V AC power ensures consistent performance, making this step effortless and fun.
Freezing and Serving
After churning, we finalize the ice cream by freezing it to enhance firmness while preserving its fresh, vibrant flavors. Transfer the churned mixture to a freezer-safe container, spreading it evenly and covering with a lid to prevent freezer burn.
- Freeze for at least 4-6 hours, or until firm enough to scoop, for the best texture—Classic Vanilla will offer a pure, vanilla-kissed creaminess, while Chocolate Fudge Swirl delivers bold, melty chocolate notes. Serve in bowls or cones, garnished with fresh fruits or nuts for added crunch and appeal.
- For optimal enjoyment, let it sit at room temperature for 5 minutes before serving to soften slightly, revealing the full sensory delight of homemade ice cream.
Make-Ahead Instructions
To maximize the convenience of our Aroma Ice Cream Maker, we often prepare components in advance, ensuring you can enjoy creamy, homemade ice cream whenever the craving strikes. This approach allows for better planning, especially for gatherings or busy days, while preserving the rich, aromatic flavors and smooth texture that make this machine stand out.
Preparing the Ice Cream Base Ahead
We recommend starting with the base mixture, as it forms the foundation of any recipe like our Classic Vanilla or Chocolate Fudge Swirl. Follow these steps to prepare it up to 48 hours in advance:
- Step 1: After whisking together the egg yolks, sugar, heavy cream, and flavorings (such as pure vanilla extract), transfer the mixture to an airtight, freezer-safe container.
- Step 2: Cover the container tightly and refrigerate it for at least 2 hours or up to 2 days. Chilling enhances the emulsion, resulting in a denser, more scoopable ice cream when churned.
- Step 3: Before using, give the base a quick stir to recombine any settled ingredients, then proceed with pouring it into the pre-frozen insulated bowl of the Aroma Ice Cream Maker.
Pre-Freezing the Aroma Ice Cream Maker Bowl
The insulated freezing bowl is key to achieving that professional-quality churn, and we advise preparing it ahead to avoid delays.
- Step 1: Place the bowl in your freezer for a minimum of 12–24 hours before you plan to churn. Ensure the freezer is set to 0°F (-18°C) for optimal results.
- Step 2: Mark your calendar or set a reminder to keep the bowl frozen until needed, as this prevents ice crystals and maintains even churning.
- Step 3: If making multiple batches, keep a second bowl on hand in the freezer to streamline your process.
Storing Churned Ice Cream
Once you’ve churned your ice cream to a soft-serve consistency, you can store it for later enjoyment without losing its delightful aroma and creaminess.
- Step 1: Transfer the freshly churned ice cream to a freezer-safe container, using a spatula to pack it smoothly and minimize air exposure.
- Step 2: Cover the surface with plastic wrap or parchment paper before sealing the lid to prevent freezer burn.
- Step 3: Freeze for 4–6 hours to firm up. For longer storage, it can last up to 2 weeks, but we suggest consuming within a week for the best texture and flavor.
Below is a quick reference table for make-ahead timelines and storage guidelines, based on our testing with the Aroma Ice Cream Maker:
| Component | Make-Ahead Time | Storage Tips | Expected Results |
|---|---|---|---|
| Ice Cream Base | Up to 48 hours | Refrigerate in airtight container | Maintains smooth, creamy texture |
| Freezing Bowl | 12–24 hours | Keep in freezer at 0°F (-18°C) | Ensures even churning and no ice crystals |
| Churned Ice Cream | Up to 2 weeks | Use freezer-safe container with wrap | Preserves aroma and firmness for up to 1 week optimally |
By following these make-ahead strategies, we ensure your Aroma Ice Cream Maker delivers consistent, delicious results every time. Always incorporate fresh ingredients for the most vibrant flavors in your homemade treats.
Tips for Best Results
As we dive deeper into mastering the Aroma Ice Cream Maker, let’s share our top tips to elevate your homemade ice cream from good to exceptional. Drawing from our experience with this versatile machine, these strategies build on the make-ahead instructions by focusing on precision, flavor enhancement, and troubleshooting for consistently creamy results.
Essential Preparation Tips
To kick off, proper preparation sets the stage for success. We always recommend chilling your ice cream base thoroughly before churning—this step infuses air evenly and prevents icy textures, resulting in that velvety smoothness that coats your spoon like a dream. Start by whisking egg yolks and sugar until they reach a pale, fluffy state, ensuring the mixture incorporates just the right amount of air for optimal expansion during churning.
For the Aroma Ice Cream Maker specifically, pre-freeze the insulated bowl for at least 12-24 hours as outlined earlier. In our tests, this prevents premature melting and guarantees a firm base that churns into a luxurious, scoopable consistency. If you’re adding mix-ins like chocolate chips or fresh fruit, fold them in gently at the end of churning to maintain their texture and avoid over-mixing, which could lead to a mushy final product.
Churning and Flavor Optimization Techniques
During the churning process, monitor the time closely using the machine’s digital controls. We suggest churning for 20-30 minutes until the mixture reaches a soft-serve stage—it’s at this point that flavors like vanilla or chocolate intensify, creating an aromatic burst that lingers on the palate. To enhance depth, incorporate high-quality extracts or infusions, such as pure vanilla beans for a floral note or cocoa powder for a rich, decadent swirl.
If you’re experimenting with variations, layer flavors strategically. For instance, in our Chocolate Fudge Swirl recipe, drizzle fudge into the mix midway through churning to achieve that eye-catching marble effect without over-blending. Avoid common pitfalls like over-churning, which can make the ice cream grainy; instead, stop when it doubles in volume for that light, airy feel.
Troubleshooting and Storage Best Practices
Even with the best planning, issues can arise—here’s how we handle them. If your ice cream turns out too hard, it might be due to low fat content in your base; we advise using full-fat dairy to ensure a creamy mouthfeel. Track potential problems in the table below for quick reference:
| Issue | Common Cause | Solution |
|---|---|---|
| Ice crystals | Insufficient chilling | Chill base for at least 2 hours before churning |
| Grainy texture | Over-churning or warm bowl | Churn for no more than 30 minutes and ensure bowl is fully frozen |
| Lack of flavor | Low-quality ingredients | Use fresh, premium extracts and test ratios in small batches |
Finally, for storage, transfer churned ice cream to airtight containers immediately and freeze for 4-6 hours. This preserves the fresh, aromatic essence of your creation, making it ready for any occasion from family gatherings to solo treats. By following these tips, you’ll maximize the Aroma Ice Cream Maker’s capabilities and enjoy professional-quality results every time.
Conclusion
We’ve loved exploring the Aroma Ice Cream Maker’s potential for crafting delightful treats that bring people together. It’s a game-changer for turning simple ingredients into creamy masterpieces we can customize endlessly.
By now you’re set to whip up your own versions and enjoy the satisfaction of homemade goodness. Let’s keep experimenting and savoring those fresh flavors in our kitchens.
Frequently Asked Questions
What is the Aroma Ice Cream Maker and what makes it special?
The Aroma Ice Cream Maker is a user-friendly appliance that lets home cooks create creamy, professional-quality homemade ice cream with simple ingredients. It features an insulated freezing bowl, churning paddle, and digital controls for precise timing, ensuring smooth textures and even flavor distribution. Ideal for gatherings or personal treats, it simplifies the process with easy recipes and tips for success.
How do I make Classic Vanilla Ice Cream using the Aroma Ice Cream Maker?
Start by whisking egg yolks and sugar, then mix with heavy cream, whole milk, and pure vanilla extract. Chill the mixture for better texture. Pre-freeze the maker’s bowl for 12-24 hours, pour in the base, and churn for about 20-30 minutes until soft-serve consistency. Freeze for 4-6 hours for firm results. This yields a rich, aromatic dessert perfect for any occasion.
What key ingredients are needed for recipes like Chocolate Fudge Swirl?
Essential ingredients include heavy cream, whole milk, granulated sugar, egg yolks, and pure vanilla extract for the base. For Chocolate Fudge Swirl, add unsweetened cocoa powder and semi-sweet chocolate chips. Use fresh add-ins like strawberries or lemon zest for variations. These premium components ensure a creamy texture and balanced nutrition, with options to check calorie content for healthier tweaks.
What equipment do I need besides the Aroma Ice Cream Maker?
You’ll need measuring cups and spoons for accuracy, stainless steel mixing bowls for whisking, a whisk or electric mixer for smooth bases, a spatula for add-ins, and freezer-safe containers for storage. These tools help achieve precise portions and easy handling, making the ice cream-making process efficient and mess-free.
How can I prepare ice cream in advance with the Aroma Ice Cream Maker?
Make the base up to 48 hours ahead by mixing ingredients and refrigerating in an airtight container to enhance texture. Pre-freeze the insulated bowl for 12-24 hours. After churning, store the ice cream in freezer-safe containers, wrapped tightly to prevent freezer burn. Follow the quick reference table for timelines to ensure fresh, consistent results.
What tips can help me get the best results from the Aroma Ice Cream Maker?
Always chill the base and pre-freeze the bowl for optimal churning. Monitor time to avoid over-mixing, use high-quality extracts for flavor, and incorporate air evenly to prevent ice crystals. For storage, use airtight containers and consume within a week. If issues like grainy texture occur, re-chill and re-churn for professional-quality ice cream every time.