
We’ve always loved how Bishop’s Chili brings people together with its hearty warmth and bold flavors, making it a go-to for family dinners or game-day feasts. This classic American dish draws from simple yet vibrant ingredients that create a satisfying meal.
In our kitchen we tweak traditions to craft a version that’s easy to prepare yet packed with depth. Whether you’re new to chili or a seasoned pro you’ll find our take irresistible for its comforting spice and versatility.
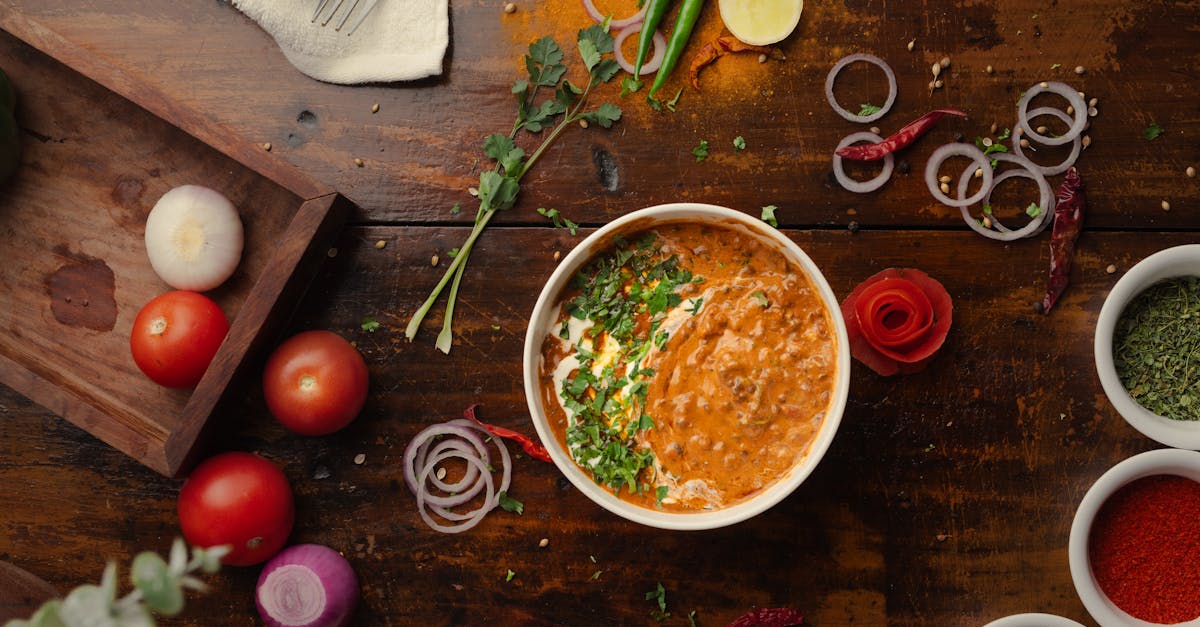
Ingredients
In our version of Bishop’s Bishop’s Chili, we select high-quality, vibrant ingredients that capture the hearty essence of this classic American dish, blending bold flavors for a satisfying meal that warms the soul. Below, we list the ingredients in the order they are typically used during preparation, with precise measurements and any necessary prep notes to ensure your cooking experience is seamless and flavorful.
Fresh Aromatics and Base
- 1 large onion, finely chopped – This forms the flavorful base, adding a sweet and pungent depth that we sauté first to release its natural oils.
- 4 cloves garlic, minced – We add this next for its robust, aromatic punch that elevates the overall spice profile.
Proteins and Vegetables
- 1 pound ground beef (80% lean) – Browned early in the process, this provides the rich, meaty foundation that makes Bishop’s Chili so comforting and filling.
- 1 bell pepper, diced – Preferably red or green, we incorporate this for a crisp, sweet contrast that enhances the vegetable medley.
- 1 can (15 oz) kidney beans, drained and rinsed – Added midway, these hearty beans offer a creamy texture and plant-based protein to balance the meat.
Tomatoes and Liquids
- 2 cans (14.5 oz each) diced tomatoes, undrained – We use these for their juicy, tangy backbone, which we pour in to create a thick, simmerable sauce.
- 1 cup beef broth – This liquid helps achieve the perfect consistency, infusing the chili with savory depth as it cooks down.
Spices and Seasonings
- 2 tablespoons chili powder – Our key spice, stirred in to deliver that signature, bold heat and earthiness.
- 1 teaspoon ground cumin – Added for its warm, nutty notes that complement the chili’s traditional roots.
- 1 teaspoon smoked paprika – We include this for a subtle smokiness that adds complexity without overwhelming the other flavors.
- Salt and black pepper, to taste – Season at the end of prep for precise control, ensuring every bite is perfectly balanced.
These ingredients come together to create the inviting aromas and rich tastes that make Bishop’s Chili a go-to for gatherings, using simple, accessible items you likely have on hand or can easily source.
Tools and Equipment
Having gathered our fresh ingredients for Bishop’s Chili, we now turn to the essential tools and equipment that make preparation straightforward and efficient. These items help us achieve that perfect blend of flavors with minimal effort, ensuring our recipe comes together seamlessly from start to finish.
To streamline the cooking process, here’s a detailed list of the key tools we’ll need, organized by their role in the recipe:
- Large Dutch Oven or Heavy-Bottomed Pot: We rely on this versatile staple for browning meats and simmering the chili to develop rich, deep flavors. Opt for one that holds at least 5 quarts to accommodate the ingredients without overflow.
- Chef’s Knife: Essential for precisely chopping onions, garlic, and bell peppers. A sharp, 8-inch blade ensures quick, even cuts that release the aromatics effectively.
- Cutting Board: We use a sturdy, non-slip board—preferably wood or plastic—to provide a safe surface for all our prep work, preventing slips and keeping our kitchen organized.
- Measuring Cups and Spoons: Accuracy is key in our Bishop’s Chili recipe, so these precise tools help us measure spices like chili powder and cumin exactly, avoiding any imbalance in flavors.
- Wooden Spoon or Silicone Spatula: Perfect for stirring and scraping the pot without damaging the surface, this tool ensures even distribution of ingredients and prevents sticking during cooking.
- Can Opener: If we’re using canned items like diced tomatoes or beans, this simple tool saves time and keeps our hands clean for hassle-free opening.
For quick reference, here’s a table summarizing the recommended tools with their primary uses and any specific considerations:
| Tool | Primary Use | Considerations |
|---|---|---|
| Large Dutch Oven | Browning and simmering | At least 5 quarts; cast iron for even heat distribution |
| Chef’s Knife | Chopping ingredients | 8-inch blade; keep sharpened for safety and efficiency |
| Cutting Board | Prep surface | Non-slip base; easy to clean to maintain hygiene |
| Measuring Cups/Spoons | Accurate measurements | Set includes both dry and liquid options for versatility |
| Wooden Spoon | Stirring and mixing | Heat-resistant; avoids scratching pots |
| Can Opener | Opening cans | Manual or electric; choose based on kitchen setup |
With these tools in hand, we’re fully equipped to move forward and bring our Bishop’s Chili to life, focusing on efficiency and flavor every step of the way.
Instructions
We guide you through preparing our flavorful Bishop’s Chili with straightforward steps that leverage the fresh ingredients and tools we’ve outlined. Let’s transform those simple components into a hearty, aromatic dish perfect for any gathering.
Prepare Ingredients
Before we dive into cooking, we start by prepping our ingredients in the order they’ll be used to ensure everything flows smoothly. Begin with the aromatics: finely chop 1 large onion and 2 garlic cloves using a sharp chef’s knife on a stable cutting board for even cooking and maximum flavor release. Onion and garlic form the flavorful base, infusing the chili with their pungent, sweet notes.
Next, dice 1 bell pepper into ½-inch pieces to add a crisp texture and subtle sweetness. Measure out 1 pound of ground beef, ensuring it’s at room temperature for even browning, and drain and rinse a 15-ounce can of kidney beans to remove excess sodium and improve their tender bite. In a small bowl, combine 2 tablespoons chili powder, 1 teaspoon cumin, and ½ teaspoon smoked paprika—these spices create the bold, smoky essence that defines our Bishop’s Chili.
Gather the remaining items: open a 14.5-ounce can of diced tomatoes and measure 2 cups of beef broth. This preparation step sets the stage for a seamless cook, allowing the ingredients to meld into a rich, savory profile.
Cook the Chili
Now that our ingredients are ready, we move to the Dutch oven to build layers of flavor. Heat 2 tablespoons of oil over medium-high heat in the large Dutch oven, then add the chopped onion and garlic. Stir frequently with a wooden spoon until they soften and release a fragrant, golden aroma, about 3-4 minutes—this step locks in the foundational flavors.
Add the ground beef to the pot and brown it thoroughly, breaking it up with the wooden spoon until no pink remains, approximately 5-7 minutes. The meat’s rich, savory juices will begin to coat the aromatics, creating a robust base. Incorporate the diced bell pepper, stirring for 2 minutes until it brightens and releases its fresh, vegetal scent.
Pour in the diced tomatoes, beef broth, kidney beans, and the spice mixture we prepared earlier. Stir everything together to combine, ensuring the spices evenly distribute for a balanced, fiery kick. This active cooking phase builds the chili’s depth, blending the hearty proteins and vegetables into a symphony of textures and tastes.
Simmer and Serve
With the chili base assembled, we reduce the heat to low and let it simmer uncovered in the Dutch oven for 45-60 minutes, stirring occasionally to prevent sticking and allow the flavors to meld into a thick, comforting stew. As it simmers, the aromas of smoked paprika and cumin will fill your kitchen, promising a dish that’s warmly spiced and irresistibly inviting.
Taste and adjust seasoning if needed, adding salt or more chili powder for extra heat. Once ready, serve our Bishop’s Chili hot in bowls, garnished with shredded cheese or fresh cilantro for a vibrant finish—the tender beans and beef create a satisfying, melt-in-your-mouth experience that highlights the dish’s bold, layered flavors.
Make-Ahead Instructions
One of the great advantages of our Bishop’s Chili is its ability to improve in flavor as it sits, making it ideal for meal prep and busy weeknights. By preparing it ahead, we allow the spices and ingredients to meld into a deeper, more robust taste that enhances the dish’s hearty warmth and bold flavors.
Preparing Bishop’s Chili in Advance
To streamline your cooking process, follow these steps for making our chili ahead of time:
- Cook the full recipe first: After following the step-by-step instructions in the previous section, let the chili cool completely at room temperature for about 30 minutes. This prevents condensation that could affect texture when stored.
- Portion for convenience: Divide the cooled chili into meal-sized portions using airtight containers or freezer-safe bags. This makes it easier to reheat just what you need, preserving the dish’s satisfying thickness and layered spices.
Storage Guidelines
Proper storage ensures our Bishop’s Chili retains its comforting aroma and rich flavors. Use the table below for quick reference on durations and tips:
| Storage Method | Duration | Tips |
|---|---|---|
| Refrigerator | 3-4 days | Store in an airtight container to maintain freshness; stir before reheating to redistribute the savory broth and spices. |
| Freezer | Up to 3 months | Use freezer-safe bags or containers; label with the date to track quality, as freezing helps lock in the chili’s bold, smoky notes from cumin and smoked paprika. |
Reheating Tips
When you’re ready to enjoy our Bishop’s Chili, reheat it gently to keep the meat tender and vegetables intact:
- Stovetop method: Transfer the stored chili to a Dutch oven over medium heat. Add a splash of beef broth if needed to loosen the consistency, stirring occasionally until it reaches a simmer. This method revives the dish’s hearty warmth and lets the aromas of garlic and onions fill your kitchen.
- Microwave method: For quicker results, heat individual portions in a microwave-safe bowl on high for 2-3 minutes, stirring halfway through. Cover loosely to trap steam, ensuring the chili emerges piping hot with its vibrant flavors intact.
By incorporating these make-ahead strategies, we make our Bishop’s Chili even more versatile for family gatherings or game-day events, allowing you to savor its classic American roots without the last-minute rush.
Conclusion
We’ve crafted Bishop’s Chili as a go-to recipe that’s simple yet packed with flavor, perfect for any occasion. It’s more than just a meal—it’s a way to gather friends and family effortlessly.
By following our tips, you’ll create a dish that’s versatile and satisfying every time. Give it a try and make it your own for memorable moments around the table.
Frequently Asked Questions
What is Bishop’s Chili and why is it popular?
Bishop’s Chili is a classic American comfort dish featuring hearty, bold flavors that bring people together for family dinners or game-day events. Its appeal lies in simple, vibrant ingredients that create a satisfying meal, blending warmth and taste to suit both beginners and seasoned cooks. This easy-to-modify recipe fosters community and nostalgia.
What are the key ingredients in Bishop’s Chili?
The main ingredients include fresh aromatics like onion and garlic, ground beef as the protein, vegetables such as bell pepper and kidney beans, diced tomatoes, and beef broth for the base. Spices like chili powder, cumin, and smoked paprika add depth. These elements combine to deliver a rich, flavorful stew that’s straightforward and customizable.
What tools are needed to prepare Bishop’s Chili?
Essential tools include a large Dutch oven for cooking, a chef’s knife and cutting board for chopping, measuring cups and spoons for accuracy, a wooden spoon for stirring, and a can opener for ingredients. These items streamline the process, ensuring efficient preparation and a perfect flavor blend without complications.
How do I prepare Bishop’s Chili step by step?
Start by chopping aromatics like onion and garlic, then dice vegetables and measure spices. In a Dutch oven, sauté onions and garlic, brown the ground beef, and add vegetables, beans, tomatoes, broth, and spices. Simmer to meld flavors into a thick stew. Serve hot, garnished with cheese or cilantro for enhanced taste. Total time is about 45-60 minutes.
Can I make Bishop’s Chili ahead of time?
Yes, Bishop’s Chili improves in flavor when made ahead, ideal for meal prep or busy nights. Prepare as directed, then cool and store in the fridge for up to 4 days or freeze for up to 3 months. This method allows flavors to develop, making it perfect for gatherings without last-minute hassle.
How should I store and reheat Bishop’s Chili?
Store cooled chili in airtight containers in the fridge for up to 4 days or freeze for up to 3 months. To reheat, warm on the stovetop over low heat with a splash of broth to maintain moisture, or use the microwave in short bursts, stirring occasionally. This keeps the chili’s rich flavors intact and ready to enjoy.