
We’ve always been huge fans of Ina Garten’s creative twists on comfort food, and her enchiladas recipe stands out as a cozy favorite. Drawing from her Barefoot Contessa flair it blends bold Mexican flavors with simple elegance that makes every bite irresistible.
In our kitchen we’ve whipped up this dish time and again proving it’s perfect for weeknights or gatherings. Let’s explore why this recipe has won our hearts and could become yours too.
Ingredients
To bring our Ina Garten Enchiladas Recipe to life, we start by gathering high-quality ingredients that blend bold Mexican flavors with elegant simplicity. We’ve organized them in the order they’re used, with prep notes for precision.
Filling Ingredients
- 2 tablespoons olive oil – for sautéing to build a flavorful base
- 1 medium onion, finely chopped – adds a sweet, aromatic depth
- 2 garlic cloves, minced – enhances the savory profile
- 1 pound chicken breast, cooked and shredded – use rotisserie or poached for tender texture
Sauce Ingredients
- 1 can (14 ounces) diced tomatoes – drained for a chunky sauce consistency
- 2 teaspoons chili powder – our key spice for authentic warmth and color
- 1 teaspoon ground cumin – provides earthy notes to tie the flavors together
- 1/2 teaspoon salt – adjust to taste for balanced seasoning
- 1/4 teaspoon black pepper – freshly ground for a subtle kick
Assembly Ingredients
- 8 corn tortillas – warmed to prevent cracking during rolling
- 2 cups shredded cheese (such as cheddar or Monterey Jack) – our favorite for melty richness
- 1/4 cup fresh cilantro, chopped – for a fresh, vibrant garnish at the end
This selection ensures our enchiladas are packed with layers of taste and texture, making them a standout dish in your kitchen.
Equipment Needed
Before we dive into preparing our Ina Garten enchiladas recipe, having the right equipment ensures a smooth process and helps us achieve that perfect balance of flavors and textures. Transitioning from our list of fresh ingredients, we’ll focus on the essential tools that make assembling and baking these enchiladas effortless and enjoyable.
To organize our setup, here’s a curated list of key equipment. We’ve bolded the main items for quick reference and included brief notes on their roles:
- Cutting board: A sturdy surface for safely chopping onions, garlic, and other veggies, preventing any kitchen mishaps.
- Chef’s knife: Ideal for precise slicing of ingredients like diced tomatoes and shredded chicken, ensuring even cooking.
- Measuring cups and spoons: Essential for accurate measurements of spices such as chili powder and cumin, guaranteeing the dish’s bold flavors shine through.
- Large skillet: Used for sautéing aromatics and building the sauce base, allowing us to develop rich, layered tastes with ease.
- Mixing bowls: Perfect for combining fillings like cheese and cilantro, keeping our workspace organized and ingredients fresh.
- Baking dish (e.g., a 9×13-inch pan): The heart of the recipe, where we assemble the enchiladas for baking to golden perfection.
- Oven: A must-have for baking the assembled dish, delivering that crispy, melted-cheese topping we love in Ina Garten’s enchiladas.
- Wooden spoon or spatula: Great for stirring and flipping in the skillet, helping us avoid sticking and maintain texture integrity.
- Cheese grater: Handy for freshly grating cheese, adding a melty, irresistible element to our enchiladas.
With this equipment ready, we’re set to move forward seamlessly in our recipe journey, turning simple ingredients into an elegant, flavorful meal.
Instructions
Now that we have our high-quality ingredients and essential equipment lined up, let’s walk through preparing Ina Garten’s enchiladas step by step. We’ll ensure each phase delivers the bold flavors and comforting textures that make this dish a standout favorite in our kitchen.
Prepare the Ingredients
Before we start cooking, we’ll get everything prepped for efficiency and flavor. Begin by chopping 1 medium onion into fine dice and mincing 2 garlic cloves to release their pungent aroma. If your chicken isn’t pre-shredded, take 2 cups of cooked chicken and shred it using a chef’s knife on a cutting board for even texture. Dice 1 can (14 ounces) of tomatoes into small pieces, and measure out 1 tablespoon of chili powder and 1 teaspoon of cumin for the spice blend that adds depth to the filling. Gather 8 corn tortillas, 2 cups of shredded cheese (like cheddar or Monterey Jack), and a handful of fresh cilantro leaves, roughly chopped for garnish. This preparation sets the stage for a seamless cooking process, ensuring our enchiladas boast vibrant colors and fresh tastes.
Cook the Filling
We’ll now create the hearty filling that forms the heart of Ina Garten’s enchiladas. Heat 2 tablespoons of olive oil in a large skillet over medium heat, then add the chopped onion and sauté for 3-4 minutes until it turns golden and releases a sweet, savory aroma that fills the kitchen. Stir in the minced garlic and cook for another 30 seconds until fragrant, being careful not to let it brown. Add the shredded chicken, diced tomatoes, chili powder, and cumin, stirring everything together with a wooden spoon to coat evenly. Let the mixture simmer for 5-7 minutes, allowing the spices to bloom and the flavors to meld into a rich, smoky blend that promises a satisfying bite with every roll. Once the filling thickens slightly, remove it from the heat—this step ensures our enchiladas have that perfect, juicy yet cohesive texture.
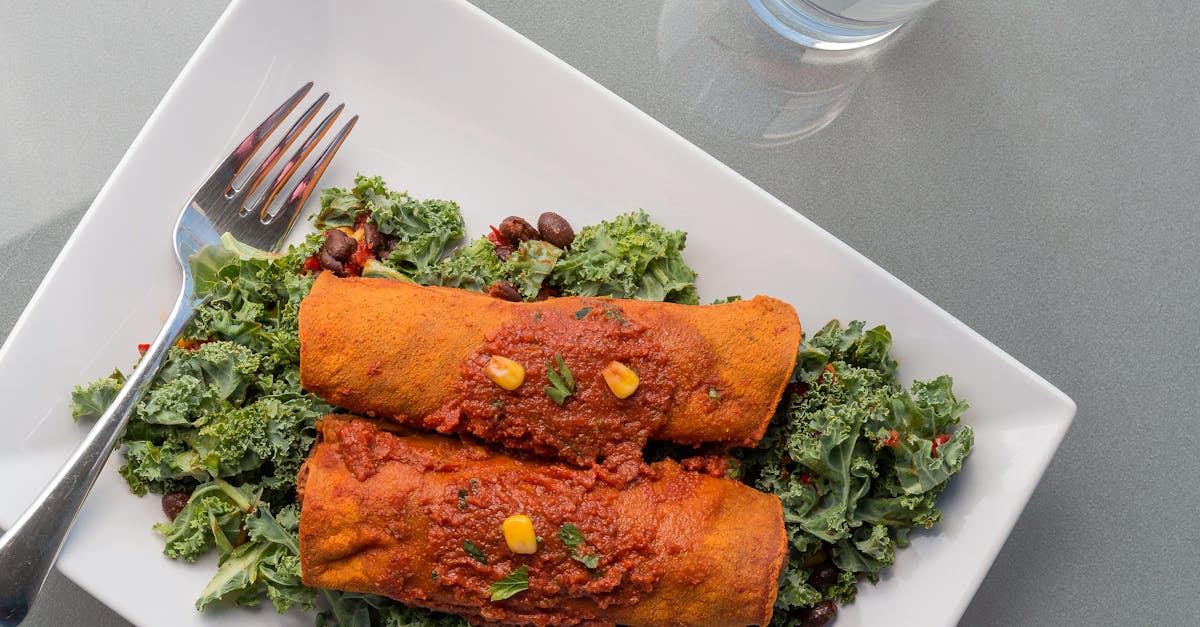
Assemble the Enchiladas
With the filling ready, it’s time to build the enchiladas for that irresistible layered effect. Warm the 8 corn tortillas in a dry skillet for 10-15 seconds per side to make them pliable and prevent cracking, enhancing their corn-fresh taste. Lay each tortilla flat on your cutting board, spoon about 1/4 cup of the chicken filling down the center, and sprinkle with 2 tablespoons of shredded cheese for a gooey, melty contrast. Roll the tortillas tightly around the filling and place them seam-side down in a greased baking dish. Arrange them snugly side by side, then top the assembled enchiladas with the remaining cheese, creating a golden, bubbly crust that locks in the flavors. This assembly transforms simple components into an elegant, textured dish ready for the oven.
Bake
Finally, we’ll bake the enchiladas to achieve that crave-worthy crispiness and melt-in-your-mouth interior. Preheat your oven to 350°F (175°C) and position the baking dish on the middle rack. Bake for 20-25 minutes until the cheese is melted and lightly browned, filling the air with an irresistible, cheesy aroma. For reference, here’s a quick overview of baking times based on common variables:
| Oven Temperature (°F) | Baking Time (minutes) | Key Outcome |
|---|---|---|
| 350 | 20-25 | Cheese melts and browns |
| 375 | 15-20 | Faster crisp for rushed meals |
Once done, let the enchiladas rest for 5 minutes to set, ensuring each slice reveals layers of bold, comforting flavors that define Ina Garten’s signature style.
Make-Ahead Instructions
We often prepare Ina Garten’s enchiladas in advance to simplify busy schedules while letting the flavors develop even more. This approach allows us to enjoy bold, comforting enchiladas with minimal effort on the day of serving. Below, we break down the steps for preparing, storing, and reheating your enchiladas safely and effectively.
Preparing the Filling Ahead
To get a head start, focus on the filling first as it’s the heart of Ina Garten’s recipe. We recommend making the filling up to 2 days in advance for optimal freshness.
- Sauté and mix the ingredients: Begin by chopping the onion and garlic, then sauté them in olive oil until softened. Add the shredded chicken, diced tomatoes, chili powder, and cumin to the skillet. Cook until the mixture is fully combined and aromatic, then let it cool completely before storing.
- Portion and store: Divide the cooled filling into airtight containers. This prevents sogginess and makes it easy to use later.
Assembling the Enchiladas in Advance
Once the filling is ready, you can assemble the entire dish ahead of time. We find this step transforms Ina Garten enchiladas into a convenient make-ahead meal.
- Warm and fill the tortillas: Heat the corn tortillas as directed, then fill each with the prepared mixture and roll tightly. Place them seam-side down in your baking dish and top with cheese.
- Cover and refrigerate: After assembling, cover the baking dish tightly with plastic wrap or foil. Store in the refrigerator for up to 24 hours to allow the spices to infuse the ingredients.
Storage Options
For longer-term planning, we suggest considering refrigeration or freezing. Here’s a quick overview of storage guidelines in the table below to ensure safety and quality:
| Storage Method | Duration | Key Tips |
|---|---|---|
| Refrigerator | Up to 2 days | Keep covered to maintain moisture; flavors will intensify overnight. |
| Freezer | Up to 3 months | Wrap the assembled dish in freezer-safe foil; thaw in the fridge before baking. |
Reheating and Baking
When you’re ready to enjoy your make-ahead enchiladas, we advise following these steps for the best results.
- For refrigerated enchiladas: Remove from the fridge and let sit at room temperature for 15-20 minutes. Preheat your oven to 350°F, remove any covering, and bake for 25-30 minutes until the cheese is golden and bubbly.
- For frozen enchiladas: Thaw overnight in the refrigerator first, then follow the same baking instructions, adding 5-10 minutes to the cook time to ensure even heating.
- Rest and serve: After baking, let the dish rest for 5 minutes to set, preserving that elegant, layered texture that defines Ina Garten’s style.
By planning ahead, we make these enchiladas even more versatile for gatherings or quick meals without sacrificing flavor.
Conclusion
We’ve loved exploring Ina Garten’s enchiladas recipe and how it brings vibrant flavors to our table. It’s a dish that effortlessly combines simplicity with sophistication, making every bite memorable.
As we wrap up, we’re confident you’ll enjoy making this a staple in your kitchen—it’s perfect for creating cherished moments with family and friends. Give it a try and let us know your twists!
Frequently Asked Questions
What ingredients are needed for Ina Garten’s enchiladas recipe?
The key ingredients include olive oil, onion, garlic, shredded chicken, diced tomatoes, chili powder, cumin, corn tortillas, cheese, and fresh cilantro. These high-quality items create a flavorful, textured dish that’s perfect for weeknight dinners or gatherings, blending bold Mexican flavors with elegance.
What equipment is required to make this enchiladas recipe?
You’ll need a cutting board, chef’s knife, measuring cups and spoons, large skillet, mixing bowls, baking dish, oven, wooden spoon or spatula, and a cheese grater. Each tool ensures smooth preparation, from chopping ingredients to baking for the ideal balance of flavors and textures.
How do I prepare Ina Garten’s enchiladas step by step?
Start by chopping onions and garlic, shredding chicken, and measuring spices. Sauté onions and garlic, then mix with chicken, tomatoes, and spices for the filling. Warm tortillas, fill and roll them, place in a baking dish, top with cheese, and bake at 350°F for 20-25 minutes until golden and bubbly. Let rest before serving.
Can I make these enchiladas ahead of time?
Yes, prepare the filling up to 2 days in advance and store in airtight containers. Assemble the enchiladas ahead and refrigerate for up to 24 hours to enhance flavors. For longer storage, freeze them, then reheat in the oven at 350°F until warmed through, making it easy for busy schedules or events.
How long should I bake the enchiladas?
Bake at 350°F for 20-25 minutes until the cheese is golden and bubbly. After baking, let the enchiladas rest for a few minutes to set, ensuring the flavors meld perfectly for a comforting, elegant meal inspired by Ina Garten.
What are some tips for storing and reheating enchiladas?
Store assembled enchiladas in the fridge for up to 24 hours or freeze for longer. To reheat refrigerated ones, bake at 350°F for 15-20 minutes. For frozen, thaw overnight in the fridge first, then bake until heated through, preserving the dish’s bold flavors and textures.