
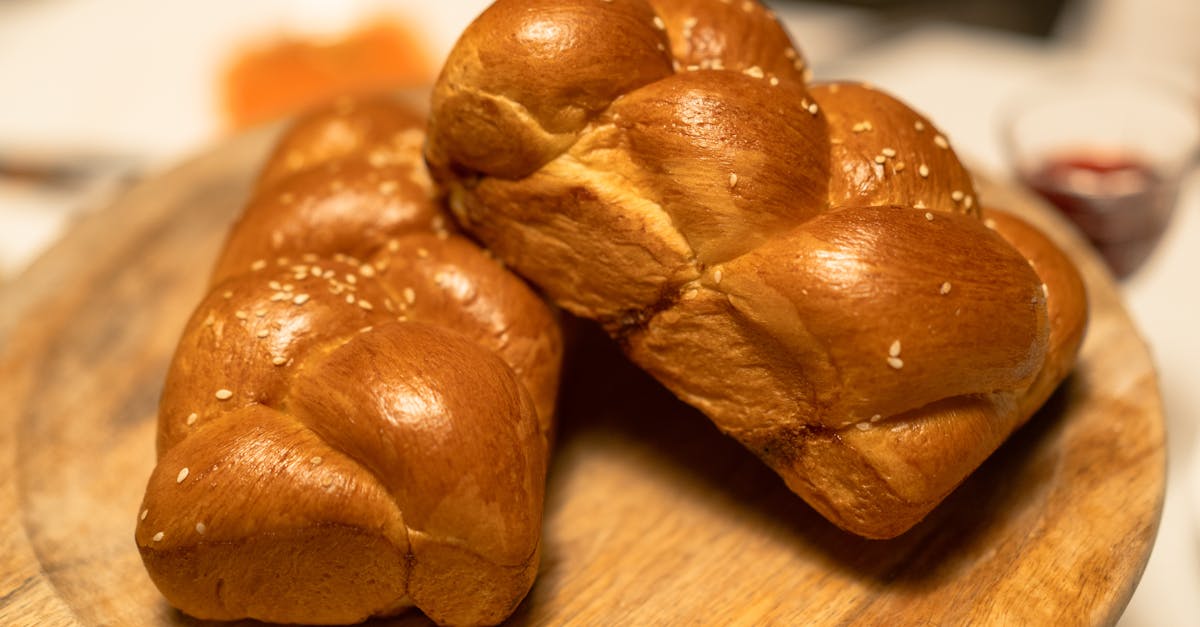
We’ve always been captivated by the warm, braided goodness of Challah with raisins, a delightful spin on a traditional Jewish bread that’s perfect for family gatherings or cozy weekends. This sweet variation infuses the classic loaf with plump raisins, creating a tender crumb that fills your kitchen with irresistible aromas.
Originating from ancient Jewish traditions, Challah symbolizes celebration and community, often gracing Shabbat tables. We’re sharing our simple recipe so you can bake this comforting treat at home and make every bite a memorable one.
Ingredients
In our exploration of baking Challah with Raisins, we gather fresh, high-quality ingredients that bring out the bread’s signature soft texture and sweet, festive flavor. Below, we list them in the order they are typically used, from dry to wet components, with precise measurements and prep notes for effortless preparation.
- All-purpose flour (4 ½ cups, sifted): This forms the base of our dough, providing structure and a tender crumb—sift it to ensure even mixing.
- Active dry yeast (2 ¼ teaspoons, proofed): We use this to activate the rise, proofing it in warm water for about 5 minutes until foamy for optimal leavening.
- Granulated sugar (½ cup): Added to feed the yeast and enhance sweetness, it helps create the golden crust we love in Challah with Raisins.
- Salt (2 teaspoons): This seasons the dough and balances flavors—use fine sea salt for even distribution.
- Large eggs (4, at room temperature): Beaten well, they enrich the dough with moisture and a glossy finish, making our bread irresistibly rich.
- Vegetable oil (½ cup): Incorporated for a soft, tender interior—we recommend a neutral oil to avoid overpowering the raisins’ natural sweetness.
- Warm water (1 ¼ cups, around 110°F): Used to dissolve the yeast, ensuring the dough hydrates smoothly for a perfect knead.
- Raisins (1 cup, soaked): Plumped in warm water for 10 minutes then drained, they add bursts of sweetness and chewy texture throughout our Challah with Raisins.
Tools and Equipment
To bring our Challah with raisins recipe to life, we need the right tools and equipment to ensure seamless preparation and baking. Having these essentials on hand complements the high-quality ingredients we’ve discussed, allowing us to achieve that perfect soft texture and festive flavor with confidence.
Here’s a curated list of the key tools, organized by their role in the process:
- Large mixing bowl: We use this for combining dry ingredients like flour and yeast, providing ample space to avoid spills and ensure even mixing.
- Measuring cups and spoons: Accurate measurements are crucial for baking success, so we recommend a set of dry measuring cups (for flour and sugar) and spoons (for salt and yeast) to maintain precision.
- Stand mixer with dough hook or sturdy wooden spoon: For kneading the dough, a stand mixer saves time and effort, but if we prefer a hands-on approach, a wooden spoon works well for initial mixing followed by manual kneading.
- Baking sheet or loaf pan: We opt for a lined baking sheet to shape the braided Challah, as it promotes even baking and a golden crust; a loaf pan can be used for a simpler loaf shape.
- Oven thermometer: To guarantee the bread rises perfectly, we always check our oven’s temperature with this tool, ensuring it hits the ideal 350°F for baking.
- Pastry brush: Essential for applying an egg wash to the dough’s surface, which gives our Challah its shiny, golden finish.
- Plastic wrap or clean kitchen towel: We cover the dough during rising to keep it moist and protected, preventing a dry crust from forming.
- Bench scraper or sharp knife: This helps us divide and shape the dough precisely, making the braiding process smoother and more professional.
By gathering these tools beforehand, we set ourselves up for a straightforward baking experience that highlights the comforting traditions of Challah with raisins.
Instructions
Now that we have gathered our high-quality ingredients and essential tools, we guide you through the steps to bake our flavorful Challah with raisins. Each step ensures a soft golden loaf that fills your kitchen with a warm inviting aroma.
Prep
Before we begin, activate the yeast to set the foundation for our dough. In a large mixing bowl, combine 2 ¼ teaspoons active dry yeast, ½ cup warm water (around 110°F), and 1 tablespoon granulated sugar; stir gently and let it sit for 5-10 minutes until it foams indicating the yeast is alive. Next, in the same bowl, add 4 large eggs, ½ cup vegetable oil, 1 teaspoon salt, and the remaining ½ cup granulated sugar from our ingredients list; whisk until fully blended to create a smooth wet mixture that promises a rich tender texture.
Knead
Once the wet mixture is ready, gradually incorporate 4 ½ cups all-purpose flour one cup at a time using a stand mixer or wooden spoon to knead. Knead the dough on a lightly floured surface for 8-10 minutes until it forms a smooth elastic ball that springs back when pressed; this step develops the gluten for our Challah’s signature soft structure and helps distribute flavors evenly.
First Rise
After kneading, transfer the dough to a greased large mixing bowl and cover it with plastic wrap or a kitchen towel. Let the dough rise in a warm draft-free spot for 1-1.5 hours or until it doubles in size; during this time, the dough will absorb the yeast’s magic transforming into a light airy base that evokes the comforting essence of traditional Jewish bread.
Shape and Add Raisins
When the dough has risen, punch it down gently to release air and turn it onto a floured surface. Divide the dough into 3 equal portions and roll each into a long rope about 12 inches long; now incorporate the 1 cup soaked raisins by pressing them evenly into the ropes to add bursts of sweet tanginess. Braid the ropes together tightly forming a loaf and place it on a greased baking sheet; this shaping step honors the celebratory symbolism of Challah while enhancing its festive flavor.
Second Rise
Cover the shaped loaf loosely with plastic wrap or a kitchen towel and let it rise again in a warm area for 45-60 minutes or until it puffs up noticeably. This second rise builds additional volume and deepens the dough’s texture making our Challah with raisins irresistibly soft and ready for the oven’s golden touch.
Bake
Preheat your oven to 350°F and position the rack in the center. Brush the risen loaf with 1 beaten large egg using a pastry brush for a shiny crust then bake for 25-30 minutes until the top turns a deep golden brown and an internal thermometer reads 190°F; the baking process releases a heavenly scent that signals the completion of our homemade treat.
Cool
Remove the baked Challah from the oven and transfer it to a wire rack to cool for at least 30 minutes before slicing. This cooling period allows the bread to set preserving its moist interior and preventing it from becoming gummy ensuring every bite showcases the perfect balance of sweetness and tradition.
Make-Ahead Instructions
To help you enjoy our Challah with Raisins without last-minute rushes, we offer these practical make-ahead strategies. These methods allow the dough to develop richer flavors and textures over time, ensuring your bread remains soft, aromatic, and full of that signature sweet, fruity essence from the raisins.
Preparing Dough in Advance
One of our favorite ways to simplify baking is to prepare the dough ahead and refrigerate it. This technique not only saves time but also enhances the dough’s flavor profile, giving the yeast a longer fermentation period for a more complex taste.
- Mix and Knead the Dough First: Follow our recipe steps up to the point where the dough is kneaded and formed into a ball. Once ready, cover it tightly with plastic wrap or place it in a greased bowl covered with a kitchen towel.
- Refrigerate Immediately: Transfer the covered dough to the refrigerator. Chill for up to 24 hours to allow flavors to intensify without over-proofing.
- Resume the Process: When you’re ready to bake, remove the dough from the fridge and let it sit at room temperature for about 1 to 2 hours until it reaches a pliable, slightly warm state. This step ensures the dough rises properly and maintains its soft, airy texture. Proceed with shaping, adding the soaked raisins, and completing the second rise and baking as outlined in our recipe.
Freezing Options for Dough or Baked Bread
Freezing is another excellent make-ahead option, perfect for busy schedules or preparing in bulk. We recommend freezing at key stages to preserve the bread’s moist interior and glossy crust.
| Make-Ahead Option | Storage Duration | Thawing and Preparation Instructions |
|---|---|---|
| Unbaked Dough | Up to 1 month | Thaw in the refrigerator overnight, then let it sit at room temperature for 1-2 hours. Shape, add raisins, and follow the second rise and baking steps for fresh, golden loaves. |
| Shaped and Braided Dough | Up to 2 weeks | Thaw in the refrigerator for 8-12 hours, then proceed directly to the second rise at room temperature before baking. This keeps the braided structure intact for that classic Challah appearance. |
| Fully Baked Bread | Up to 3 months | Thaw at room temperature for 2-3 hours or overnight in the fridge. For the best results, reheat in a 350°F oven for 10-15 minutes to restore its warm, fragrant aroma and soft crumb. |
By using these make-ahead techniques, we ensure your Challah with Raisins fits seamlessly into your routine, delivering that comforting, community-inspired bread whenever you need it. Always check for any signs of spoilage before use to maintain food safety.
Conclusion
We’ve cherished guiding you through this Challah with raisins adventure. It’s a simple way to weave tradition into your daily life and spark family joy.
We’re confident that with these tips you’ll bake a loaf that delights and becomes a cherished ritual in your home.
Frequently Asked Questions
What is Challah with raisins?
Challah with raisins is a sweet variation of traditional Jewish bread, often enjoyed during Shabbat or family gatherings. Originating from ancient Jewish traditions, it symbolizes celebration and community, with raisins adding a festive, fruity flavor. This soft, braided bread is perfect for cozy weekends and enhances any meal with its comforting texture.
What ingredients are needed for Challah with raisins?
To make Challah with raisins, you’ll need all-purpose flour, active dry yeast, granulated sugar, salt, large eggs, vegetable oil, warm water, and soaked raisins. Use precise measurements for the best results: about 4-5 cups of flour, 2 teaspoons of yeast, and 1 cup of raisins. These high-quality ingredients ensure a soft texture and sweet taste.
What tools do I need to bake Challah with raisins?
Essential tools include a large mixing bowl, measuring cups and spoons, a stand mixer or wooden spoon for kneading, a baking sheet or loaf pan, an oven thermometer, a pastry brush, plastic wrap or a kitchen towel, and a bench scraper or knife. Gathering these items beforehand makes the baking process smooth and enjoyable.
How do I make Challah with raisins at home?
Start by activating the yeast in warm water with sugar. Mix in eggs, oil, salt, and flour to form dough, then knead until smooth. Let it rise, shape and braid with soaked raisins, and rise again. Bake at 350°F for 25-30 minutes after brushing with egg wash. This simple recipe yields a delicious, traditional bread in about 2-3 hours.
Can I prepare Challah with raisins ahead of time?
Yes, you can make Challah with raisins ahead for richer flavors. Prepare the dough and refrigerate it unbaked for up to 24 hours, or shape and braid it before chilling. For baked bread, store in the fridge for 3-5 days or freeze for up to a month. Thaw and reheat as needed for easy family meals.
How should I store baked Challah with raisins?
Store baked Challah in an airtight container at room temperature for up to 2 days, or refrigerate for up to 5 days to keep it fresh. For longer storage, freeze slices wrapped in plastic for up to a month. Always cool completely before storing to maintain its soft, moist interior and prevent sogginess.