
We absolutely love the vibrant kick of cherry peppers, those glossy red gems that bring a perfect blend of heat and sweetness to our kitchens. Originating from Italian traditions, canning them at home lets us preserve summer’s bounty for year-round enjoyment, adding zesty flair to salads, sandwiches, and more.
It’s a simple process that anyone can master, and we’re excited to share our foolproof method. Whether you’re new to preserving or a seasoned pro, this recipe ensures your pantry stays stocked with homemade goodness that elevates every meal.
Ingredients
To get started with our foolproof cherry pepper canning recipe, we’ll gather the essential ingredients that bring out the vibrant heat and sweetness of cherry peppers. We organize them here in the order they’ll be used, from preparation to packing, ensuring you have everything ready for a seamless process.
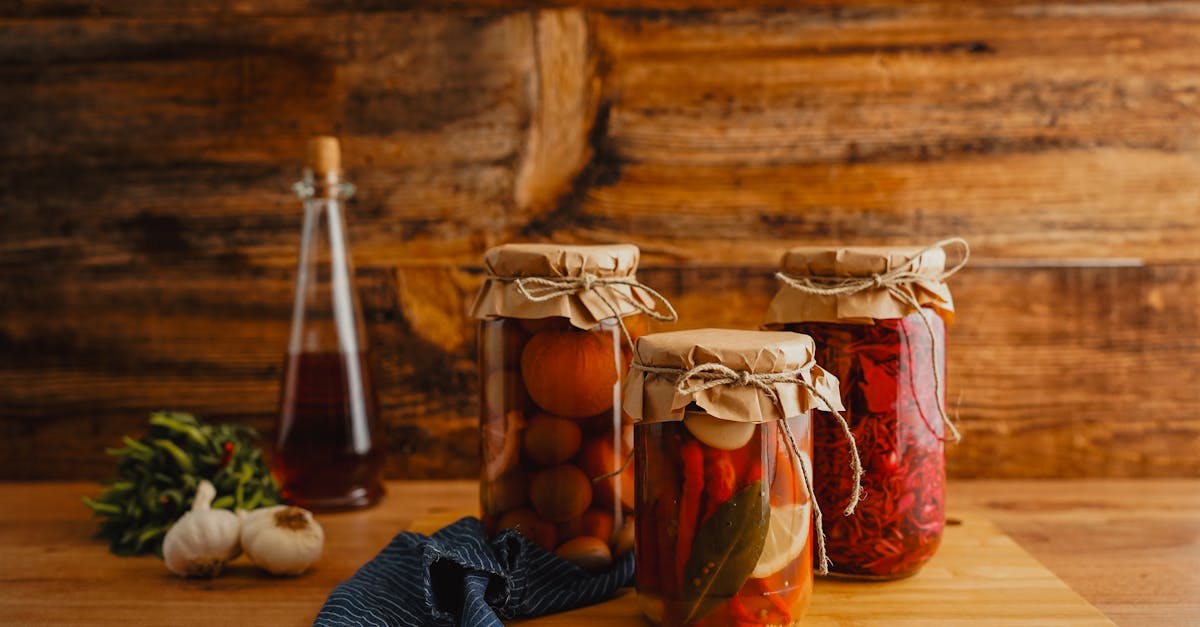
- Fresh cherry peppers: 2 pounds, washed, stemmed, and sliced if desired for varying heat levels—opt for ripe, firm peppers to maximize flavor and crunch.
- White vinegar: 4 cups, used as the base for the brine to preserve the peppers’ tangy profile and extend shelf life.
- Water: 4 cups, combined with vinegar to create a balanced brine that keeps the peppers crisp without overwhelming their natural sweetness.
- Kosher salt: 2 tablespoons, added to the brine mixture for seasoning and to draw out excess moisture from the peppers, enhancing preservation.
- Garlic cloves: 6 cloves, peeled and lightly crushed, incorporated next for aromatic depth that complements the peppers’ Italian origins.
- Fresh oregano: 2 tablespoons, chopped, introduced to infuse herbal notes as we pack the jars, tying into traditional canning methods.
- Olive oil: 1 cup, for topping off the jars to create a seal and add a rich, Mediterranean flair that locks in flavors for year-round enjoyment.
- Optional add-ins: A pinch of red pepper flakes or bay leaves, prepared just before sealing, to customize heat and add extra layers based on your preference.
This selection ensures our homemade cherry pepper canning yields jars bursting with vivid color, spicy aroma, and that signature sweet-heat balance. Always use high-quality, fresh ingredients for the best results in your pantry staples.
Equipment Needed
Before we proceed from selecting our fresh ingredients to the actual canning of cherry peppers, gathering the right equipment ensures a safe, efficient, and successful preservation process. We recommend using high-quality tools to maintain hygiene and achieve professional results.
Here’s a detailed list of the essential equipment:
- Canning jars: We need pint-sized or quart-sized Mason jars with tight seals to store the cherry peppers. Opt for new or thoroughly cleaned jars to prevent contamination.
- Lids and bands: Use new lids for each batch to ensure a proper vacuum seal, paired with reusable bands that fit the jars snugly.
- Canning pot or large stockpot: A dedicated canning pot with a rack is ideal for boiling water baths, as it allows jars to be submerged fully and processed evenly.
- Jar lifter: This tool is crucial for safely removing hot jars from boiling water without risking burns or accidents.
- Funnel: A wide-mouthed canning funnel helps us transfer the cherry pepper mixture into jars neatly, minimizing spills and waste.
- Ladle: Employ a stainless-steel ladle to pour hot brine into the jars precisely, ensuring even distribution of liquid.
- Bubble remover or non-metallic utensil: We use this to gently remove air bubbles from the jars after filling, promoting a better seal and longer shelf life.
- Clean towels or cloths: Have several lint-free towels on hand for wiping jar rims and handling equipment, keeping our workspace sanitary.
| Equipment Item | Estimated Cost (USD) | Why It’s Essential |
|---|---|---|
| Canning jars (set of 12) | 10-15 | Provides airtight storage for preserved peppers |
| Lids and bands (set) | 5-10 | Ensures vacuum sealing to prevent spoilage |
| Canning pot | 20-40 | Facilitates safe water bath processing |
| Jar lifter | 5-10 | Protects hands from high temperatures |
| Funnel | 5-8 | Reduces mess during filling |
| Ladle | 5-10 | Allows precise pouring of hot liquids |
| Bubble remover | 2-5 | Removes air pockets for optimal preservation |
Instructions
Now that we have our fresh ingredients and essential equipment prepared, we guide you through the step-by-step process for canning cherry peppers safely and effectively.
Prepare the Peppers
First, we select 1 pound of firm, vibrant cherry peppers and rinse them under cold water to remove any dirt. Pat them dry with a clean towel then carefully slice off the stems and make a small slit in each pepper to allow the brine to penetrate—enhancing their crisp texture and spicy-sweet flavor. If you prefer milder heat, we remove the seeds using a small knife. For added customization, add optional red pepper flakes from our ingredients list to amp up the spice.
Sterilize the Jars
To ensure safety and prevent contamination, we start by washing our pint-sized Mason jars, lids, and bands in hot soapy water. Place the jars in a large stockpot or canning pot filled with water, ensuring they are fully submerged, and bring the water to a rolling boil. Boil for 10 minutes to sterilize, then use a jar lifter to carefully remove and drain the jars upside down on clean towels—keeping everything hygiene-focused for that professional, long-lasting seal.
Fill and Seal the Jars
With our sterilized jars ready, we begin by preparing the brine: In a medium saucepan, combine 2 cups of white vinegar, 2 cups of water, and 2 tablespoons of kosher salt, then bring to a boil until the salt dissolves completely. Next, pack each jar tightly with the prepared cherry peppers, adding 2 garlic cloves and a sprig of fresh oregano per jar for an aromatic burst that infuses the peppers with earthy notes. Using a funnel and ladle, pour the hot brine over the peppers, leaving ½ inch of headspace at the top to avoid overflow. Gently run a bubble remover around the edges to release any trapped air bubbles, then wipe the jar rims clean, place the lids on top, and secure the bands fingertip-tight for a secure yet flexible seal.
Process in Water Bath
Finally, we place the sealed jars back into the canning pot, ensuring they are covered by at least 1-2 inches of water. Bring the water to a full boil, then process the jars for 10 minutes for pints or 15 minutes for quarts—adjusting time based on your altitude as follows:
| Altitude (feet) | Add to Processing Time (minutes) |
|---|---|
| 0-1,000 | 0 |
| 1,001-3,000 | 5 |
| 3,001-6,000 | 10 |
| Above 6,000 | 15 |
After processing, we remove the jars with the jar lifter and let them cool undisturbed on a towel for 12-24 hours, listening for the satisfying pop of the lids sealing to confirm success.
Conclusion
We’ve loved sharing this cherry pepper canning adventure with you, turning simple ingredients into pantry staples that bring bold flavors to your table all year. It’s rewarding to create something so versatile and delicious right at home.
Now it’s your turn—grab those peppers and dive in, knowing we’ve got your back for safe, tasty results that elevate every meal. Let’s keep the canning spirit alive!
Frequently Asked Questions
What are cherry peppers and where do they come from?
Cherry peppers are small, round peppers known for their sweet and spicy flavor. They originated in Italy and are popular in various dishes due to their unique taste. Canning them at home preserves their freshness for year-round use.
Why should I can cherry peppers at home?
Canning cherry peppers at home lets you enjoy their heat and sweetness anytime, while customizing flavors to your liking. It’s a simple way to stock your pantry with fresh, preservative-free options, saving money and reducing waste from store-bought versions.
What ingredients are needed for canning cherry peppers?
You’ll need fresh cherry peppers, white vinegar, water, kosher salt, garlic cloves, fresh oregano, and olive oil. Optional add-ins like red pepper flakes or bay leaves can enhance flavor. Using high-quality ingredients ensures the best taste and safety.
What equipment is required for canning cherry peppers?
Essential equipment includes Mason jars with new lids and bands, a canning pot or large stockpot, jar lifter, funnel, ladle, bubble remover, and clean towels. These tools ensure safe, efficient canning and maintain hygiene—most are affordable and easy to find.
How do I prepare cherry peppers for canning?
Rinse and dry fresh cherry peppers, then slice them to your desired heat level. Sterilize jars, fill with peppers, add brine (vinegar, water, salt), and include flavorings like garlic and oregano. Process in a water bath for safety and proper sealing.
How long does the canning process take?
The entire process, including prep and water bath, typically takes 1-2 hours, depending on batch size. Processing time in the water bath is about 10-15 minutes, adjusted for altitude, followed by cooling and sealing checks.
Can I customize canned cherry peppers?
Yes, add extras like red pepper flakes for more heat or bay leaves for extra aroma. Experiment with ingredients while following safe canning guidelines to keep flavors balanced and the product shelf-stable. Always use fresh, high-quality add-ins.