
Craving a chewy, tangy bagel but need to skip the gluten? We’ve got you covered with our incredible Gluten Free Sourdough Bagel Recipe! Bagels, a beloved staple with roots in Jewish communities of Poland, have evolved into a breakfast favorite worldwide. Now, we’re thrilled to bring this classic to your kitchen in a gluten-free form that doesn’t skimp on flavor or texture.
What sets our recipe apart is the use of a gluten-free sourdough starter, infusing that signature tangy depth into every bite. We’ve tested and tweaked this method to ensure you get that perfect crusty exterior and soft, chewy interior—gluten or no gluten. Whether you’re managing a dietary restriction or just exploring new baking adventures, these bagels promise to impress.
Why Choose Gluten Free Sourdough Bagels?
We’re diving into the reasons why our Gluten Free Sourdough Bagels are a game-changer for anyone seeking a delicious and dietary-friendly twist on a classic. Building on the rich history of bagels and the unique tangy flavor of a gluten-free sourdough starter we’ve discussed earlier, let’s explore why this recipe stands out as a must-try for both health-conscious eaters and passionate bakers.
Health Benefits of Gluten Free Baking
Opting for gluten-free options isn’t just a trend; it’s a lifestyle choice for many of us dealing with gluten sensitivities or celiac disease. Our Gluten Free Sourdough Bagels offer a safe and satisfying alternative without sacrificing the iconic chewy texture and crusty bite of traditional bagels. By using a gluten-free sourdough starter, we also introduce beneficial probiotics that can aid digestion—a bonus for gut health! Plus, we’ve carefully selected ingredients to keep the nutritional profile balanced while ensuring every bite bursts with flavor.
Unique Flavor Profile
Imagine sinking your teeth into a bagel with a tangy sourdough kick paired with that perfect crusty exterior and chewy interior. That’s what our Gluten Free Sourdough Bagels bring to the table. The fermentation process of the sourdough starter adds depth and complexity—a taste you won’t find in store-bought gluten-free options. We’ve fine-tuned this recipe to ensure the sourdough’s signature tang shines through, making each bagel a delightful balance of sharp and savory notes.
Versatility for Every Meal
One of the best things about our Gluten Free Sourdough Bagels is their adaptability. Toast them up for a quick breakfast with a smear of cream cheese or build a hearty lunch sandwich stacked with your favorite deli meats and veggies. They’re even sturdy enough for a dinner-time burger bun! We love experimenting with toppings like everything seasoning or sesame seeds to customize each batch. No matter how you slice it, these bagels fit seamlessly into any meal of the day.
Catering to Dietary Needs
We know dietary restrictions can be challenging, but our Gluten Free Sourdough Bagels make it easier to enjoy a beloved staple. Crafted specifically for those avoiding gluten, this recipe ensures no one misses out on the joy of a freshly baked bagel. Whether you’re baking for yourself or sharing with loved ones, we’ve got you covered with a recipe that’s as inclusive as it is delicious. As one of our readers put it, “These bagels let me enjoy my favorite breakfast without worry!”
Comparison: Gluten Free vs. Traditional Bagels
To highlight why our recipe is a fantastic choice, let’s break down the differences between Gluten Free Sourdough Bagels and traditional wheat-based bagels in a clear comparison.
| Aspect | Gluten Free Sourdough Bagels | Traditional Bagels |
|---|---|---|
| Main Ingredient | Gluten-free flour blend and sourdough starter | Wheat flour |
| Dietary Suitability | Suitable for celiac and gluten-sensitive diets | Not suitable for gluten-free diets |
| Flavor | Tangy and complex due to sourdough fermentation | Milder and more neutral |
| Texture | Chewy interior with a crusty exterior | Chewy and dense |
| Health Benefits | Potential probiotics from sourdough | Minimal additional health benefits |
Ingredients for Gluten Free Sourdough Bagel Recipe
Let’s dive into the essential components that make our Gluten Free Sourdough Bagel Recipe a delightful and dietary-friendly treat. We’ve carefully curated each ingredient to ensure that signature tangy flavor and chewy texture while keeping it safe for those with gluten sensitivities.
Dry Ingredients
Gather these foundational elements to build the structure of our gluten-free bagels with precision:
- Gluten-Free All-Purpose Flour: 3 cups (ensure it’s a blend with xanthan gum for better binding)
- Brown Rice Flour: 1 cup (adds a subtle nutty flavor and texture)
- Tapioca Starch: ½ cup (for that classic chewy bite)
- Psyllium Husk Powder: 2 tablespoons (acts as a binding agent in place of gluten)
- Salt: 1 ½ teaspoons (enhances flavor)
- Baking Soda: ½ teaspoon (for a slight lift during boiling)
Wet Ingredients
These liquid components bring our sourdough bagel dough to life with moisture and tang:
- Gluten-Free Sourdough Starter: 1 cup (active and bubbly for that signature sourdough kick)
- Warm Water: 1 ¼ cups (between 100-110°F to activate the starter)
- Honey: 2 tablespoons (feeds the fermentation and adds a hint of sweetness)
- Olive Oil: 2 tablespoons (for a tender crumb and subtle richness)
- Apple Cider Vinegar: 1 tablespoon (boosts fermentation and flavor)
Optional Add-Ins
- Sesame Seeds: 2 tablespoons (for a nutty topping)
- Poppy Seeds: 2 tablespoons (adds a classic bagel look and crunch)
- Dried Blueberries: ¼ cup (for a sweet twist in every bite)
- Cinnamon and Raisins: 1 teaspoon cinnamon + ¼ cup raisins (for a warm spiced variation)
- Everything Bagel Seasoning: 2 tablespoons (for that savory all-in-one flavor)
Essential Tools and Equipment
When crafting our Gluten-Free Sourdough Bagel Recipe, having the right tools and equipment is crucial for achieving that perfect crusty exterior and chewy interior. We’re excited to guide you through the must-have items that will make the process seamless and ensure your gluten-free bagels turn out bakery-worthy. Let’s dive into the essentials that will elevate your baking game and help you master this tangy delight.
Mixing and Measuring Tools
To start, precise measurements are key to balancing the unique texture of gluten-free dough. Equip yourself with the following:
- Digital Kitchen Scale: We rely on this for accurate measurements of ingredients like gluten-free all-purpose flour and psyllium husk powder. Weighing ensures consistency in every batch.
- Measuring Cups and Spoons: These are handy for smaller quantities of wet ingredients like honey or dry add-ins like sesame seeds.
- Large Mixing Bowl: Opt for a sturdy bowl to combine your gluten-free sourdough starter with other ingredients. A wide base helps with thorough mixing.
- Whisk or Wooden Spoon: We use these to blend the wet and dry components into a cohesive dough without overworking it.
Baking and Shaping Essentials
Shaping and baking gluten-free sourdough bagels require tools that support structure and even cooking. Here’s what we recommend:
- Baking Sheet: A heavy-duty sheet ensures even heat distribution for a golden crust. Line it with parchment paper to prevent sticking.
- Parchment Paper or Silicone Baking Mat: These keep your bagels from adhering to the tray and make cleanup a breeze.
- Bagel Cutter or Dough Scraper: We love using a dough scraper to divide the sticky gluten-free dough into equal portions. A bagel cutter can help form perfect rings if you’re after uniformity.
- Pastry Brush: This is ideal for brushing water or an egg wash on the bagels before baking to enhance that shiny, professional finish.
Boiling and Finishing Gear
Boiling is a signature step in bagel-making that sets the crust. For this stage of our Gluten-Free Sourdough Bagel Recipe, you’ll need:
- Large Pot or Dutch Oven: Use this for boiling the bagels before baking. A wide pot allows multiple bagels to cook at once without crowding.
- Slotted Spoon or Spider Strainer: We find these indispensable for safely lifting bagels out of boiling water without breaking their shape.
- Cooling Rack: After baking, let your bagels cool on a wire rack to maintain their crisp exterior. This prevents sogginess from trapped steam.
Optional but Helpful Tools
While not mandatory, these extras can take your gluten-free baking to the next level:
- Stand Mixer with Dough Hook: If kneading by hand feels daunting, we suggest a stand mixer to effortlessly combine the sticky gluten-free dough.
- Thermometer: Check the temperature of your warm water (ideally 100-110°F) to activate the gluten-free sourdough starter without killing the cultures.
- Seed Sprinkler or Shaker: For even distribution of toppings like poppy seeds or everything bagel seasoning, a shaker makes the job neat and quick.
Quick Reference Table for Tools
| Tool | Purpose | Importance |
|---|---|---|
| Digital Kitchen Scale | Accurate ingredient measurement | Essential |
| Large Mixing Bowl | Combining dough ingredients | Essential |
| Baking Sheet | Even baking of bagels | Essential |
| Large Pot | Boiling bagels for crust formation | Essential |
| Stand Mixer (Optional) | Easier dough mixing | Helpful |
| Thermometer (Optional) | Checking water temperature for starter | Helpful |
Preparing the Gluten Free Sourdough Starter
Let’s dive into the heart of our Gluten Free Sourdough Bagel Recipe by preparing the gluten-free sourdough starter. This crucial step sets the foundation for that signature tangy flavor and chewy texture we crave in a perfect bagel.
Feeding the Starter
To ensure our gluten-free sourdough starter is active and ready for baking, we need to feed it properly. Follow these precise steps for the best results:
- Gather Ingredients: Measure out 50 grams of gluten-free brown rice flour and 50 grams of lukewarm water (around 80°F/27°C). Using a digital scale ensures accuracy for consistent fermentation.
- Mix Thoroughly: In a clean glass jar, combine the gluten-free starter (about 50 grams of existing starter) with the flour and water. Stir vigorously with a non-metal spoon to incorporate air and encourage fermentation. The mixture should resemble a thick pancake batter.
- Cover and Rest: Loosely cover the jar with a lid or cloth and let it sit at room temperature (ideally 70-75°F/21-24°C) for 6-12 hours. Warmer environments speed up the process, while cooler ones slow it down.
- Observe Activity: Look for bubbles on the surface and a slight sour aroma—these are signs that the starter is active and feeding on the flour. If it doubles in size within this time frame, you’re on the right track!
Tip: If your starter hasn’t been fed in a while, repeat this feeding process twice (discarding half each time) over 24 hours to revive its strength before using it in our gluten-free sourdough bagel dough.
Checking Readiness
Before we mix our gluten-free sourdough starter into the bagel dough, we must confirm it’s at peak activity for optimal rise and flavor. Here’s how to check its readiness:
- Float Test: Fill a small bowl with water. Drop a teaspoon of your gluten-free starter into it. If it floats, it’s ready to use—this indicates enough gas production from fermentation. If it sinks, feed it again and wait a few more hours.
- Visual Cues: Inspect the starter for a domed top and bubbly surface. It should have a pleasant tangy smell, not an unpleasant or alcoholic odor. A strong sour scent means it’s perfect for adding that classic sourdough kick to our bagels.
- Timing Check: Use the starter when it’s at its peak—typically 4-6 hours after feeding when it has doubled in volume. Don’t let it sit too long or it will lose strength and affect the bagel texture.
Pro Tip: Keep a feeding log to track how your gluten-free sourdough starter responds to temperature and time. As quoted by experienced bakers, “Consistency is the secret to mastering sourdough!” Adjust based on your kitchen environment for reliable results every time.
| Starter Readiness Indicators | What to Look For | Action if Not Ready |
|---|---|---|
| Float Test | Floats in water | Feed again and wait 4-6 hours |
| Visual Appearance | Bubbly surface and domed top | Feed and observe for activity |
| Smell | Pleasant tangy aroma | Discard and restart if off-odor |
By mastering these steps, we ensure our gluten-free sourdough starter delivers the tangy depth and structural lift needed for irresistible gluten-free sourdough bagels.
Instructions for Making Gluten Free Sourdough Bagels
Let’s dive into the step-by-step process of crafting Gluten Free Sourdough Bagels that boast a tangy flavor and chewy texture. Follow our detailed guide to create bakery-quality bagels right in your kitchen.
Mixing the Dough
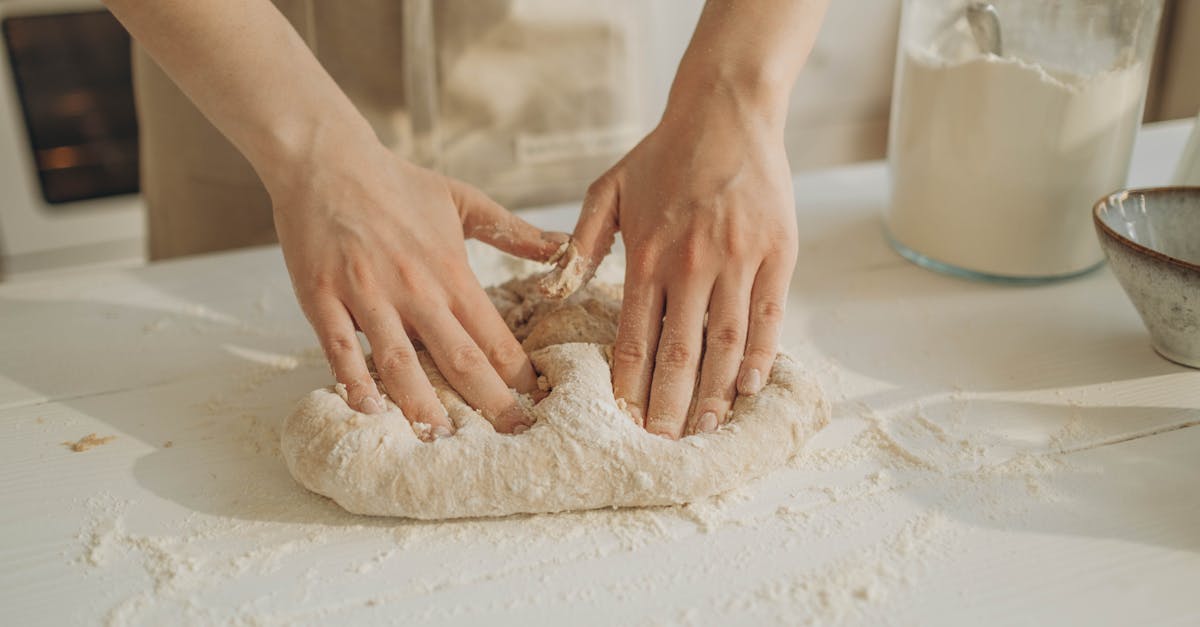
Start by gathering all the ingredients and tools we’ve prepared for our Gluten Free Sourdough Bagel recipe. In a large mixing bowl combine 2 cups of gluten-free all-purpose flour, 1 cup of brown rice flour, and 2 tablespoons of psyllium husk powder to ensure proper binding and texture. Whisk these dry ingredients thoroughly to avoid clumps. In a separate small bowl mix 1.5 cups of warm water (around 100°F or 38°C), ½ cup of active gluten-free sourdough starter, and 1 tablespoon of honey to activate fermentation. Pour the wet mixture into the dry ingredients and stir with a wooden spoon or use a stand mixer with a dough hook for about 5 minutes until a sticky yet cohesive dough forms. The dough should smell slightly tangy from the sourdough starter and feel tacky to the touch. Cover the bowl with a damp cloth and let it rest for 30 minutes to allow the flours to hydrate fully.
Fermentation Process
Place the covered dough in a warm spot ideally between 75°F and 80°F (24°C to 27°C) for the fermentation to work its magic. Let it ferment for 6 to 8 hours or until it has visibly puffed up and smells delightfully sour. This slow rise is crucial for developing the signature sourdough tang in our Gluten Free Sourdough Bagels. If you’re short on time you can refrigerate the dough after 4 hours of fermentation and let it continue to develop overnight for up to 12 hours. Keep an eye on the dough as over-fermentation can weaken the structure leading to flat bagels. Once ready the dough should feel airy and slightly springy.
Shaping the Bagels
After fermentation lightly dust a clean work surface with gluten-free flour to prevent sticking. Divide the dough into 8 equal portions each weighing about 4 ounces. Roll each portion into a smooth ball then use your thumb to poke a hole in the center stretching it gently to form a classic bagel shape with a 1.5-inch hole. Ensure the hole is wide enough as it will shrink during boiling and baking. Place the shaped bagels on a parchment-lined baking sheet dusted with a little more gluten-free flour. Cover them with a damp cloth and let them rest for 30 to 45 minutes to puff up slightly. This step ensures our Gluten Free Sourdough Bagels maintain their shape and develop a chewy texture.
Boiling the Bagels
Bring a large pot of water to a rolling boil and add 1 tablespoon of honey or baking soda to enhance the crust’s color and flavor. Preheat your oven to 425°F (220°C) while the water heats. Carefully lower 2 to 3 bagels at a time into the boiling water using a slotted spoon. Boil each side for 30 seconds ensuring they don’t stick to the bottom. The boiling step gives our Gluten Free Sourdough Bagels their iconic shiny crust and dense chew. Remove them with the slotted spoon and place them back on the parchment-lined baking sheet. If desired sprinkle optional toppings like sesame seeds or poppy seeds on the wet bagels immediately after boiling so they adhere well.
Baking the Bagels
Once all bagels are boiled slide the baking sheet into the preheated oven on the middle rack. Bake for 20 to 25 minutes or until the Gluten Free Sourdough Bagels turn golden brown and sound hollow when tapped on the bottom. Halfway through baking rotate the tray for even browning. The aroma of freshly baked sourdough will fill your kitchen promising a crusty exterior and soft chewy interior. Let the bagels cool on a wire rack for at least 15 minutes before slicing to avoid a gummy texture. Enjoy the satisfaction of biting into a warm Gluten Free Sourdough Bagel that rivals any traditional version.
Tips for Perfect Gluten Free Sourdough Bagels
We’re passionate about helping you achieve the best Gluten Free Sourdough Bagels possible. Crafting these bagels at home can be a rewarding experience with the right techniques and attention to detail. Let’s dive into our expert tips to ensure your bagels boast that signature tangy flavor, chewy texture, and crusty exterior every time.
Master Your Gluten Free Sourdough Starter
The heart of our Gluten Free Sourdough Bagels lies in a robust gluten-free sourdough starter. Ensure it’s active and bubbly before use by feeding it 8-12 hours prior with equal parts gluten-free flour and water. Test its readiness with the float test: drop a spoonful into water and if it floats, you’re good to go. A strong starter guarantees that irresistible tangy kick and helps with the dough’s structure despite the absence of gluten.
Hydration is Key
Gluten-free doughs can be notoriously sticky. Maintain the right hydration level by sticking to the exact measurements of water and psyllium husk powder outlined in our recipe. Psyllium husk acts as a binder mimicking gluten so don’t skimp on it. If the dough feels too wet while mixing, resist the urge to add more flour. Instead let it rest for 10-15 minutes to allow the husk to fully hydrate and firm up.
Control the Fermentation Environment
Fermentation is crucial for developing the deep flavor in your Gluten Free Sourdough Bagels. Keep your dough in a warm spot ideally between 75-80°F (24-27°C) during the rise. If your kitchen is cooler cover the bowl with a damp cloth and place it near a warm oven or use a proofing box. Monitor the dough’s rise; it should look puffy but not overly doubled as over-fermentation can lead to a gummy texture.
Perfect the Boiling Step
Boiling sets the crusty exterior of your bagels. Use a large pot with at least 2 quarts of water and add a tablespoon of honey or sugar to enhance the shine. Boil each bagel for just 30-60 seconds per side—too long and they’ll get soggy. Use a slotted spoon to gently flip them ensuring an even crust formation. This step locks in the shape and prepares them for that golden bake.
Experiment with Toppings
Elevate your Gluten Free Sourdough Bagels by adding toppings right after boiling while they’re still wet. Sprinkle on sesame seeds, poppy seeds, or even a savory everything bagel mix for extra flair. Press lightly to ensure they stick during baking. Customizing toppings not only boosts flavor but also adds a delightful crunch to every bite.
Bake to Golden Perfection
Achieving that ideal golden brown crust requires precise baking. Preheat your oven to 425°F (218°C) and bake on a parchment-lined baking sheet for 20-25 minutes. For an extra crispy exterior brush the bagels with a light coat of olive oil before baking. Rotate the tray halfway through to ensure even browning. Keep an eye on them in the last few minutes to avoid over-baking which can dry out the interior.
Cooling for Texture
Resist the temptation to slice into your Gluten Free Sourdough Bagels right out of the oven. Let them cool on a wire rack for at least 30 minutes. This cooling period allows the interior to set properly ensuring that perfect chewy texture rather than a steamy mush. Trust us—patience pays off with every satisfying bite.
Storage Tips for Freshness
To keep your bagels fresh store them in an airtight container at room temperature for up to 2 days. For longer storage slice them and freeze in a freezer-safe bag for up to 3 months. Reheat in a toaster or oven at 350°F (177°C) for 5-7 minutes to revive that just-baked feel. Avoid refrigerating as it can make them stale faster.
| Tip | Key Detail | Benefit |
|---|---|---|
| Active Starter | Feed 8-12 hours before; use float test | Ensures tangy flavor and lift |
| Hydration Control | Stick to recipe; let rest if sticky | Prevents overly wet or dry dough |
| Fermentation Temperature | Keep at 75-80°F (24-27°C) | Enhances flavor development |
| Boiling Time | 30-60 seconds per side | Sets crust and maintains shape |
| Baking Temperature | Preheat to 425°F (218°C) | Achieves golden crust |
| Cooling Time | Wait 30 minutes on rack | Preserves chewy texture |
| Storage | Freeze for up to 3 months | Maintains freshness |
With these tips in your baking arsenal we’re confident you’ll craft Gluten Free Sourdough Bagels that rival any traditional version. Keep experimenting and tweaking to match your taste preferences and enjoy the process of creating something truly special.
Storing and Make-Ahead Instructions
As we continue our journey with this Gluten-Free Sourdough Bagel Recipe, let’s dive into the essential know-how for keeping these delightful bagels fresh and ready to enjoy. Whether you’re baking for the week ahead or savoring leftovers, we’ve got you covered with practical tips on storing and make-ahead strategies. Our goal is to ensure that every bite of these gluten-free sourdough bagels retains that irresistible tangy flavor and chewy texture.
Storing Your Gluten-Free Sourdough Bagels
Once you’ve baked a batch of these mouthwatering gluten-free sourdough bagels, proper storage is key to maintaining their crusty exterior and soft interior. Follow these steps to keep them tasting bakery-fresh:
- Room Temperature Storage: Place cooled bagels in an airtight container or resealable plastic bag. They’ll stay fresh for up to 2 days at room temperature. Avoid refrigeration as it can dry them out and alter the texture.
- Freezing for Longer Freshness: For extended storage, freeze the bagels. Slice them in half before freezing to make reheating easier. Wrap each half individually in plastic wrap then place them in a freezer-safe bag. They’ll keep well for up to 3 months.
- Reheating Tips: To revive frozen bagels, thaw them overnight in the fridge or at room temperature for a few hours. Pop them into a toaster or preheat your oven to 350°F (175°C) and warm them for 5-7 minutes. This restores their crisp crust and chewy center.
Pro Tip: Never store gluten-free sourdough bagels in a paper bag as they’ll lose moisture quickly and become stale.
Make-Ahead Instructions for Busy Bakers
We know life gets hectic so let’s make baking these gluten-free sourdough bagels fit into your schedule with ease. Preparing components ahead of time saves effort and ensures you’ve got fresh bagels whenever the craving strikes.
- Prepare the Sourdough Starter: Feed your gluten-free sourdough starter the night before you plan to mix the dough. Keep it in a warm spot to ensure it’s bubbly and active by morning. This can be done up to 12 hours in advance.
- Mix and Shape in Advance: Mix the dough and shape the bagels as per the recipe instructions. After shaping, place them on a parchment-lined baking sheet and cover tightly with plastic wrap. Refrigerate for up to 24 hours. When ready to bake, let them sit at room temperature for 1 hour before boiling and baking.
- Par-Boil and Freeze: For ultimate convenience, boil the shaped bagels for 1 minute per side then let them cool completely. Arrange them on a baking sheet to freeze individually for 2 hours before transferring to a freezer-safe bag. They’ll keep for up to 1 month. When ready to enjoy, bake directly from frozen at 425°F (220°C) for 20-25 minutes until golden brown.
Storage and Make-Ahead Timeline
To help you plan, here’s a quick reference table for storing and preparing your gluten-free sourdough bagels:
| Method | Duration | Best For | Notes |
|---|---|---|---|
| Room Temperature Storage | Up to 2 days | Immediate consumption | Use airtight container to prevent staleness |
| Freezing (Sliced) | Up to 3 months | Long-term storage | Slice before freezing for easy reheating |
| Refrigerated Shaped Dough | Up to 24 hours | Make-ahead baking | Rest at room temp for 1 hour before boiling |
| Par-Boiled & Frozen | Up to 1 month | Quick baking later | Bake from frozen for fresh results |
With these storing and make-ahead tips, we ensure that your gluten-free sourdough bagels are always ready to impress. Whether you’re toasting one for a quick breakfast or pulling a batch from the freezer for a weekend brunch, you’ll savor that tangy sourdough kick and perfect chew every time.
Conclusion
We’re thrilled to share this gluten-free sourdough bagel recipe with you. It’s a game-changer for anyone craving that authentic bagel experience without the gluten.
Our carefully crafted method ensures you’ll enjoy a delightful tangy flavor and perfect texture. We’re confident these bagels will become a staple in your kitchen.
So grab your apron and let’s bake something extraordinary together. Your taste buds will thank us!
Frequently Asked Questions
What makes gluten-free sourdough bagels different from traditional bagels?
Gluten-free sourdough bagels are made without wheat, using gluten-free flours like all-purpose and brown rice flour. They incorporate a gluten-free sourdough starter for a tangy flavor and better digestion through probiotics. While traditional bagels rely on gluten for their chewy texture, this recipe uses ingredients like psyllium husk to mimic that signature chew, making them safe for those with gluten sensitivities or celiac disease.
Can I use a regular sourdough starter for this gluten-free recipe?
No, a regular sourdough starter contains gluten from wheat flour. For this recipe, you must use a gluten-free sourdough starter made with gluten-free flours to ensure the bagels remain safe for those with gluten sensitivities or celiac disease. Follow the article’s guide to prepare a suitable starter.
What are the health benefits of gluten-free sourdough bagels?
These bagels are safe for individuals with gluten sensitivities or celiac disease. The gluten-free sourdough starter introduces beneficial probiotics that aid digestion. Additionally, the recipe uses carefully selected ingredients to maintain a balanced nutritional profile while delivering a tasty, chewy texture without compromising on health.
How do I know if my gluten-free sourdough starter is ready to use?
Check your starter’s readiness with the float test—drop a small spoonful into water; if it floats, it’s ready. Look for visual cues like bubbles and a doubled size after feeding. The article provides detailed instructions on feeding and optimal fermentation conditions to ensure peak activity for the best bagel results.
What tools do I need to make gluten-free sourdough bagels at home?
Essential tools include a digital kitchen scale for precise measurements, a large mixing bowl, a baking sheet, and a large pot for boiling. Optional tools like a stand mixer and thermometer can enhance the process. The article lists all necessary equipment to help you achieve bakery-quality bagels.
How can I store gluten-free sourdough bagels to keep them fresh?
Store bagels at room temperature for up to 2 days in an airtight container. For longer freshness, slice and freeze them, then reheat as needed. The article offers detailed storage tips, including freezing techniques and make-ahead strategies to enjoy fresh bagels anytime.
Can I customize the flavor of my gluten-free sourdough bagels?
Yes, you can enhance the flavor with optional add-ins like sesame seeds, poppy seeds, or dried blueberries. The article suggests experimenting with toppings and mix-ins to personalize your bagels, making them versatile for breakfast, lunch, or dinner.
Why is boiling important in the bagel-making process?
Boiling the bagels before baking creates their signature shiny crust and dense, chewy texture. It’s a crucial step in achieving the classic bagel exterior. The article explains the boiling process in detail, ensuring your gluten-free sourdough bagels have the perfect finish.
How long does it take to make gluten-free sourdough bagels?
The process can take several hours due to fermentation and resting times for the dough to develop flavor and texture. This includes preparing the starter, mixing, shaping, boiling, and baking. The article’s step-by-step guide helps manage the timeline for successful results.
Are gluten-free sourdough bagels suitable for beginners?
Yes, this recipe is designed for bakers of all levels, including beginners. The article provides detailed instructions, from preparing the starter to baking, along with expert tips to ensure success. With patience and the right tools, anyone can master these bagels.