
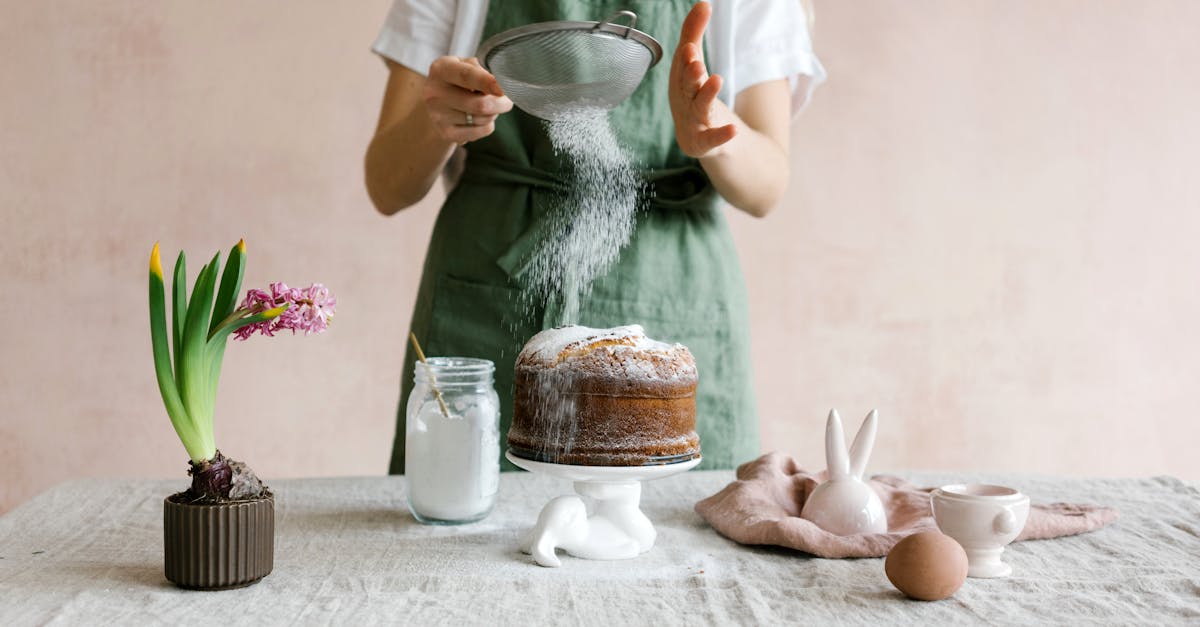
We’ve always been fans of recipes that blend fun with flavor, and our Canadian Honker Bunny Cake is no exception. Inspired by Canada’s vibrant wildlife like the iconic honking geese, this adorable bunny-shaped cake brings a playful twist to classic baking. It’s perfect for family gatherings or holidays, offering a sweet nod to Canadian charm that we’ll guarantee delights everyone.
Ingredients
To bring our Canadian Honker Bunny Cake to life—a whimsical dessert inspired by Canada’s vibrant wildlife—we start by assembling these essential ingredients. We’ve organized them in the order they’re typically used, with prep notes for precision.
- All-purpose flour: 2 cups, sifted to ensure a light and airy base for our cake layers.
- Granulated sugar: 1 ½ cups, measured and set aside to sweeten the batter perfectly.
- Unsalted butter: 1 cup (2 sticks), softened at room temperature to blend smoothly into the mixture.
- Large eggs: 4, at room temperature to help achieve a fluffy texture when incorporated.
- Baking powder: 2 teaspoons, for reliable rising and a tender crumb in our Canadian-inspired creation.
- Salt: ½ teaspoon, to balance flavors and enhance the overall taste.
- Pure maple syrup: ½ cup, a nod to Canadian heritage, warmed slightly for easy mixing into the batter.
- Vanilla extract: 2 teaspoons, for adding a rich, aromatic depth that complements the maple notes.
- Milk: 1 cup, whole for creaminess, to adjust the batter’s consistency as needed.
- Cream cheese frosting ingredients: For the bunny’s playful decoration—8 ounces cream cheese (softened), ½ cup unsalted butter (softened), 4 cups powdered sugar, and 1 teaspoon vanilla extract—to top and shape our cake with vibrant flair.
- Food coloring: Gel-based, in shades of pink and white, to tint the frosting and bring the Honker Bunny design to life with fun details like ears and a tail.
- Candies for decoration: Assorted options like licorice (for whiskers) and chocolate chips (for eyes), totaling about ½ cup, arranged last for a charming finish.
Required Tools and Equipment
Now that we’ve gathered our ingredients for the Canadian Honker Bunny Cake, let’s equip ourselves with the right tools to ensure a smooth baking process. As expert bakers, we rely on these essentials to mix, bake, and decorate this whimsical dessert with precision and ease.
To prepare and assemble our cake, we’ll need the following tools and equipment. We’ve organized them into categories for clarity:
- Baking Essentials:
- A set of measuring cups and spoons for accurate ingredient measurements, ensuring our batter turns out perfectly balanced.
- Two 9-inch round cake pans to bake the layers that will form the bunny shape—grease them well for easy release.
- An electric mixer or stand mixer to cream butter and sugar efficiently, saving time and achieving a fluffy texture.
- Mixing and Prep Tools:
- Several mixing bowls in various sizes, ideal for combining wet and dry ingredients without cross-contamination.
- A rubber spatula for folding in delicate elements like eggs, helping maintain the batter’s airy consistency.
- A whisk as a backup for manual mixing, perfect for smaller tasks like blending frosting.
- Decorating and Finishing Gear:
- Piping bags and tips for applying cream cheese frosting with artistic flair, especially for the bunny’s features.
- A cooling rack to let the cake layers set evenly, preventing sogginess and ensuring a professional finish.
- A sharp serrated knife for leveling and shaping the cake into the charming honker bunny design.
With these tools in hand, we’re set to transform our ingredients into a delightful, visually stunning Canadian Honker Bunny Cake that will impress at any gathering.
Instructions
Now that we have gathered our ingredients and tools, we guide you through creating the Canadian Honker Bunny Cake with simple steps that ensure a fun and delicious result.
Prepare the Ingredients
Before we start mixing, let’s organize our ingredients for efficiency. Begin by measuring out the dry components: 2 cups all-purpose flour, 1 ½ cups granulated sugar, 2 teaspoons baking powder, and ½ teaspoon salt into a large mixing bowl. For the wet ingredients, soften 1 cup unsalted butter by leaving it at room temperature for 30 minutes then cube it for easy blending. Crack 3 large eggs into a separate bowl and set aside along with ½ cup pure maple syrup, 1 teaspoon vanilla extract, and 1 cup milk. Grease two 9-inch round cake pans with butter and line them with parchment paper to prevent sticking. This preparation sets the stage for a smooth baking process and highlights the Canadian Honker Bunny Cake‘s signature maple flavor.
Mix the Batter
With ingredients prepped, we combine them to form a light and airy batter. In a large mixing bowl, whisk together the dry ingredients—flour, sugar, baking powder, and salt—until evenly blended for about 1 minute. In another bowl, beat the softened butter with an electric mixer on medium speed until creamy then gradually add the eggs one at a time followed by the maple syrup and vanilla extract. Slowly incorporate the dry mixture alternating with the milk to avoid lumps creating a smooth batter that promises a moist Canadian Honker Bunny Cake. For the cream cheese frosting, blend 8 ounces softened cream cheese, ½ cup unsalted butter, and 4 cups powdered sugar in a separate bowl until fluffy adding a few drops of food coloring for the bunny design. This step infuses the batter with the warm aroma of maple ensuring every bite is flavorful and irresistible.
Bake the Cake
Now we transfer the batter to the oven for perfect baking. Pour the batter evenly into the prepared cake pans filling each about two-thirds full to allow for rising. Place the pans in a preheated oven at 350°F and bake for 25-30 minutes or until a toothpick inserted in the center comes out clean. Monitor the cakes closely as the maple scent fills your kitchen signaling a golden-brown finish that evokes Canada’s wild landscapes. Once baked, remove the pans and let the cakes cool on a wire rack for 10 minutes before turning them out—this ensures a tender crumb and prevents breakage for our Canadian Honker Bunny Cake.
| Baking Step | Temperature (°F) | Time (minutes) | Key Check |
|---|---|---|---|
| Preheat Oven | 350 | N/A | Oven ready |
| Bake Cakes | 350 | 25-30 | Toothpick clean |
Assemble and Decorate
With the cakes cooled, we assemble and decorate to bring the bunny theme to life. Level the tops of the cakes using a serrated knife for even layers then stack them with a generous spread of cream cheese frosting in between creating a whimsical base. Frost the entire cake smoothly and use tinted frosting to pipe on bunny features like ears, eyes, and a beak incorporating assorted candies for added charm. Finish by arranging extra candies to mimic a honking goose scene making the Canadian Honker Bunny Cake a visually stunning centerpiece that tastes as delightful as it looks with its creamy texture and subtle maple sweetness.
Make-Ahead Instructions
To make preparing our Canadian Honker Bunny Cake easier, we recommend planning ahead so you can focus on assembly and enjoyment. This approach lets you bake and decorate without last-minute rushes, ensuring a flawless result every time.
Preparing the Cake Layers
We suggest baking the cake layers up to 2 days in advance or freezing them for longer storage. Here’s how:
- Step 1: After baking the cake as outlined in the previous section, allow the layers to cool completely on a wire rack.
- Step 2: Wrap each layer tightly in plastic wrap to prevent drying out.
- Step 3: For short-term storage, place the wrapped layers in an airtight container and refrigerate for up to 2 days.
- Step 4: For longer storage, freeze the wrapped layers in a freezer-safe bag. They can be frozen for up to 3 months—simply thaw in the refrigerator overnight before use.
Making the Frosting Ahead
Our cream cheese frosting for the Canadian Honker Bunny Cake holds up well when prepared in advance, maintaining its creamy texture and maple-infused flavor.
- Step 1: Prepare the frosting as per the recipe, then transfer it to an airtight container.
- Step 2: Refrigerate the frosting for up to 5 days. Stir well before using to restore its smooth consistency.
- Step 3: If you need it for a later date, freeze the frosting in portions for up to 2 months. Thaw in the refrigerator and re-whip if necessary for the best results.
Assembling in Advance
While we advise assembling the full Canadian Honker Bunny Cake on the day of serving for optimal freshness, you can partially prepare it ahead.
- Level and stack the layers: Do this up to 1 day ahead, then cover the stacked cake with plastic wrap and refrigerate.
- Add decorations: Apply the frosting and bunny features (using tinted frosting and candies) no more than 4 hours before serving to keep the design vibrant and the texture perfect.
| Component | Make-Ahead Time | Storage Method | Thawing/Prep Notes |
|---|---|---|---|
| Cake Layers | Up to 2 days | Refrigerate wrapped | Use directly from fridge |
| Cake Layers | Up to 3 months | Freeze wrapped | Thaw overnight in fridge |
| Cream Cheese Frosting | Up to 5 days | Refrigerate in container | Stir before use |
| Cream Cheese Frosting | Up to 2 months | Freeze in portions | Thaw in fridge and re-whip |
| Partially Assembled Cake | Up to 1 day | Refrigerate covered | Add final decorations before serving |
Conclusion
We’ve loved sharing this delightful Canadian Honker Bunny Cake recipe with you. It’s more than just a treat—it’s a fun way to bring family together and celebrate with a touch of Canadian flair.
As you bake and decorate we’ll bet it’ll become a favorite in your home too. Give it a try and let us know how yours turns out—we’re confident it’ll impress everyone at your next gathering.
Frequently Asked Questions
What is the Canadian Honker Bunny Cake?
The Canadian Honker Bunny Cake is a fun, whimsical dessert inspired by Canadian wildlife, like honking geese. It’s a flavorful cake with a maple twist, perfect for family gatherings or holidays. Made with simple ingredients, it features a light, airy texture and is decorated to look like a bunny, offering a delightful mix of taste and visual appeal.
What ingredients are needed for the Canadian Honker Bunny Cake?
You’ll need all-purpose flour, granulated sugar, unsalted butter, large eggs, baking powder, salt, pure maple syrup, vanilla extract, and milk for the cake base. For frosting and decorations, use cream cheese, food coloring, and assorted candies. This combination creates a moist cake with creamy texture and subtle maple sweetness.
What tools are required to make the Canadian Honker Bunny Cake?
Essential tools include baking items like measuring cups, 9-inch round cake pans, and an electric mixer; prep tools such as mixing bowls, a rubber spatula, and a whisk; and decorating gear like piping bags, a cooling rack, and a serrated knife. These help ensure smooth preparation, mixing, baking, and assembly.
How do I prepare the Canadian Honker Bunny Cake?
Start by organizing ingredients, then mix dry and wet components to create a light batter with maple flavor. Bake in round pans until risen, cool completely, level layers, frost with cream cheese icing, and decorate with tinted frosting and candies to form bunny features. Follow the steps for a stunning, delicious result.
Can I make the Canadian Honker Bunny Cake ahead of time?
Yes, bake cake layers up to 2 days in advance or freeze for longer storage—cool, wrap tightly, and refrigerate or freeze. Prepare frosting ahead and store in the fridge. Assemble and decorate no more than 4 hours before serving to keep it fresh; stack layers a day early if needed, but add final touches last.
How should I decorate the Canadian Honker Bunny Cake?
Level and stack the cooled cake layers, then apply cream cheese frosting evenly. Use food coloring to tint frosting for bunny ears, face, and details. Add candies for eyes, nose, and other features. This creates a charming, visually appealing design that’s easy and fun to assemble.
Is the Canadian Honker Bunny Cake suitable for beginners?
Absolutely, it’s beginner-friendly with straightforward steps and common ingredients. The recipe includes clear instructions for mixing, baking, and decorating, plus tips for monitoring the process. With basic tools, anyone can create this delightful cake, making it a great starting point for new bakers.