
We’ve always adored the charm of Apple Blossom Tarts, a delightful dessert that captures the essence of spring in every bite. Inspired by the delicate petals of apple blossoms these tarts feature crisp apples swirled into flower-like shapes offering a perfect blend of tart and sweet flavors that make them irresistible.
Our recipe draws from traditional baking roots while keeping things simple for home cooks. Whether you’re hosting a gathering or craving a cozy treat we’ll show you how to whip up these elegant tarts that are sure to become a favorite in your kitchen.
Ingredients
To create our delicious Apple Blossom Tarts, we gather fresh, high-quality ingredients that highlight the tart-sweet balance of crisp apples in a flaky pastry. Below, we list them in the order they’re typically used, with specific prep notes for accuracy and ease.
- Pastry dough: 1 package (store-bought or homemade), thawed if frozen, as this forms the base and should be rolled out evenly for the tart shells.
- Apples: 4 medium Honeycrisp or Granny Smith varieties, cored and thinly sliced (about 1/8-inch thick) to create the flower-like petals that define our Apple Blossom Tarts.
- Lemon juice: 2 tablespoons, freshly squeezed, to toss with the apple slices and prevent browning while enhancing their natural tartness.
- Granulated sugar: 1/4 cup, mixed with spices, for sprinkling over the apples to add a sweet contrast.
- Ground cinnamon: 1 teaspoon, combined with sugar, to infuse warm, aromatic flavors into the fruit layers.
- Unsalted butter: 2 tablespoons, melted, for brushing the tarts and achieving a golden, crisp finish.
- Egg: 1 large, beaten, for an egg wash that promotes a shiny, bakery-style appearance on the pastry edges.
These ingredients ensure our Apple Blossom Tarts remain simple yet elegant, perfect for spring-inspired baking.
Required Equipment
Now that we have gathered our fresh ingredients for the Apple Blossom Tarts, let’s equip ourselves with the essential tools to bring this spring-inspired dessert to life. Having the right equipment ensures precise preparation and baking success, allowing us to create those elegant, flower-like tarts with ease.
To keep things organized, we recommend the following key pieces of equipment. We’ve listed them in the order they might be used during the recipe process:
- Mixing bowls: Two medium-sized bowls for combining ingredients like sugar and spices or preparing the egg wash.
- Rolling pin: A standard wooden or silicone rolling pin to roll out the pastry dough evenly for the tart bases.
- Knife or mandoline slicer: A sharp chef’s knife or mandoline for thinly slicing the apples into delicate, petal-like shapes that enhance the tart’s visual appeal and texture.
- Apple peeler (optional): A handheld peeler to quickly remove skins from the apples, ensuring a smooth finish if desired.
- Muffin tin or tart molds: A 12-cup muffin tin or set of individual tart molds to shape the tarts, giving them their signature blossom form.
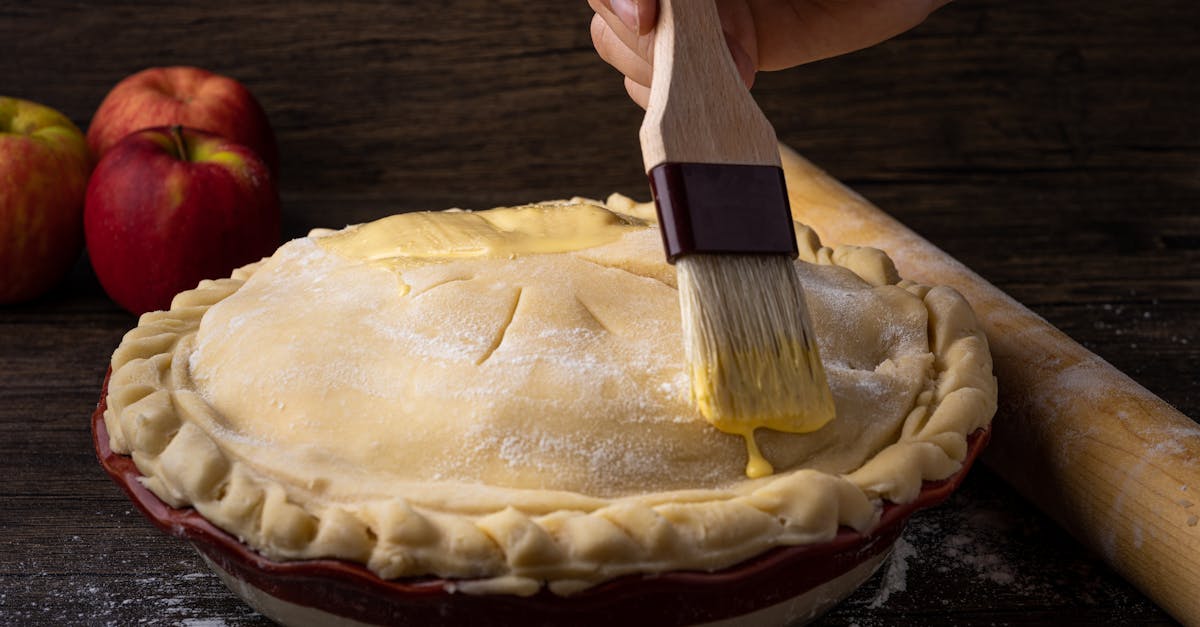
- Pastry brush: A soft-bristled brush for applying the egg wash, which helps achieve a golden, flaky crust on our Apple Blossom Tarts.
- Baking sheet: A rimmed baking sheet placed under the muffin tin to catch any drips and prevent oven messes.
- Oven thermometer: A reliable thermometer to verify our oven is at the precise temperature for even baking, typically around 375°F for these tarts.
- Measuring cups and spoons: Standard sets for accurate measurements of ingredients, ensuring consistent results every time we bake.
With these tools in hand, we’re set to transition smoothly into the preparation steps, making the process efficient and enjoyable.
Instructions
We walk you through the straightforward steps to craft our irresistible Apple Blossom Tarts, turning fresh ingredients into a visually stunning and flavorful dessert. Let’s dive in and create these tart-sweet treats with confidence and ease.
Prep the Ingredients
Before assembling, we focus on preparing our key components for optimal results. Start by gathering the pastry dough, apples, and other elements from our ingredients list.
- Prepare the apples: Take 4 medium Honeycrisp or Granny Smith apples and wash them thoroughly under cold water. Core and slice them thinly—aim for slices about 1/8 inch thick using a sharp knife or mandoline slicer—to ensure they form delicate, petal-like layers that capture the essence of spring blossoms.
- Make the sugar mixture: In a small bowl, combine 1/2 cup granulated sugar, 1 teaspoon ground cinnamon, and a pinch of nutmeg for added warmth. Stir until the mixture is uniform, creating a sweet-spicy blend that will enhance the tart apples’ natural crunch and aroma.
- Prepare the lemon juice bath: Squeeze juice from 1 lemon into a bowl of water to prevent browning. Submerge the apple slices in this solution for 5 minutes, then drain and pat dry with a clean towel—this step keeps the apples fresh and vibrant, preserving their crisp texture and bright color.
- Ready the egg wash: Beat 1 egg with 1 tablespoon of water in a separate bowl until smooth, setting aside this glossy mixture for a perfect golden finish on our tarts.
Assemble the Tarts
With ingredients prepped, we now build the tarts’ signature flower-like design, layering flavors and textures for a dessert that’s as beautiful as it is delicious.
- Roll out the dough: On a lightly floured surface, roll 1 pound of pastry dough into a thin sheet about 1/8 inch thick, then cut it into 6-inch circles using a round cutter or knife to fit your muffin tins or tart molds.
- Arrange the apples: Lay the apple slices in a overlapping pattern on each dough circle, starting from the outer edge and working inward to mimic blossom petals. Sprinkle the sugar mixture evenly over the apples, then dot with 1 tablespoon of unsalted butter cut into small pieces for a rich, buttery melt that amplifies the tarts’ sweet-tart contrast and inviting aroma.
- Fold and seal: Gently fold the dough edges up and over the apple edges to form a rustic, cupped shape, pressing lightly to seal. Brush the tops with the prepared egg wash for a shiny, golden crust that locks in moisture and adds visual appeal.
- Chill briefly: Place the assembled tarts in the refrigerator for 10 minutes to firm up the dough, ensuring they hold their shape and deliver a flaky texture when baked.
Bake the Tarts
We bake the tarts to achieve a perfect balance of tender apples and crisp pastry, filling your kitchen with the irresistible scent of cinnamon and baked fruit.
- Preheat the oven: Set your oven to 375°F (190°C) and ensure it’s reached temperature using an oven thermometer for even baking results.
- Bake initially: Place the tarts in prepared muffin tins on a baking sheet and bake for 15 minutes, allowing the apples to soften slightly and release their juices for a juicy, caramelized interior.
- Finish baking: Reduce the oven temperature to 350°F (175°C) and continue baking for another 10-15 minutes until the crust turns golden brown and the apples are tender yet firm—watch closely to avoid over-baking, aiming for a total time of 25-30 minutes based on your oven’s performance.
| Baking Step | Temperature (°F) | Time (minutes) |
|---|---|---|
| Initial Bake | 375 | 15 |
| Finish Bake | 350 | 10-15 |
Make-Ahead Instructions
One of the joys of our Apple Blossom Tarts recipe is its flexibility for busy schedules. We love sharing tips to prepare components in advance, ensuring you can enjoy fresh-baked treats with minimal effort on the day of serving. This approach keeps the tarts‘ crisp apples and flaky pastry intact while saving time.
Preparing Ingredients Ahead
To maintain the vibrant, tart-sweet flavors of your Apple Blossom Tarts, start by prepping the apples and other elements up to 24 hours in advance:
- Apples: Wash, core, and thinly slice 4 medium Honeycrisp or Granny Smith apples. Immediately submerge the slices in a bowl of water mixed with 2 tablespoons of lemon juice to prevent browning. Store in an airtight container in the refrigerator.
- Sugar Mixture: Combine 1/4 cup granulated sugar, 1 teaspoon ground cinnamon, and a pinch of nutmeg in a small bowl. Transfer to a sealed jar and keep at room temperature for up to 3 days.
- Pastry Dough: Prepare your dough as outlined in the main recipe, then wrap it tightly in plastic wrap and refrigerate for up to 2 days. For longer storage, freeze the dough for up to 1 month; thaw in the refrigerator overnight before use.
- Egg Wash: Beat 1 large egg with 1 tablespoon water and store in a covered container in the fridge for up to 24 hours.
Assembling Tarts in Advance
If you want to get ahead on assembly, we recommend partial preparation to preserve the flower-like arrangement and texture:
- Roll and Shape: Roll out the pastry dough and cut into circles or shapes as per the recipe. Arrange the apple slices in their floral pattern on the dough base, sprinkle with the sugar mixture, and fold the edges.
- Chill Immediately: Place the assembled tarts on a baking sheet lined with parchment paper and chill in the refrigerator for at least 30 minutes to set. Cover loosely with plastic wrap to avoid drying out.
- Storage Options: Refrigerate assembled tarts for up to 8 hours or freeze them on the baking sheet until solid, then transfer to a freezer-safe bag for up to 1 month.
Storage and Reheating Guidelines
Proper storage is key to keeping your Apple Blossom Tarts fresh and delicious. Here’s a quick overview of timelines and methods:
| Storage Method | Duration | Key Tips |
|---|---|---|
| Refrigeration | Up to 24 hours for prepped ingredients; up to 8 hours for assembled tarts | Keep in an airtight container; bring to room temperature before baking. |
| Freezing | Up to 1 month for dough or assembled tarts | Wrap tightly to prevent freezer burn; thaw in the fridge for optimal results. |
| Reheating | Varies; bake from fresh or thawed state | If baking from frozen, add 5-10 minutes to the original time; monitor to avoid over-browning. |
By following these steps, we ensure your Apple Blossom Tarts retain their elegant, spring-inspired appeal, ready to impress at any gathering. Always double-check for freshness before proceeding to the baking stage for the best results.
Conclusion
We’ve loved sharing our take on Apple Blossom Tarts, a simple yet elegant treat that brings spring’s charm to your table. It’s rewarding to see how these tarts blend flavors and textures effortlessly.
Try making them for your next gathering—we’re confident they’ll become a favorite in your kitchen, adding a touch of homemade magic to every bite.
Frequently Asked Questions
What is an Apple Blossom Tart?
Apple Blossom Tarts are a spring-inspired dessert featuring crisp apples arranged in flower-like shapes on pastry dough, blending tart and sweet flavors. They’re simple to make at home, perfect for gatherings or treats, and add a elegant touch to any meal.
What ingredients are needed for Apple Blossom Tarts?
Key ingredients include pastry dough, fresh Honeycrisp or Granny Smith apples, lemon juice, granulated sugar mixed with cinnamon, unsalted butter, and a beaten egg for egg wash. Using high-quality, fresh components ensures a balanced, flavorful tart that’s easy for home bakers.
What equipment is required to make Apple Blossom Tarts?
You’ll need mixing bowls, a rolling pin, a knife or mandoline for slicing apples, muffin tins or tart molds, a pastry brush, baking sheet, oven thermometer, and measuring tools. These basics make preparation efficient and help achieve perfect results.
How do I make Apple Blossom Tarts?
Start by preparing apples with lemon juice to prevent browning, mix sugar and spices, roll out dough, arrange apple slices in a flower pattern, add sugar mixture, fold edges, chill, then bake at 375°F for 15 minutes followed by 350°F for 10-15 minutes until golden and tender.
Can I make Apple Blossom Tarts ahead of time?
Yes, prep ingredients like apples, sugar mixture, dough, and egg wash up to 24 hours in advance. Assemble tarts ahead and chill for up to 8 hours, or freeze for longer storage, ensuring they stay fresh and ready for baking when needed.
How should I store Apple Blossom Tarts?
Store prepped ingredients in the fridge for up to 24 hours and assembled tarts for up to 8 hours. For baked tarts, refrigerate for up to 3 days or freeze for up to a month. Reheat in the oven at 350°F to restore crispness and flavor.