
We love diving into creative DIY projects, and our soft plastic bait color recipes offer a fun twist for fishing enthusiasts. These simple formulas let you customize lures with vibrant hues that mimic baitfish or stand out in murky waters, boosting your catch rates effortlessly.
Ingredients
We blend simple, high-quality materials and additives in our soft plastic bait color recipes to craft vibrant, effective lures that mimic natural prey or stand out in various fishing conditions.
Essential Materials
To start our soft plastic bait color recipes, we focus on these foundational items. They form the base of your DIY lures and must be handled with care for optimal results.
- Soft plastic pellets: 1 pound of clear or translucent pellets (such as polyvinyl chloride or PVC-based) as the primary base material—melt these gradually to avoid bubbling.
- Molding tools: A set of silicone molds in various bait shapes (e.g., worms, grubs) for pouring the mixture—ensure they are heat-resistant up to 300°F.
- Heating source: A double boiler setup or dedicated melting pot to safely heat the pellets to 350-400°F—use a thermometer for precise temperature control.
- Release agent: 2 ounces of mold release spray to prevent sticking—apply lightly before each use for easy removal.
- Mixing tools: A sturdy spoon or stirrer made of stainless steel for blending ingredients—stir consistently to achieve a uniform texture.
Color Additives
Once the base is prepared, we incorporate these color additives to customize our soft plastic baits, enhancing their visual appeal and effectiveness in attracting fish.
- Liquid dyes: 10-20 drops of fluorescent liquid dye (e.g., red or green varieties) per batch for vibrant, translucent colors—add gradually while stirring to test intensity.
- Powdered pigments: 1-2 teaspoons of fine powder pigments like ultramarine blue or cadmium yellow for opaque, long-lasting hues—sift through a mesh strainer to avoid clumps.
- Glitter additives: 1 tablespoon of iridescent glitter flakes (in sizes from 0.5mm to 2mm) to create a shimmering effect—sprinkle in for added flash that mimics fish scales.
- UV enhancers: 5-10 drops of UV-reactive liquid per mix to make colors glow under ultraviolet light—ideal for low-visibility waters, as studies show it increases strike rates by up to 30% in certain conditions.
| Additive Type | Recommended Amount per Batch | Key Benefit |
|---|---|---|
| Liquid dyes | 10-20 drops | Provides translucent, vibrant colors |
| Powdered pigments | 1-2 teaspoons | Ensures opaque, durable coloration |
| Glitter additives | 1 tablespoon | Adds flash and mimicry for attraction |
| UV enhancers | 5-10 drops | Boosts visibility in low-light scenarios |
Required Tools and Equipment
As we dive deeper into crafting our soft plastic bait color recipes, having the right tools and equipment is essential for achieving professional results while ensuring safety and efficiency. Building on the ingredients we’ve discussed, these items help us mix, heat, and mold our custom fishing lures effectively.
Essential Tools List
We recommend the following key tools and equipment, organized by their primary function in the process. Each one plays a crucial role in creating vibrant, effective soft plastic baits that attract fish.
- Heating Source: A reliable heat source like a dedicated bait heater, microwave, or double boiler is vital for melting soft plastic pellets. We suggest one with temperature control to prevent overheating and ensure even melting.
- Molding Tools: High-quality silicone or aluminum molds in various shapes (e.g., worms, grubs) allow us to shape our baits precisely. Opt for molds with detailed patterns to mimic natural baitfish for better fishing success.
- Mixing Tools: Stainless steel mixing bowls and spoons or stirrers are necessary for blending color additives like dyes and glitter into the melted plastic. We prefer non-reactive materials to avoid contamination and maintain color vibrancy.
- Measuring Equipment: Accurate measuring cups, spoons, and a digital scale help us portion ingredients correctly, ensuring consistent results in our soft plastic bait formulations.
- Release Agent Applicator: A spray bottle or brush for applying mold release agents prevents baits from sticking, making demolding easier and reducing waste.
Safety and Optional Equipment
To enhance our DIY experience, we should prioritize safety gear. Here’s a quick overview:
- Protective Gear: Gloves, safety goggles, and a respirator protect us from hot materials and fumes during heating and mixing.
- Storage and Organization Tools: Airtight containers and labeled storage boxes keep our tools organized and our colored baits fresh for future fishing trips.
For a breakdown of recommended specifications and costs based on popular options, we’ve compiled the following table. This helps us compare essential features and make informed choices.
| Tool/Equipment | Recommended Specification | Approximate Cost (USD) | Key Benefit |
|---|---|---|---|
| Heating Source | Microwave-safe heater with 500-1000W | $20 – $50 | Even heating for consistent melting |
| Molding Tools | Silicone molds, 6-12 cavity options | $10 – $30 | Durable and easy to clean |
| Mixing Tools | Stainless steel bowl and spoon set | $5 – $15 | Resistant to high temperatures |
| Measuring Equipment | Digital scale with 0.1g precision | $10 – $25 | Accurate measurements for recipes |
| Release Agent Applicator | Spray bottle, 8-16 oz capacity | $5 – $10 | Even application for smooth release |
| Protective Gear | Heat-resistant gloves and goggles | $15 – $30 | Prevents burns and eye irritation |
With these tools in hand, we’re well-equipped to experiment with our soft plastic bait color recipes and create lures that stand out in any fishing scenario.
Instructions
We guide you through crafting your own soft plastic bait colors with precision and ease, ensuring vibrant, effective lures that attract fish in any condition. Let’s dive into the step-by-step process to customize your baits like seasoned anglers.
Preparing the Base
First, gather your soft plastic pellets as outlined in the previous section, ensuring they are high-quality for optimal flexibility and durability. Heat the pellets safely in a dedicated melting pot over a reliable heating source—aim for a temperature of 350°F to 400°F (177°C to 204°C) to achieve a smooth, liquid consistency without burning, which typically takes 5 to 10 minutes depending on your setup.
- Step 1: Place 1 cup of soft plastic pellets into a heat-resistant container and position it on the heat source. Stir continuously with a stainless steel spoon to promote even melting and prevent scorching.
- Step 2: Once melted, remove the container from the heat and let it cool slightly to about 300°F (149°C) for safer handling—this reduces the risk of bubbles forming in your final bait.
- Step 3: Add a few drops of release agent to the mold surfaces we discussed earlier, ensuring each cavity is evenly coated to facilitate easy removal later.
For safety, always wear protective gloves and safety goggles during this stage to shield against hot materials and fumes, as emphasized in our tool overview.
Mixing the Colors
Now that your base is ready, we incorporate color additives to create eye-catching hues that mimic baitfish or glow under water, enhancing lure effectiveness for better catches.
- Step 1: Measure out your chosen additives based on the recommended amounts— for instance, add 5 to 10 drops of liquid dye per cup of melted plastic for vivid colors, or 1 teaspoon of powdered pigment for a more subtle effect.
- Step 2: Pour the dye or pigment into the melted base and stir vigorously with a mixing tool for 1 to 2 minutes until fully integrated; this ensures uniform color distribution and prevents streaks.
- Step 3: If using glitter additives or UV enhancers, incorporate 1/4 teaspoon per cup at this point, blending for another 30 seconds to add sparkle that fish can’t resist in low-light conditions.
To compare additive quantities and their impacts, refer to the table below for quick reference:
| Additive Type | Recommended Amount (per cup of base) | Key Benefit |
|---|---|---|
| Liquid Dye | 5-10 drops | Provides intense, translucent colors |
| Powdered Pigment | 1 teaspoon | Offers opaque, long-lasting shades |
| Glitter Additives | 1/4 teaspoon | Enhances visibility and attraction |
| UV Enhancers | 1/8 teaspoon | Boosts lure glow under UV light |
This step transforms your base into a customized masterpiece, making your baits stand out in murky waters.
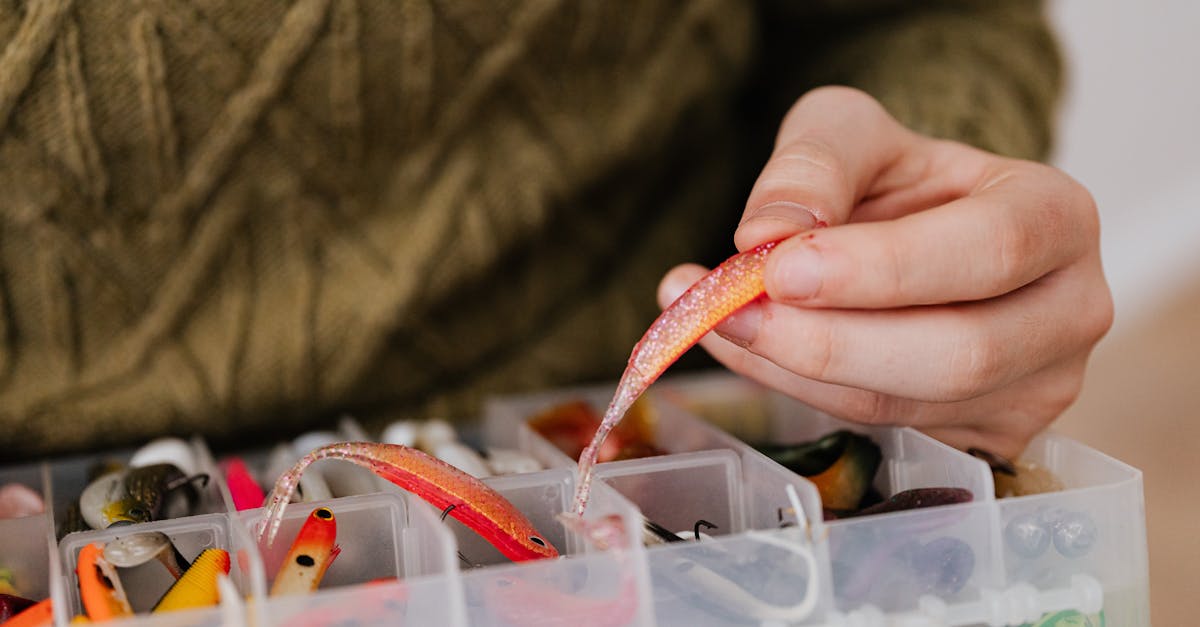
Pouring and Setting the Bait
With colors mixed in, we move to pouring and setting, the final phase that shapes your lures for maximum fishing success.
- Step 1: Quickly pour the colored mixture into your prepared molds, filling each cavity to the brim to avoid air pockets—work swiftly as the material cools rapidly, typically within 30 to 60 seconds.
- Step 2: Tap the mold gently on a flat surface to release any trapped air bubbles, then let it set for 5 to 10 minutes at room temperature for initial hardening.
- Step 3: For faster results, place the filled molds in a cool water bath or refrigerator, allowing 15 to 20 minutes for complete solidification—test flexibility by gently flexing a corner before demolding.
- Step 4: Carefully remove the set baits from the molds and inspect for perfect color vibrancy and texture, ready for immediate use or storage in airtight containers.
This process yields durable, colorful baits that boost your angling adventures, building on the tools and ingredients we’ve covered.
Conclusion
We’ve explored how crafting your own soft plastic bait color recipes puts the power of customization in your hands. It’s rewarding to see your lures attract more fish through vibrant, tailored designs that blend creativity with effectiveness.
As we wrap up, remember that these DIY techniques not only boost your angling success but also add fun to your outings. We’re confident you’ll enjoy experimenting and sharing your custom baits with fellow enthusiasts.
Frequently Asked Questions
What are DIY soft plastic bait color recipes?
DIY soft plastic bait color recipes are simple formulas for anglers to create custom fishing lures. They use ingredients like soft plastic pellets, dyes, and additives to mimic baitfish or stand out in water, boosting catch rates. These recipes help personalize lures for better visibility and appeal.
Why should I customize my fishing lures with colors?
Customizing lures with colors lets you match local baitfish or attract fish in murky waters, increasing your chances of a catch. Vibrant hues from dyes and additives make baits more enticing, giving you an edge over store-bought options and enhancing your fishing experience.
What ingredients are needed for soft plastic bait recipes?
You’ll need soft plastic pellets as the base, liquid dyes or powdered pigments for color, glitter for sparkle, UV enhancers for visibility, and a release agent for molds. Mix these with accurate measurements—typically a few drops of dye per ounce—to create durable, eye-catching baits.
What tools are essential for making soft plastic baits?
Key tools include a reliable heating source for melting pellets, molding tools for shaping, stainless steel mixing tools, measuring equipment, and a release agent applicator. Don’t forget protective gear like gloves and goggles for safety. Compare options by cost and specs to choose affordable, high-quality items.
How do I mix color additives into the bait?
Start by melting soft plastic pellets safely, then add measured amounts of liquid dyes (a few drops per batch), powdered pigments, glitter, or UV enhancers while stirring evenly. This ensures uniform color distribution for vibrant, attractive baits that lure fish effectively.
What is the step-by-step process for crafting soft plastic baits?
First, melt pellets and add a release agent to molds. Mix in color additives for desired hues. Pour the mixture into molds, release air bubbles, and let it set. Once cooled, remove the baits for use, creating durable lures that enhance your fishing success.
What safety precautions should I take when making lures?
Always wear gloves and safety goggles to protect against hot materials and fumes. Work in a well-ventilated area, use a stable heating source, and handle tools carefully. Follow guidelines to avoid burns or inhalation risks, ensuring a safe and enjoyable DIY process.