
Ever stumbled upon a dish that sounds as intriguing as it tastes? Let’s dive into the delightful world of Bags of Gold—a unique recipe that’s as fun to make as it is to eat. Originating from creative home kitchens, this dish transforms simple ingredients into little pouches of pure joy, often filled with savory or sweet surprises that burst with flavor in every bite.
We’re thrilled to share this hidden gem with you because it’s not just about the taste—it’s about the experience. Picture yourself folding delicate dough into tiny treasure sacks, sealing in delicious fillings that’ll have everyone guessing what’s inside. It’s a perfect recipe for family gatherings or a cozy night in.
What Are Bags of Gold?
We’re thrilled to dive deeper into the enchanting world of Bags of Gold, a recipe that transforms humble ingredients into delightful little pouches of joy. These treasure sacks aren’t just food; they’re an experience, blending creativity and flavor into every bite. Whether you’re a seasoned home cook or a curious beginner, understanding the essence of Bags of Gold will inspire you to create these whimsical treats for your next gathering.
The Concept Behind Bags of Gold
At their core, Bags of Gold are small dough pouches stuffed with either savory or sweet fillings, resembling tiny sacks tied at the top. Think of them as edible gift bags hiding a surprise inside—be it a burst of cheesy goodness or a sweet fruit medley. We love how this dish sparks imagination, letting us play with flavors while crafting something visually stunning. Historically, similar concepts appear in various cuisines, often symbolizing wealth or good fortune, which ties into the playful name of these treasure-filled pouches.
Why We Adore Bags of Gold
What makes Bags of Gold so special to us is their versatility and the sheer fun of making them. You can customize the fillings to suit any palate—think spicy meat mixtures for dinner or cinnamon-apple blends for dessert. Beyond taste, the process of shaping and tying each bag feels like crafting a tiny masterpiece. They’re perfect for family cooking sessions or as a unique appetizer at parties, ensuring everyone remembers your culinary creativity. As we often say, “It’s not just a dish; it’s a memory in the making!”
A Peek at the Sensory Magic
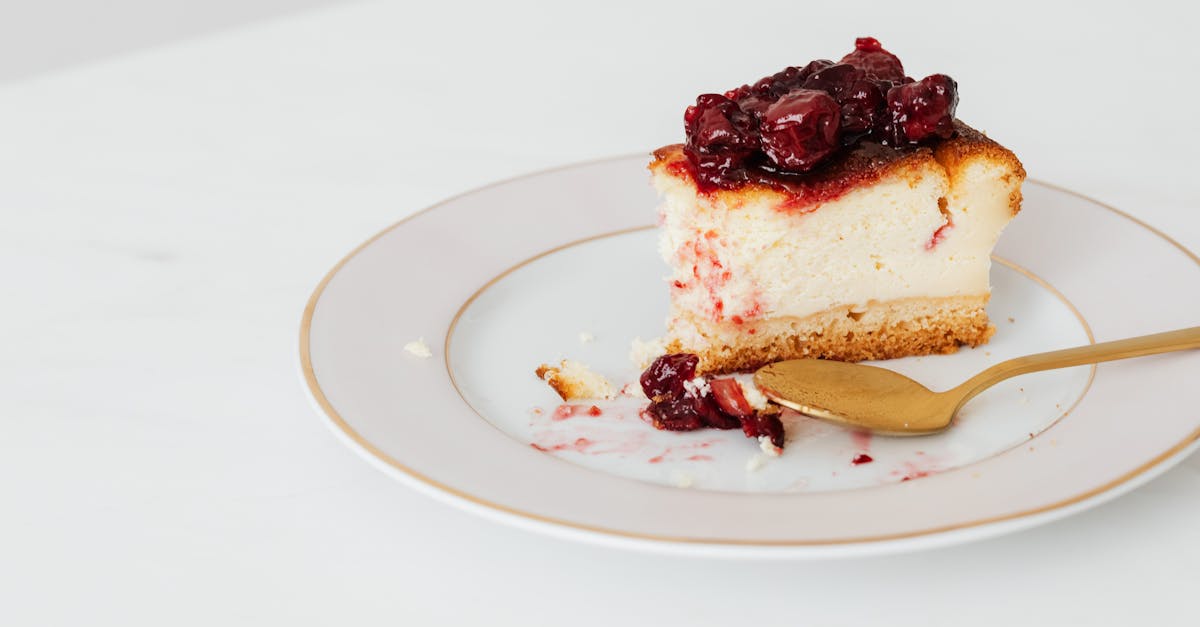
Picture this: golden-brown pouches fresh from the oven, their crisp exteriors giving way to a warm, aromatic filling. The scent of buttery dough mingles with hints of herbs or sugar, teasing your senses before you even take a bite. When you finally untie or break into a Bag of Gold, the steam escapes, revealing a treasure of flavors—perhaps a tangy cheese blend or a gooey chocolate center. We guarantee the texture contrast between the flaky outside and soft inside will leave you craving more.
Quick Facts About Bags of Gold
To give you a clearer picture of why Bags of Gold are a must-try, we’ve compiled some key details in the table below:
| Aspect | Details |
|---|---|
| Origin Inspiration | Influenced by global dumpling and pastry traditions |
| Preparation Time | Approximately 45 minutes |
| Serving Size | Makes about 12-15 small pouches |
| Customization | Endless filling options—savory or sweet |
| Best For | Family gatherings, parties, cozy nights |
With these insights, we’re confident you’ll see why Bags of Gold are more than just a recipe—they’re a delightful journey of taste and creativity. Let’s carry this excitement forward as we explore how to craft these treasures step by step in the upcoming sections.
Ingredients for Bags of Gold Recipe
Let’s dive into the heart of our Bags of Gold recipe by gathering all the essentials. We’re excited to share the precise components needed to craft these delightful treasure pouches that promise bursts of flavor in every bite.
Dough Ingredients
To create the perfect golden sacks for our Bags of Gold, we need a simple yet sturdy dough. Here’s what you’ll need (measurements are exact for best results):
- 2 cups all-purpose flour (sifted for a smoother texture)
- 1 teaspoon salt
- 1 large egg (beaten for binding)
- 1/2 cup water (lukewarm to help with kneading)
- 2 tablespoons unsalted butter (melted for richness)
Filling Ingredients
The magic of our Bags of Gold lies in the surprise fillings! We’re offering a versatile mix of savory and sweet options to cater to all tastes. Feel free to customize based on your preferences.
- Savory Filling Option:
- 1 cup ground beef or chicken (pre-cooked and seasoned)
- 1/2 cup finely chopped onions (sautéed for flavor)
- 1/4 cup shredded cheddar cheese (optional for creaminess)
- 1 teaspoon garlic powder
- Salt and pepper to taste
- Sweet Filling Option:
- 1/2 cup cream cheese (softened for easy mixing)
- 1/4 cup powdered sugar
- 1/4 cup chopped nuts or dried fruit (like raisins or walnuts for texture)
- 1/2 teaspoon vanilla extract
Pro Tip: “Mix and match fillings to create your own unique Bags of Gold. Experiment with spices or seasonal ingredients to make these pouches truly yours!”
With these ingredients ready, we’re all set to transform simple components into golden treasures that will captivate your senses with their aroma and taste.
Essential Tools and Equipment
When crafting the delightful Bags of Gold, having the right tools and equipment at hand ensures a smooth and enjoyable cooking experience. We’re excited to guide you through the must-have items that will help transform simple ingredients into these whimsical treasure sacks. From mixing the dough to shaping and cooking your golden pouches, each tool plays a vital role in bringing this recipe to life. Let’s dive into the essentials that will make your kitchen adventure a success.
Must-Have Kitchen Tools
To create the perfect Bags of Gold, we rely on a curated set of tools that streamline the process. Here’s what you’ll need:
- Mixing Bowl: A medium to large bowl is crucial for combining the dough ingredients. Opt for a sturdy one to handle vigorous mixing.
- Measuring Cups and Spoons: Precision is key for the dough and fillings. Use these to measure out flour, water, and seasonings accurately.
- Rolling Pin: Essential for rolling out the dough into thin, even sheets. A wooden or silicone pin works best for control.
- Sharp Knife or Dough Cutter: Perfect for dividing the dough into uniform pieces to form your tiny treasure sacks.
- Spoon or Small Scoop: Handy for portioning out savory or sweet fillings into each pouch.
- Parchment Paper or Silicone Mat: Line your workspace or baking tray to prevent sticking and make cleanup a breeze.
- Pastry Brush: Useful for brushing melted butter or egg wash over the Bags of Gold for that irresistible golden sheen.
Cooking Equipment
Once your Bags of Gold are shaped and filled with delightful surprises, the right equipment ensures they cook to perfection. Here’s our go-to gear:
- Large Pot or Deep Fryer: If frying, a deep pot or fryer is ideal for achieving that crispy, golden-brown exterior. Ensure it’s deep enough to submerge the pouches safely.
- Baking Sheet: For baking, a sturdy sheet lined with parchment paper works wonders to cook multiple treasure sacks evenly.
- Oven or Stovetop: Depending on your cooking method, preheat your oven to 375°F (190°C) for baking or maintain medium-high heat on the stovetop for frying.
- Slotted Spoon or Tongs: Essential for safely removing the Bags of Gold from hot oil or transferring them from the baking sheet.
- Cooling Rack: Allow your golden pouches to cool slightly after cooking, preserving their crisp texture without sogginess.
Optional but Helpful Gadgets
While not mandatory, these extras can elevate your Bags of Gold making experience to a whole new level:
- Food Processor: Speeds up the preparation of fillings, especially for savory mixes like ground meat or chopped veggies.
- Dough Scraper: Makes handling sticky dough easier and helps with clean cuts for uniform pouches.
- Thermometer: A candy or oil thermometer ensures the frying oil is at the perfect temperature—around 350°F (175°C)—for even cooking.
Quick Reference Table for Cooking Specs
| Equipment | Purpose | Ideal Specification |
|---|---|---|
| Oven | Baking Bags of Gold | Preheat to 375°F (190°C) |
| Frying Oil Temperature | Frying for crispy texture | Maintain at 350°F (175°C) |
| Mixing Bowl Size | Combining dough ingredients | Medium to Large (4-6 quarts) |
Instructions for Bags of Gold Recipe
Let’s dive into the heart of creating our delightful Bags of Gold recipe. Follow these step-by-step instructions to craft these whimsical pouches filled with savory or sweet surprises.
Prep the Dough
First, we need to create the foundation of our Bags of Gold. Gather your ingredients and tools to make a soft and pliable dough that will hold our treasures securely.
- In a large mixing bowl, combine 2 cups of all-purpose flour, 1 tsp of salt, and 1 tbsp of sugar for a balanced base.
- Cut in 4 tbsp of cold unsalted butter using a pastry cutter or your fingers until the mixture resembles coarse crumbs.
- Gradually add 3/4 cup of cold water, mixing with a wooden spoon or your hands until a dough forms. Avoid overworking it to keep the texture tender.
- Knead the dough on a lightly floured surface for about 2-3 minutes until smooth.
- Wrap the dough in plastic wrap and let it rest in the refrigerator for at least 30 minutes. This step ensures easier rolling and shaping later.
Tip: Keep the dough chilled until ready to use for the best results in achieving that golden flaky texture.
Prepare the Filling
Let’s whip up the filling that makes our Bags of Gold truly shine. Whether you opt for savory or sweet, customize to your heart’s content.
- For a savory option, mix 1 cup of cooked ground beef or chicken, 1/2 cup of finely chopped onions, 1/4 cup of peas, and 1 tsp of garlic powder in a bowl. Season with salt and pepper to taste.
- For a sweet variation, combine 1 cup of ricotta cheese, 1/4 cup of powdered sugar, and 1 tsp of vanilla extract. Add 1/4 cup of mini chocolate chips or chopped fruit for an extra treat.
- Stir your chosen filling until well blended and set aside. Ensure it’s not too wet to prevent soggy dough.
Note: Experiment with fillings like spiced lentils or fruit compote to surprise your guests with every bite of these treasure sacks.
Assemble the Bags of Gold
Here comes the fun part—shaping our Bags of Gold into tiny pouches of joy. This step lets your creativity flow as you seal in the delicious fillings.
- Roll out the chilled dough on a floured surface to a thickness of about 1/8 inch.
- Using a round cutter or a glass, cut out circles approximately 3-4 inches in diameter.
- Place 1-2 tsp of filling in the center of each circle. Be careful not to overfill to avoid leakage during cooking.
- Fold the dough over the filling to create a half-moon shape then pinch the edges tightly to seal. Alternatively, gather the edges upward to form a small pouch and twist gently to mimic a treasure sack.
- Place the assembled pouches on a parchment-lined baking sheet and brush lightly with a beaten egg for a golden sheen.
Pro Tip: If the dough tears, patch it with a small piece of extra dough and pinch to seal for a flawless finish.
Cook the Bags of Gold
Finally, let’s bring our Bags of Gold to life with the perfect cooking method. Choose between frying for a crispy exterior or baking for a lighter touch.
- For frying, heat 2-3 inches of vegetable oil in a deep pot or fryer to 350°F. Use a thermometer for precision.
- Carefully lower 3-4 pouches at a time into the hot oil and fry for 2-3 minutes per side or until golden brown and crisp.
- For baking, preheat your oven to 375°F. Place the pouches on a baking sheet and bake for 15-20 minutes or until they achieve a beautiful golden hue.
- Remove from oil or oven and let them cool on a wire rack for 5 minutes before serving to avoid burning your mouth on the hot filling.
| Cooking Method | Temperature | Time | Texture Result |
|---|---|---|---|
| Frying | 350°F | 2-3 mins per side | Crispy and golden |
| Baking | 375°F | 15-20 minutes | Light and golden-brown |
Serving Suggestion: Serve these Bags of Gold hot with a dipping sauce or dusting of powdered sugar to enhance the burst of flavors from the aromatic fillings. Smell the enticing aroma as you break open a pouch and enjoy the contrast of the crisp exterior with the warm tender filling inside.
Serving Suggestions
Dive into the delightful world of Bags of Gold with us as we explore the best ways to present and enjoy these whimsical pouches. Serving these golden treasures isn’t just about placing them on a plate; it’s about creating an experience that tantalizes the senses and sparks joy. Whether you’re hosting a family gathering or enjoying a cozy night in, our Bags of Gold can shine as the star of the show with the right pairings and presentations. Let’s elevate your culinary adventure with these creative and mouthwatering ideas.
Perfect Pairings for Every Palate
Enhance the flavors of your Bags of Gold by pairing them with complementary dips and sauces. For savory pouches filled with meats or veggies, consider offering a trio of dipping sauces like tangy marinara, creamy garlic aioli, or spicy sriracha mayo. These add an extra layer of excitement to every bite. If you’ve opted for sweet fillings, a drizzle of warm chocolate sauce or a side of vanilla custard can transform your Bags of Gold into an irresistible dessert. Don’t shy away from experimenting—try a zesty citrus glaze for a refreshing twist.
For a complete meal experience, serve savory Bags of Gold alongside a crisp green salad or a bowl of steaming soup. The contrast of textures and temperatures will delight your guests. On the sweeter side, pair dessert pouches with a scoop of vanilla ice cream or a handful of fresh berries for a burst of color and flavor. As we always say, “The magic of Bags of Gold lies in their versatility—make them your own!”
Presentation Tips for Wow Factor
Turn your Bags of Gold into a visual feast with thoughtful presentation. Serve them hot straight from the fryer or oven on a rustic wooden platter dusted with a sprinkle of powdered sugar for sweet versions or fresh herbs for savory ones. Arrange them in a circle with a small bowl of dipping sauce in the center for an inviting look. For a fun twist, tie each pouch with a thin strand of edible twine or chive to mimic a real treasure sack—your guests will love the creativity!
If you’re hosting a party, set up a Bags of Gold station** where guests can mix and match fillings and dips. Label each option with cute handwritten cards for a personal touch. We recommend serving them in small batches to keep them warm and crispy—nothing beats that first bite of a freshly cooked pouch bursting with flavor.
Ideal Occasions and Portion Guide
Our Bags of Gold are perfect for any occasion, from casual weeknight dinners to festive celebrations. They’re a hit at holiday gatherings, symbolizing wealth and good fortune, or as a unique appetizer for birthday parties. For a cozy vibe, enjoy them during a movie night with loved ones, paired with your favorite hot beverage.
To help you plan, we’ve created a quick guide for portion sizes based on the type of event:
| Occasion | Serving Size per Person | Suggested Pairings |
|---|---|---|
| Appetizer at Dinner | 2-3 Bags of Gold | Dipping sauces and light salad |
| Main Course | 4-5 Bags of Gold | Soup or hearty side dish |
| Dessert | 2-3 Bags of Gold | Ice cream or fruit compote |
| Party Snack | 3-4 Bags of Gold | Variety of dips for sharing |
Temperature and Timing Tips
Serve your Bags of Gold at the right temperature to maximize their appeal. Savory pouches are best enjoyed piping hot, straight from the fryer or oven, to maintain their crispy exterior and melty interior. Sweet versions can be served warm to highlight the gooey fillings like chocolate or fruit jam. If you’ve prepared them ahead, reheat in a 350°F oven for 5-7 minutes to revive their texture—avoid microwaving as it can make them soggy.
Time your serving to coincide with the peak of their freshness. We suggest cooking them just before your guests arrive or staggering the batches during an event. This ensures everyone gets to experience the Bags of Gold at their absolute best—crisp, aromatic, and bursting with surprises.
Make-Ahead and Storage Tips
When it comes to enjoying Bags of Gold, a little planning can go a long way. We know how busy life can get, so we’ve compiled essential tips to help you prepare these delightful pouches ahead of time and store them properly. Whether you’re hosting a party or simply craving a quick treat, our make-ahead strategies and storage advice ensure that your Bags of Gold remain as fresh and flavorful as the day they were made. Let’s dive into how to keep these golden treasures ready for any occasion.
Preparing Bags of Gold in Advance
To save time on busy days, we recommend preparing your Bags of Gold in advance. Follow these steps to ensure they retain their charm and texture:
- Dough Preparation: Make the dough up to 24 hours ahead. After kneading, wrap it tightly in plastic wrap and store it in the refrigerator. This keeps it fresh and ready to roll out when you’re set to assemble.
- Filling Ahead: Prepare your savory or sweet fillings a day in advance. Store them in airtight containers in the fridge to maintain their flavors. For savory fillings like spiced meat or cheese, ensure they cool completely before sealing to avoid sogginess.
- Assembly Option: Assemble the Bags of Gold pouches without cooking them. Place the filled pouches on a parchment-lined tray, ensuring they don’t touch. Cover with plastic wrap and refrigerate for up to 12 hours. This method is perfect for last-minute frying or baking.
- Freezing for Later: For longer storage, freeze the assembled but uncooked pouches. Lay them in a single layer on a baking sheet until frozen solid (about 2 hours) then transfer to a freezer-safe bag. They can be stored for up to 2 months. When ready to cook, no thawing is needed—just add an extra minute or two to the cooking time.
“Planning ahead with Bags of Gold turns a delightful recipe into a stress-free experience!”
Cooking and Reheating Tips
If you’ve made your Bags of Gold ahead of time or have leftovers, reheating them correctly is key to preserving their crispy exterior and warm, flavorful centers. Here’s how we do it:
- Pre-Cooked Pouches: If you’ve frozen or refrigerated assembled pouches, cook them straight from their chilled state. For frying, heat oil to 350°F and fry for 3-4 minutes until golden brown. For baking, preheat your oven to 375°F and bake for 12-15 minutes or until they achieve that perfect golden-brown hue.
- Reheating Cooked Bags of Gold: To revive leftover cooked pouches, avoid the microwave as it can make them soggy. Instead, reheat in a preheated oven at 350°F for 5-7 minutes or until warmed through. This method keeps the texture crisp and delightful.
- Quick Tip: Sprinkle a tiny bit of water over the pouches before reheating in the oven to prevent them from drying out. This little trick helps maintain their tender yet crispy appeal.
Storage Guidelines for Freshness
Proper storage ensures that your Bags of Gold stay as irresistible as when they first came out of the kitchen. We’ve put together a handy table to guide you on how to store them based on their state—raw or cooked.
| State of Bags of Gold | Storage Method | Location | Duration | Tips for Best Results |
|---|---|---|---|---|
| Raw (Assembled) | Refrigerate in airtight wrap | Refrigerator | Up to 12 hours | Keep on a tray in a single layer to avoid sticking. |
| Raw (Assembled) | Freeze in freezer-safe bag | Freezer | Up to 2 months | Freeze on a tray first then transfer to bag. |
| Cooked | Store in airtight container | Refrigerator | Up to 3 days | Cool completely before sealing to prevent sogginess. |
| Cooked | Freeze in freezer-safe bag | Freezer | Up to 1 month | Reheat in oven for best texture; avoid microwaving. |
Additional Notes on Storage
We always prioritize flavor and safety when storing our Bags of Gold. Label your containers or bags with the date to keep track of freshness. If freezing, consider portioning them into smaller batches so you only thaw what you need. For cooked pouches, avoid stacking them too closely in storage to prevent them from sticking together or losing their crisp exterior. With these tips, we’re confident you’ll enjoy the same burst of flavor and texture every time you indulge in these golden treasures.
Conclusion
We hope you’re as excited as we are to dive into the delightful world of Bags of Gold. This recipe isn’t just about creating a tasty dish—it’s about crafting memories with every pouch you fill and share.
Whether you’re planning a festive gathering or a quiet evening at home, these little treasures are sure to impress. So grab your ingredients, unleash your creativity, and let’s make every bite a golden moment!
Frequently Asked Questions
What are Bags of Gold?
Bags of Gold are small dough pouches filled with either savory or sweet surprises. Resembling tiny sacks, they symbolize wealth and good fortune in various cultures. Their versatility allows for endless customization, making them perfect for any meal or dessert.
How long does it take to prepare Bags of Gold?
Preparation time for Bags of Gold typically ranges from 30 to 60 minutes, depending on the complexity of the fillings and cooking method. This includes making the dough, preparing fillings, assembling the pouches, and cooking them either by frying or baking.
What ingredients are needed for Bags of Gold?
Essential ingredients for Bags of Gold include flour, water, and a pinch of salt for the dough. Fillings can vary widely, from savory options like cheese and meat to sweet choices like fruit or chocolate. Specific recipes may call for additional seasonings or binders.
Can Bags of Gold be made ahead of time?
Yes, you can prepare Bags of Gold in advance. Make the dough and fillings ahead, assemble the pouches, and store them uncooked in the fridge for a day or freeze them for longer storage. Cook or reheat just before serving for the best texture.
What are the best cooking methods for Bags of Gold?
Bags of Gold can be fried for a crispy, golden texture or baked for a lighter option. Frying typically takes a few minutes per batch in hot oil, while baking requires about 15-20 minutes at a moderate oven temperature for even cooking.
What are some creative filling ideas for Bags of Gold?
Try savory fillings like spiced ground meat, cheese with herbs, or veggies. For sweet versions, consider chocolate, fruit jams, or sweetened cream cheese. The possibilities are endless, allowing you to experiment with flavors that suit your taste or occasion.
How should Bags of Gold be served?
Serve Bags of Gold hot for the best experience. Pair savory ones with dipping sauces like marinara or garlic aioli, and sweet ones with powdered sugar or chocolate drizzle. Create a visual feast by arranging them on a platter or setting up a serving station.
Can Bags of Gold be frozen?
Yes, uncooked Bags of Gold can be frozen for up to a month. Assemble the pouches, place them on a tray to freeze individually, then transfer to a freezer bag. Cook directly from frozen, adding a few extra minutes to the cooking time.
What kitchen tools are essential for making Bags of Gold?
Key tools include mixing bowls, measuring cups, a rolling pin, and baking sheets for preparation. For cooking, you’ll need a pot or deep fryer for frying, or an oven for baking. Optional gadgets like food processors can speed up the process.
Are Bags of Gold suitable for special occasions?
Absolutely! Bags of Gold are ideal for family gatherings, cozy nights in, or festive events. Their customizable fillings and charming presentation make them a delightful addition to any occasion, whether as a main dish, appetizer, or dessert.