
We absolutely love cannoli bars as a fun twist on the classic Sicilian treat that’s been delighting dessert lovers for generations. These bars pack all the creamy ricotta goodness and crisp texture of traditional cannoli into an easy-to-share format that’s perfect for parties or cozy nights in.
In our kitchen we’ve simplified the process so you can whip up this Italian-inspired favorite without fuss. Whether you’re a baking newbie or a pro these bars will become a go-to recipe in no time.
Ingredients
To bring our irresistible Cannoli Bars to life—combining creamy ricotta goodness with a crisp base—we’ve curated this list of essential ingredients. We’ll organize them by category for clarity, noting any prep specifics as needed.
Crust Ingredients
- 2 cups graham cracker crumbs (we recommend crushing them finely for a sturdy base)
- 1/2 cup unsalted butter, melted (ensure it’s at room temperature for even mixing)
- 1/4 cup granulated sugar (use fine-grain for better dissolution)
Filling Ingredients
- 2 cups whole milk ricotta cheese, drained (press through a fine mesh sieve to remove excess moisture and achieve a smooth texture)
- 1 cup powdered sugar (sifted to avoid lumps and ensure a velvety consistency)
- 1 teaspoon pure vanilla extract (opt for high-quality for enhanced flavor depth)
- 1/2 cup mini chocolate chips (semi-sweet variety works best to balance the sweetness)
- Zest of 1 orange (freshly grated for a bright, citrusy note that elevates the traditional cannoli taste)
- 1/4 cup chopped pistachios (toasted lightly for added crunch and nutty aroma, if desired for topping)
Optional Add-Ins
- 1/2 teaspoon ground cinnamon (sprinkle into the filling for a warm, authentic Sicilian twist)
- 1 large egg, beaten (for binding, if you’re adapting the recipe for a firmer bar)
Tools and Equipment
To prepare our delicious Cannoli Bars efficiently, we need a selection of essential tools and equipment. This ensures seamless mixing, baking, and assembly while maintaining the recipe’s simplicity. Below, we’ve organized the items into categories for clarity, helping us transition smoothly from gathering ingredients to hands-on preparation.
Baking Essentials
- 9×13-inch baking pan: This is crucial for creating the perfect bar thickness; grease it lightly for easy release.
- Mixing bowls: We recommend two sizes—one large for the filling and one medium for the crust—to keep ingredients separate and organized.
- Measuring cups and spoons: Accurate measurements are key to our Cannoli Bars’ success; use a set that includes both dry and liquid options for precision.
Mixing and Blending Tools
- Whisk or electric mixer: A whisk works wonders for blending the ricotta filling smoothly, or opt for an electric mixer if we want to speed up the process and achieve a creamy texture.
- Spatula: Essential for folding in mini chocolate chips and other add-ins without deflating the mixture.
- Food processor (optional): If we’re aiming for a finer crust, this tool helps pulse graham cracker crumbs quickly, though a sturdy bowl and spoon can substitute.
Other Necessary Items
- Oven thermometer: To guarantee even baking, we suggest using one to verify our oven is at the precise temperature required—typically 350°F for these bars.
- Refrigerator or freezer: Chilling the bars is vital for setting the filling; ensure we have space for at least 2 hours of cooling.
| Tool | Primary Use | Notes |
|---|---|---|
| 9×13-inch baking pan | Shaping and baking the bars | Non-stick preferred for ease |
| Mixing bowls | Combining ingredients | Glass or stainless steel for durability |
| Measuring cups/spoons | Precise ingredient measurement | Digital scales as an alternative for accuracy |
| Whisk or mixer | Blending filling | Hand whisk saves on cleanup |
| Spatula | Folding and spreading | Silicone for heat resistance |
| Food processor | Crumb preparation | Only if a finer texture is desired |
| Oven thermometer | Temperature accuracy | Essential for consistent results |
| Refrigerator | Chilling and setting | Freezer for faster cooling if needed |
Instructions
Let’s dive into creating our delicious Cannoli Bars, transforming simple ingredients into a creamy, crisp treat that’s perfect for any occasion. We guide you through each step with precision to ensure your bars turn out irresistible.
Prep Work
Before we start, gather and prepare our ingredients and tools for a seamless process. Preheat the oven to 350°F (175°C) to ensure even baking, and lightly grease a 9×13-inch baking pan with unsalted butter or cooking spray for easy release. Measure out graham cracker crumbs (2 cups), unsalted butter (1/2 cup, melted), and granulated sugar (1/4 cup) for the crust, while draining whole milk ricotta cheese (2 cups) in a fine-mesh sieve to remove excess moisture—this step enhances the filling’s silky texture. For the filling, zest one orange and chop any optional pistachios (1/4 cup) if using, and have ready powdered sugar (1 cup), vanilla extract (1 teaspoon), and mini chocolate chips (1/2 cup). This preparation sets the stage for our flavorful assembly.
Make the Crust
Now we build the base that provides the signature crisp contrast to the creamy filling. In a medium mixing bowl, combine 2 cups graham cracker crumbs, 1/2 cup melted unsalted butter, and 1/4 cup granulated sugar until the mixture resembles wet sand with a buttery aroma. Press this evenly into the greased 9×13-inch baking pan using the back of a spatula or your hands, ensuring a firm, even layer that will hold up to the rich filling. Bake in the preheated oven for 10 minutes until golden and fragrant, allowing the crust to set without over-browning for that perfect crunchy texture we love in Cannoli Bars.
Prepare the Filling
With the crust ready, we focus on crafting the heart of our Cannoli Bars—the luscious, velvety filling that captures the essence of traditional cannoli. In a large mixing bowl, beat 2 cups drained whole milk ricotta cheese with 1 cup powdered sugar and 1 teaspoon vanilla extract using a whisk or electric mixer on medium speed for 2-3 minutes until smooth and airy, with a light, creamy consistency that hints at subtle sweetness. Gently fold in 1/2 cup mini chocolate chips, the zest of one orange for a bright citrus note, and optional 1/4 cup chopped pistachios or 1/2 teaspoon ground cinnamon to add nutty and spiced layers of flavor. If you want firmer bars, mix in one beaten egg at this stage for added structure, ensuring everything blends without overmixing to preserve the filling’s delicate texture.
Assemble the Bars
It’s time to layer everything together, creating the shareable magic of our Cannoli Bars. Once the crust has cooled for 5 minutes, spread the prepared filling evenly over the top using a spatula, aiming for a uniform 1/2-inch thickness that covers the entire surface for balanced bites. Sprinkle an extra handful of mini chocolate chips or chopped pistachios on top for visual appeal and added crunch, pressing them lightly into the filling to secure them. This step transforms the components into a cohesive dessert with a tempting contrast of textures and flavors, ready for the final set.
Chill and Set
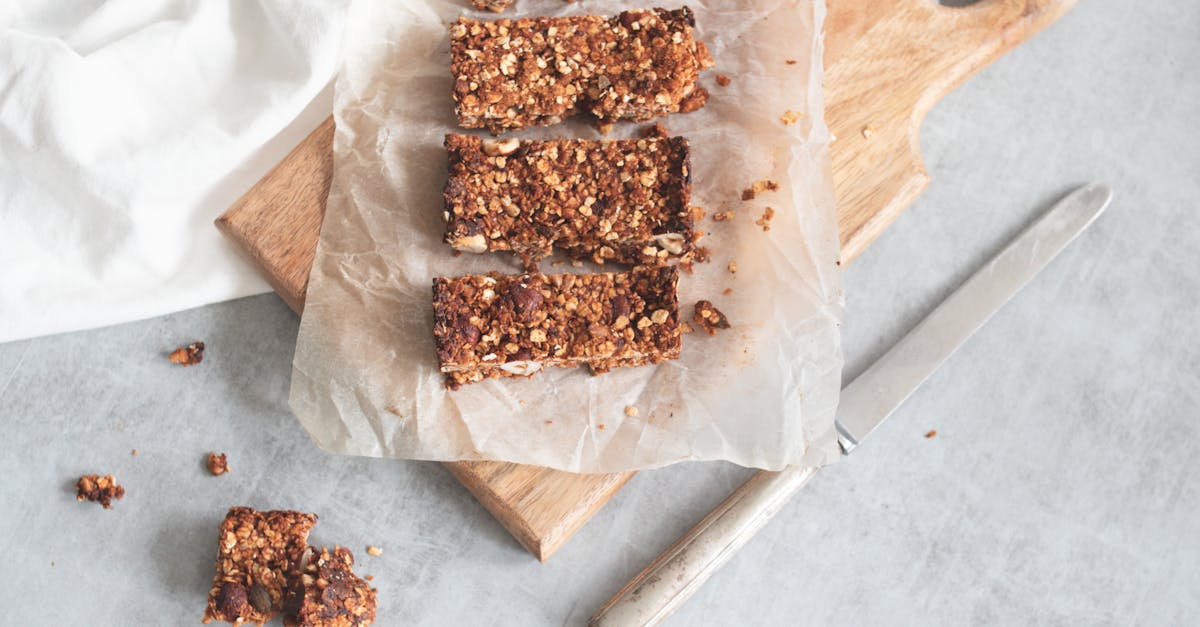
To achieve the perfect firm texture, we let our assembled bars chill and develop their full creamy profile. Transfer the pan to the refrigerator and chill for at least 2 hours, or for faster results, place it in the freezer for 30-45 minutes until the filling sets firmly without becoming icy. Once set, cut into squares using a sharp knife for clean edges, revealing the inviting layers that make these Cannoli Bars a crowd-pleaser.
Make-Ahead and Storage
One of the beauties of our Cannoli Bars is their flexibility for planning ahead, allowing you to enjoy that perfect blend of crisp crust and creamy ricotta filling without last-minute rush. We outline below how to prepare and store these bars to maintain their fresh taste and texture.
Make-Ahead Tips
To streamline your baking, make-ahead preparation lets you focus on other details for your gathering. We recommend starting with the crust, as it holds up well:
- Prepare the crust in advance: Mix and bake the graham cracker base up to 2 days ahead. Once cooled, wrap it tightly in plastic wrap and store at room temperature. This keeps the crisp texture intact, ensuring it doesn’t soften prematurely.
- Assemble the full bars: For maximum convenience, complete the entire recipe—including spreading the ricotta filling and chilling—up to 24 hours before serving. Cover the pan with plastic wrap or aluminum foil and refrigerate. In our experience, this step enhances the flavors, letting the orange zest and chocolate chips meld for a more vibrant taste.
- Chill strategically: Always chill the assembled bars for at least 4 hours in the refrigerator to set the filling properly. If you’re short on time, you can freeze the unbaked assembled bars for up to 1 week, then thaw in the fridge overnight before baking as directed.
Storage Guidelines
- Refrigeration for short-term: Store any leftovers in an airtight container in the refrigerator for up to 5 days. We suggest placing parchment paper between layers to avoid sticking, which helps retain the bars’ delightful crisp edges and prevents the filling from absorbing excess moisture.
- Freezing for longer storage: These bars freeze beautifully, making them ideal for meal prep. Wrap individual portions in plastic wrap, then place them in a freezer-safe bag or container. They can be frozen for up to 3 months without losing their signature texture—just thaw in the refrigerator for 2-3 hours before enjoying the renewed creamy richness.
| Storage Method | Duration | Key Tips |
|---|---|---|
| Refrigeration | Up to 5 days | Use airtight container; separate layers with parchment. |
| Freezing | Up to 3 months | Wrap tightly; thaw slowly in fridge to maintain texture. |
Conclusion
We’ve crafted this Cannoli Bars recipe to bring a touch of Sicilian charm into your kitchen with minimal fuss
It’s a delightful way to impress friends and family while enjoying the creamy crunch we all crave
Give it a try and make it your own—your next gathering won’t be the same without these tasty treats
Remember we’re here to inspire more baking adventures so stay tuned for more.
Frequently Asked Questions
What are Cannoli Bars?
Cannoli Bars are a modern twist on the classic Sicilian cannoli dessert. They combine the creamy ricotta filling and crispy texture into a shareable bar format, perfect for parties or casual nights. This simplified recipe makes it easy for beginners and pros alike to enjoy that authentic cannoli flavor without the hassle of individual shells.
What ingredients do I need for Cannoli Bars?
For the crust, you’ll need graham cracker crumbs, unsalted butter, and granulated sugar. The filling requires whole milk ricotta cheese, powdered sugar, vanilla extract, mini chocolate chips, orange zest, and optional add-ins like chopped pistachios or ground cinnamon. A beaten egg can help firm up the bars. All ingredients are straightforward and easy to find at most grocery stores.
What tools are required to make Cannoli Bars?
Essential tools include a 9×13-inch baking pan, mixing bowls, measuring cups and spoons, a whisk or electric mixer, and a spatula. An optional food processor helps with the crust, and an oven thermometer ensures accurate baking. Don’t forget space in your fridge or freezer for chilling. These items keep prep simple and efficient.
How do I prepare Cannoli Bars?
Start by preheating your oven and greasing the pan. Mix and bake the crust first, then prepare the filling by beating ricotta with sugar and vanilla, and folding in chips and zest. Spread the filling over the cooled crust and chill until set. Cut into squares for serving. The whole process is straightforward and takes about 30-45 minutes of active time.
Can I make Cannoli Bars ahead of time?
Yes, you can! Prepare the crust up to two days in advance and assemble the full bars up to 24 hours ahead to let flavors meld. This makes them ideal for events, as chilling enhances the texture. Just cover and refrigerate until ready to serve for the best results.
How should I store Cannoli Bars?
Store leftovers in an airtight container in the fridge for up to five days to keep them fresh. For longer storage, freeze the bars for up to three months—just wrap them tightly. Thaw in the fridge before enjoying to maintain their creamy texture and delicious taste. Always check for freshness before eating.