
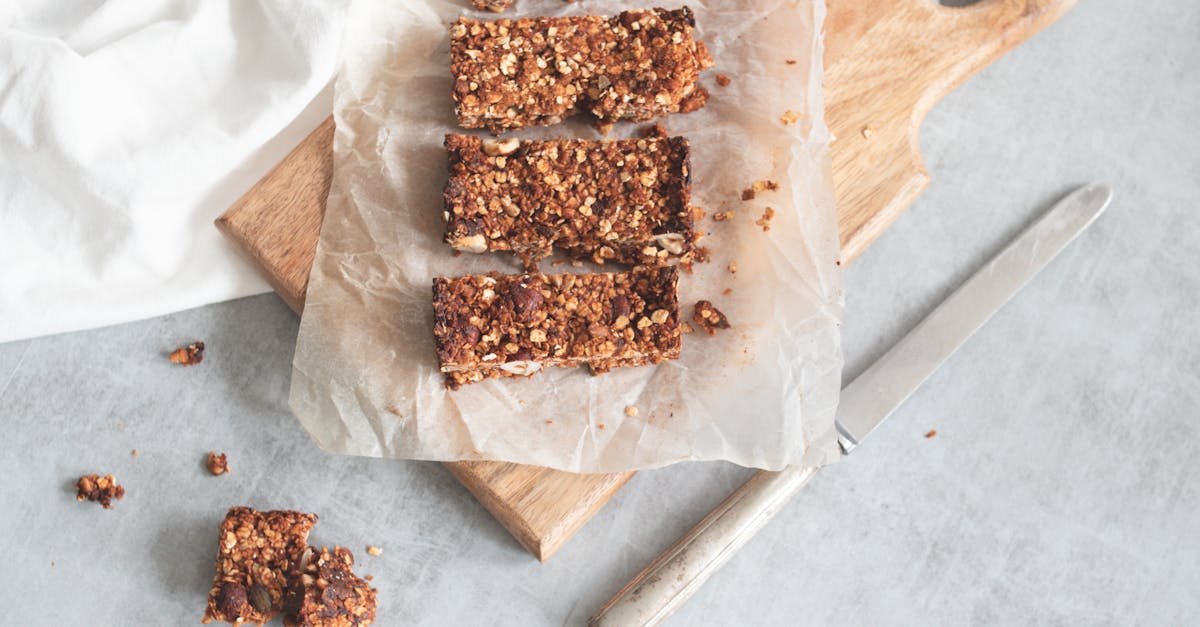
Get ready to indulge in a heavenly treat with our irresistible Angel Bars recipe! These delightful desserts, often dubbed as a slice of paradise, combine a buttery crust with a luscious, creamy topping that’ll melt in your mouth. With roots in classic American baking, Angel Bars have been a cherished sweet for generations, gracing holiday tables and family gatherings alike.
We’re thrilled to share this timeless recipe that’s perfect for bakers of all skill levels. Whether you’re whipping up a batch for a special occasion or just craving a comforting dessert, these bars promise to deliver pure bliss in every bite. The secret lies in the balance of textures and flavors that make each piece utterly addictive.
About Angel Bars
Dive into the delightful world of Angel Bars, a dessert that truly lives up to its heavenly name. We’re thrilled to share the charm and allure of this classic American treat with you. Known for their irresistible combination of a buttery crust and a creamy dreamy topping, Angel Bars are a staple at holiday gatherings and family events. Their melt-in-your-mouth texture and sweet nostalgic flavor make them a crowd-pleaser for bakers of all skill levels.
The History Behind Angel Bars
Let’s take a step back in time to uncover the roots of Angel Bars. Originating in the heart of American home baking, these bars have been a beloved dessert since the mid-20th century. Often associated with festive seasons like Christmas and Thanksgiving, they were traditionally made to share at potlucks and church gatherings. We cherish how this treat embodies the warmth of togetherness with every bite. Their name reflects the light and airy sensation they bring reminiscent of an angelic touch.
Why We Love Angel Bars
There’s so much to adore about Angel Bars and we’re eager to tell you why they hold a special place in our hearts. First it’s the perfect balance of textures – a crisp shortbread-like base paired with a luscious creamy layer that simply dissolves on your tongue. Then there’s the versatility; whether enjoyed as a decadent after-dinner dessert or a sweet afternoon pick-me-up, they never fail to impress. We also appreciate how easy they are to whip up making them ideal for both novice bakers and seasoned pros looking to craft a quick yet stunning treat.
Nutritional Snapshot
For those curious about the indulgence level of Angel Bars we’ve put together a quick nutritional overview based on a standard serving size. Keep in mind that these values are approximate and can vary based on specific ingredients used.
| Nutrient | Amount per Serving |
|---|---|
| Calories | 250 kcal |
| Total Fat | 15 g |
| Saturated Fat | 9 g |
| Carbohydrates | 28 g |
| Sugar | 18 g |
| Protein | 3 g |
Ingredients for Angel Bars Recipe
Let’s dive into the essential components that make our Angel Bars a heavenly treat. We’ve organized the ingredients into two distinct layers for clarity and ease of preparation.
Base Layer Ingredients
For the crisp and buttery foundation of our Angel Bars, gather these items to create that irresistible shortbread-like texture:
- 1 cup unsalted butter (softened to room temperature for easy mixing)
- 1/2 cup granulated sugar
- 2 cups all-purpose flour (sifted to avoid lumps)
- 1/4 teaspoon salt (to enhance the buttery flavor)
Topping Ingredients
- 8 ounces cream cheese (softened for smooth blending)
- 1 cup powdered sugar (sifted to prevent graininess)
- 1 teaspoon vanilla extract (for a hint of warmth)
- 1 cup heavy cream (whipped to soft peaks for airy lightness)
- 1/4 cup chopped pecans or walnuts (optional for a delightful crunch)
Equipment Needed
To whip up a batch of Angel Bars, we need to gather the right tools to ensure a smooth baking process. Having the proper equipment on hand makes all the difference in crafting these heavenly desserts with ease and precision. Let’s dive into the essentials that will help us create that irresistible buttery crust and creamy topping for our divine treat.
Baking Essentials
First up, grab a 9×13-inch baking pan to form the perfect shape for our Angel Bars. This size ensures even baking for the crisp shortbread-like base. We also recommend using parchment paper to line the pan for easy removal and cleanup. A mixing bowl is crucial for combining the ingredients for both the base and the topping. Opt for a medium-sized one for the crust and a larger one for the creamy layer to accommodate the whipped components.
Mixing and Measuring Tools
Accuracy is key when baking these angelic treats. We rely on a set of measuring cups and spoons to get the exact amounts of flour, sugar, and other ingredients. A whisk or electric hand mixer is essential for blending the cream cheese and whipped cream into a silky smooth topping. For the base, a pastry cutter or fork works wonders to cut the butter into the flour mixture for that perfect crumbly texture.
Additional Gear
Don’t forget a rubber spatula to scrape down the sides of the bowl and spread the layers evenly in the pan. A cooling rack is necessary to let our Angel Bars cool completely before cutting into them. This prevents the creamy topping from melting or becoming messy. If you’re adding chopped pecans or walnuts for extra crunch, a cutting board and sharp knife will help with prep.
Optional but Helpful
While not mandatory, a stand mixer can save time and effort when whipping up the heavy cream for the topping. We also find a sifter handy for ensuring the powdered sugar is lump-free before mixing it into the cream cheese layer. These tools elevate the process, making our journey to angelic perfection even smoother.
Below is a quick reference table summarizing the Equipment Needed for baking Angel Bars:
| Equipment | Purpose | Necessity |
|---|---|---|
| 9×13-inch Baking Pan | Shaping and baking the bars | Essential |
| Parchment Paper | Easy removal and cleanup | Essential |
| Mixing Bowls (Medium & Large) | Combining ingredients for layers | Essential |
| Measuring Cups and Spoons | Accurate ingredient portions | Essential |
| Whisk or Electric Hand Mixer | Blending creamy topping | Essential |
| Pastry Cutter or Fork | Creating crumbly crust texture | Essential |
| Rubber Spatula | Scraping and spreading layers | Essential |
| Cooling Rack | Cooling bars before cutting | Essential |
| Cutting Board & Sharp Knife | Chopping optional nuts | Optional (if using nuts) |
| Stand Mixer | Effortless whipping of cream | Optional |
| Sifter | Lump-free powdered sugar | Optional |
Preparation Tips
We’re excited to share some essential tips to make your Angel Bars baking experience seamless and enjoyable. Let’s dive into practical advice to ensure your heavenly dessert turns out perfect every time.
Make-Ahead Instructions
To save time during busy occasions like Christmas or Thanksgiving, we recommend preparing components of the Angel Bars in advance. Follow these steps for a stress-free baking day:
- Prepare the Crust Ahead: Mix and bake the buttery base layer up to 2 days before serving. After baking, let it cool completely in the 9×13-inch pan, then cover tightly with plastic wrap and store at room temperature. This keeps the crisp shortbread-like texture intact.
- Make the Topping Early: Whip up the creamy topping with cream cheese and whipped heavy cream up to 1 day in advance. Store it in an airtight container in the refrigerator. When ready to assemble, give it a quick stir with a rubber spatula to restore its luscious consistency before spreading it over the crust.
- Assemble on the Day: For the freshest taste and texture, assemble the layers on the day of serving. This ensures the Angel Bars maintain their signature light and airy sensation that feels like an angelic touch.
Planning ahead with these steps allows us to enjoy the process without last-minute rushes while still delivering a dessert that wows every guest.
Storage Tips
Proper storage is key to preserving the delightful flavors and textures of our Angel Bars. Here’s how we keep them tasting heavenly even days after baking:
- Room Temperature Storage: If you plan to consume the Angel Bars within 24 hours, store them in an airtight container at room temperature. This helps maintain the buttery crust’s crispness without the topping becoming too soft.
- Refrigerator Storage: For longer storage, place the bars in an airtight container or cover the baking pan tightly with plastic wrap and refrigerate for up to 5 days. The creamy topping stays fresh and the optional chopped pecans or walnuts retain their crunch when chilled. Let them sit at room temperature for 15 minutes before serving to soften slightly for that perfect bite.
- Freezing Option: Want to enjoy Angel Bars weeks later? Freeze them! Cut the bars into squares, wrap each piece individually in plastic wrap, and store in a freezer-safe container for up to 2 months. Thaw overnight in the refrigerator before serving to recapture that irresistibly addictive balance of textures.
| Storage Method | Duration | Tips for Best Results |
|---|---|---|
| Room Temperature | Up to 24 hours | Use airtight container to keep crust crisp. |
| Refrigerator | Up to 5 days | Cover tightly; let sit out briefly before serving. |
| Freezer | Up to 2 months | Wrap individually; thaw overnight in fridge. |
With these storage tips, we ensure our Angel Bars remain a delightful treat whether served fresh or savored over time for any special occasion.
Instructions for Angel Bars Recipe
Let’s dive into the step-by-step process of creating the heavenly Angel Bars that will leave everyone craving more. With our detailed guide, crafting this irresistible dessert is a breeze for bakers of all levels.
Prep the Base Layer
- Preheat your oven to 350°F (175°C) to ensure it’s ready for baking.
- Line a 9×13-inch baking pan with parchment paper leaving an overhang for easy removal of the Angel Bars later.
- In a large mixing bowl combine 1 cup unsalted butter (softened) with 1/2 cup granulated sugar using a pastry cutter or fork until the mixture resembles coarse crumbs.
- Add 2 cups all-purpose flour and 1/4 tsp salt to the butter mixture. Mix until a dough forms ensuring it’s evenly blended.
- Press the dough firmly into the bottom of the prepared pan creating a smooth and even layer. This will be the buttery shortbread-like crust that defines our Angel Bars.
- Bake the base for 20-25 minutes or until lightly golden. Set aside to cool slightly while we prepare the topping.
Prepare the Topping
- In a medium mixing bowl beat 8 oz cream cheese (softened) with 1 cup powdered sugar using an electric mixer or whisk until creamy and lump-free.
- Add 1 tsp vanilla extract to enhance the flavor profile of our Angel Bars topping.
- In a separate bowl whip 1 cup heavy cream until stiff peaks form. This will give the topping its light and airy texture reminiscent of an angelic touch.
- Gently fold the whipped cream into the cream cheese mixture until fully combined. Be careful not to deflate the whipped cream.
- If desired fold in 1/2 cup chopped pecans or walnuts for a delightful crunch that contrasts the creamy layer.
Assemble the Bars
- Spread the prepared cream cheese topping evenly over the slightly cooled base layer using a rubber spatula. Ensure every corner of the pan is covered for consistent flavor in every bite of our Angel Bars.
- Smooth the top to create a polished look that will make these bars visually appealing as well as delicious.
- If you’re feeling fancy sprinkle an additional 2 tbsp chopped nuts over the topping for an extra touch of texture and elegance.
Bake the Angel Bars
- Return the assembled pan to the oven and bake at 350°F (175°C) for an additional 15-20 minutes. The topping should be set but not browned.
- Watch closely during the last few minutes to avoid overbaking. We want the topping to retain its creamy lusciousness that makes Angel Bars so addictive.
- Once baked remove the pan from the oven and let the heavenly aroma of buttery crust and sweet cream fill your kitchen.
Cool and Cut
- Allow the Angel Bars to cool completely in the pan on a wire rack for about 2 hours. This ensures the layers set properly for clean slicing.
- Once cooled use the parchment paper overhang to lift the bars out of the pan. Place them on a cutting board for easier handling.
- Cut into 24 squares or desired sizes using a sharp knife. Wipe the knife between cuts for neat edges that showcase the beautiful layers of our Angel Bars.
- Serve these divine treats chilled or at room temperature and watch them disappear as everyone savors the perfect balance of crisp base and velvety topping.
Serving Suggestions
Dive into the delightful world of Angel Bars with us as we share the best ways to present and enjoy this heavenly dessert. Whether you’re hosting a festive gathering or indulging in a sweet treat at home, these serving ideas will elevate your experience and impress your guests. Let’s explore how to make the most of these irresistible bars with creative pairings and presentation tips.
Perfect Pairings for Angel Bars
Enhance the flavors of our Angel Bars by pairing them with complementary beverages and sides. Here are some of our top picks:
- Hot Beverages: Serve these bars alongside a steaming cup of coffee or hot chocolate. The rich and creamy notes of the drink balance the buttery crust and luscious topping of the Angel Bars, creating a cozy and comforting treat.
- Cold Drinks: For a refreshing contrast, pair them with a glass of iced tea or a vanilla latte. The coolness of the beverage highlights the dessert’s sweetness, making it a perfect match for warm weather gatherings.
- Fruit Sides: Add a fresh element by serving sliced strawberries or raspberries on the side. The tartness of the fruit cuts through the richness of the bars, offering a delightful balance of flavors.
Presentation Tips for a Stunning Display
Make your Angel Bars the centerpiece of any dessert table with these simple yet effective presentation ideas:
- Dust with Powdered Sugar: Just before serving, lightly dust the tops of the bars with powdered sugar for a snowy, elegant look that screams holiday vibes. Use a fine mesh sieve for an even application.
- Garnish with Nuts: Sprinkle some chopped pecans or walnuts over the creamy topping to add a touch of crunch and a rustic charm. This also ties into the optional nut ingredient in the recipe for a cohesive finish.
- Serve on a Tiered Stand: Arrange the cut Angel Bars on a tiered dessert stand to create height and visual interest at your event. This works wonderfully for weddings or baby showers where aesthetics matter.
Serving Size and Portions
To help you plan for your gathering, we’ve broken down the ideal serving sizes for our Angel Bars. These bars are rich, so smaller portions often satisfy. Check out the table below for guidance on how many pieces to cut from a standard 9×13-inch pan based on your crowd size.
| Crowd Size | Number of Bars | Cut Size (approx.) |
|---|---|---|
| Small (5-10 people) | 20 bars | 2×2 inches |
| Medium (10-15 people) | 30 bars | 1.5×2 inches |
| Large (15-20 people) | 40 bars | 1.5×1.5 inches |
Pro Tip: Use a sharp knife dipped in hot water and wiped dry between cuts for clean edges. This ensures each piece of Angel Bars looks as good as it tastes!
Occasion-Specific Serving Ideas
Tailor your Angel Bars to suit the theme of your event with these occasion-specific ideas:
- Holiday Celebrations: For Christmas or Thanksgiving, add a sprinkle of cinnamon or nutmeg on top to evoke warm holiday spices. Serve alongside mulled wine for an extra festive touch.
- Summer Picnics: Chill the bars in the refrigerator before serving to keep them firm in the heat. Pair with a citrus-infused water or lemonade for a light and refreshing dessert option.
- Birthday Parties: Cut the bars into fun shapes using cookie cutters for a playful twist. Top with edible glitter or sprinkles to match the party theme and delight both kids and adults.
With these serving suggestions, we’re confident that your Angel Bars will steal the show at any gathering. Experiment with pairings and presentations to find what works best for your style and occasion.
Conclusion
We’re thrilled to share the magic of Angel Bars with you and can’t wait for you to try this heavenly dessert. These treats are sure to become a cherished favorite at your gatherings or a sweet indulgence for quiet moments at home.
With their irresistible charm and easy preparation, they’re perfect for any occasion. So gather your ingredients, preheat that oven, and let’s create some angelic bliss together!
Frequently Asked Questions
What are Angel Bars?
Angel Bars are a classic American dessert with a buttery, crisp shortbread-like base and a creamy, light topping. Known for their heavenly texture and flavor, they’re a popular treat at holiday gatherings and family events. Their name reflects the airy, angelic sensation they provide with every bite.
Where did Angel Bars originate?
Angel Bars trace their roots to mid-20th century American home baking. They became a beloved dessert for festive occasions like Christmas and Thanksgiving, symbolizing comfort and indulgence in traditional holiday spreads.
Are Angel Bars easy to make for beginners?
Yes, Angel Bars are suitable for bakers of all skill levels. The recipe is straightforward, with clear steps for creating the crust and topping. With basic ingredients and tools, even beginners can achieve delicious results for any occasion.
What ingredients are needed for Angel Bars?
The base layer requires unsalted butter, granulated sugar, all-purpose flour, and salt. The topping includes cream cheese, powdered sugar, vanilla extract, whipped heavy cream, and optional nuts like pecans or walnuts for added crunch.
How should Angel Bars be stored?
Store Angel Bars at room temperature for up to 2 days, in the refrigerator for up to a week, or in the freezer for longer storage. Use airtight containers to preserve their flavor and texture, ensuring they stay fresh.
What equipment do I need to make Angel Bars?
You’ll need a 9×13-inch baking pan, parchment paper, mixing bowls, measuring cups and spoons, a whisk or electric mixer, and a pastry cutter or fork. Optional tools like a stand mixer or sifter can also help.
Can I make Angel Bars ahead of time?
Yes, you can prepare the crust and topping in advance. Store them separately and assemble on the day of serving for optimal freshness. This make-ahead option is perfect for busy occasions.
What are some serving suggestions for Angel Bars?
Serve Angel Bars with hot coffee or iced tea, or pair with fresh fruit to balance their richness. Dust with powdered sugar, garnish with nuts, or use a tiered stand for an elegant presentation at events.
How many calories are in a serving of Angel Bars?
The calorie content varies based on portion size and ingredients, but a typical serving of Angel Bars provides a moderate indulgence. The article includes a nutritional snapshot for a detailed breakdown per serving.
Can I customize Angel Bars for different occasions?
Absolutely! Add holiday spices like cinnamon for festive gatherings or use cookie cutters for fun shapes at birthday parties. These tweaks make Angel Bars versatile for any event or celebration.