
We’ve all dreamed of a chocolate cake that’s as irresistible as it sounds and our Killer Chocolate Cake Recipe delivers just that. Packed with rich, velvety cocoa flavors it’s the ultimate crowd-pleaser for birthdays or cozy nights in.
As passionate bakers we’ve perfected this classic with simple tweaks that ensure moist layers and a fudgy frosting every time. Whether you’re a novice or pro you’ll love how straightforward it is to create this showstopper that keeps everyone coming back for more.
Ingredients
We take pride in crafting our Killer Chocolate Cake Recipe with premium ingredients that deliver rich, decadent cocoa flavors and a moist, irresistible texture. To ensure your baking success, we’ve organized the ingredients in the order they are used—starting with dry components, followed by wet ones, and then frosting elements. This approach simplifies preparation for bakers of all levels.
For the Cake Batter
Gather these foundational ingredients first, as they form the base of our signature moist layers:
- 2 cups all-purpose flour: Sifted to remove lumps and ensure even distribution.
- 2 cups granulated sugar: Provides the perfect sweetness to balance the cocoa’s intensity.
- 3/4 cup unsweetened cocoa powder: We recommend high-quality Dutch-processed cocoa for a deeper, more velvety chocolate taste.
- 1 1/2 teaspoons baking powder: Freshly measured to help the cake rise flawlessly.
- 1 1/2 teaspoons baking soda: Acts as a leavening agent; combine with the above for optimal lift.
- 1 teaspoon salt: Enhances the overall flavor profile without overpowering the chocolate.
- 2 large eggs: At room temperature for better incorporation and a tender crumb.
- 1 cup whole milk: Use full-fat for extra moisture; bring to room temperature.
- 1/2 cup vegetable oil: Adds richness and keeps the cake from drying out.
- 2 teaspoons vanilla extract: Pure extract for authentic aroma and depth.
- 1 cup boiling water: Added last to bloom the cocoa and create a smooth batter.
For the Fudgy Frosting
- 1 1/2 cups unsalted butter: Softened to room temperature for a creamy consistency.
- 1 cup unsweetened cocoa powder: The same high-quality type as above to maintain flavor harmony.
- 5 cups powdered sugar: Sifted to avoid clumps and achieve a silky finish.
- 1/2 cup whole milk: Adjust as needed for desired frosting thickness.
- 2 teaspoons vanilla extract: Infuses a subtle warmth to complement the chocolate.
Required Tools and Equipment
To prepare our Killer Chocolate Cake seamlessly, we need a set of essential tools and equipment that ensure precision and efficiency in every step. Building on our ingredient selection, these items help us achieve that perfect moist texture and rich cocoa flavor without any hitches.
Baking Essentials
We recommend gathering the following core tools, organized by their primary use in the recipe:
- Mixing Bowls: Two to three medium-sized stainless steel or glass bowls for combining dry and wet ingredients. This allows us to keep our workspace organized and prevents cross-contamination.
- Measuring Cups and Spoons: A standard set of dry measuring cups (1 cup, ½ cup, ⅓ cup, ¼ cup) and spoons (1 tablespoon, 1 teaspoon, ½ teaspoon). Accurate measurements are crucial for our cake’s balance of sweetness and moisture.
- Electric Mixer or Hand Whisk: A stand mixer or handheld electric mixer for creaming butter and sugar, or a sturdy whisk if we’re opting for a hands-on approach. This tool ensures our batter is smooth and airy, enhancing the cake’s rise.
Preparation and Baking Tools
For the actual baking process, these items are non-negotiable to guarantee even cooking and professional results:
- 9-Inch Round Cake Pans: Two greased and lined pans to create the classic layered structure of our Killer Chocolate Cake. We prefer non-stick versions to prevent sticking and ensure easy release.
- Sieve: A fine-mesh sieve for sifting flour and cocoa powder, which helps eliminate lumps and incorporates air for a lighter crumb.
- Spatula: A silicone or offset spatula for folding ingredients and spreading frosting. Its flexibility makes it ideal for scraping bowls clean and achieving even layers.
- Oven Thermometer: To verify our oven’s temperature accuracy, as baking at the precise 350°F ensures the cake bakes evenly without drying out.
Additional Finishing Tools
Once the cake is baked, these tools elevate our presentation:
- Cooling Rack: A wire rack to allow air circulation under the cakes, preventing sogginess and ensuring they cool uniformly before frosting.
- Piping Bag and Tips: Optional but recommended for decorating the fudgy frosting with precision, giving our cake that polished, crowd-pleasing finish.
By having these tools ready, we streamline the process from mixing to serving, making our Killer Chocolate Cake recipe accessible and foolproof for bakers of all levels.
Instructions
Now that we have gathered our premium ingredients and essential tools, we guide you through creating our irresistible Killer Chocolate Cake with simple, step-by-step instructions that yield moist layers and decadent flavors.
Prep Work
Before we begin mixing, let’s prepare our workspace to ensure everything runs smoothly. First, preheat the oven to 350°F and grease two 9-inch round cake pans with butter or non-stick spray then line them with parchment paper for easy release.
- Sift dry ingredients: In a medium bowl, sift together 2 cups of all-purpose flour, 2 cups of granulated sugar, 3/4 cup of unsweetened cocoa powder, 2 teaspoons of baking powder, 1-1/2 teaspoons of baking soda, and 1 teaspoon of salt to remove lumps and aerate the mixture.
- Measure wet ingredients: Crack 2 large eggs into a separate bowl and measure out 1 cup of whole milk, 1/2 cup of vegetable oil, and 2 teaspoons of vanilla extract ensuring they are at room temperature for optimal blending.
Mixing the Batter
With our ingredients prepped, we combine them to create a smooth, velvety batter that forms the heart of our Killer Chocolate Cake. This step brings out rich cocoa aromas and ensures even texture.
- In a large mixing bowl, whisk the sifted dry ingredients until well combined creating a fluffy base.
- Add the eggs, whole milk, vegetable oil, and vanilla extract to the dry mixture and beat with an electric mixer on medium speed for 2 minutes until the batter is homogeneous and glossy.
- Slowly pour in 1 cup of boiling water while stirring gently with a spatula; the batter will thin out and develop a luscious, pourable consistency that promises a moist crumb.
Baking the Cake
Now we transform the batter into golden, fragrant cake layers that will make your kitchen smell heavenly with deep chocolate notes. Bake with precision for perfect results.
- Pour the batter evenly into the prepared 9-inch pans filling each about two-thirds full to allow for rising.
- Place the pans in the preheated oven and bake for 30 to 35 minutes or until a toothpick inserted in the center comes out clean indicating a tender, springy texture.
- For accuracy, we recommend checking the oven temperature with an oven thermometer to maintain 350°F ensuring even baking and preventing dry edges.
Cooling and Frosting
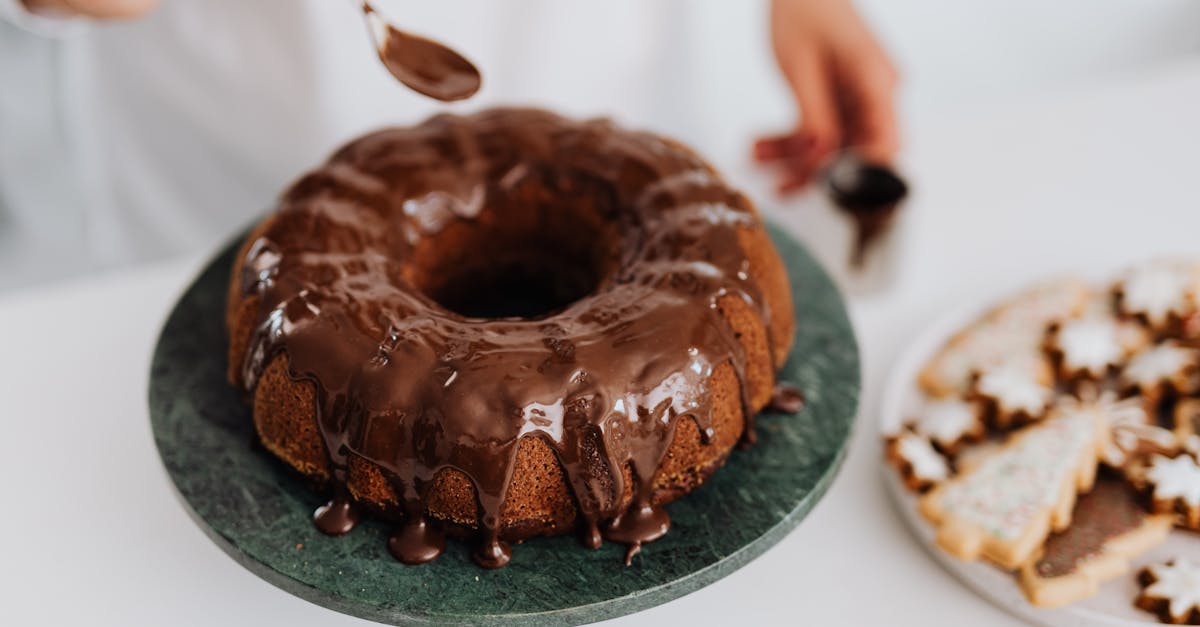
After baking, we cool the cakes to set their structure then apply our fudgy frosting for a glossy finish that enhances the cake’s indulgent taste and appearance. This final step creates a symphony of textures from soft layers to creamy topping.
- Remove the pans from the oven and let them cool on a wire rack for 10 minutes; gently invert the cakes onto the rack to cool completely for about 1 hour preventing sogginess.
- For the frosting, melt 1/2 cup of unsalted butter in a saucepan over low heat then stir in 2/3 cup of unsweetened cocoa powder until smooth and fragrant.
- In a separate bowl, gradually beat in 3 cups of powdered sugar, 1/3 cup of whole milk, and 1 teaspoon of vanilla extract using an electric mixer until the frosting reaches a thick, spreadable consistency with a rich, fudgy sheen.
- Once cooled, spread a layer of frosting between the two cake layers and over the top and sides using a spatula for an even coat that locks in moisture and delivers a decadent chocolate experience.
Make-Ahead Instructions
To help you plan your baking schedule for our Killer Chocolate Cake Recipe, we offer these practical steps for preparing components in advance. This approach ensures the cake retains its moist crumb and rich cocoa flavors while saving time on the day of your event.
Preparing the Cake Layers Ahead
We recommend baking the cake layers up to 2 days in advance to maintain their fudgy texture. Follow these steps for optimal results:
- Step 1: After baking the cake as outlined in the previous section, allow the layers to cool completely on a wire rack for at least 1 hour. This prevents condensation and keeps the crumb tender.
- Step 2: Wrap each cooled cake layer tightly in plastic wrap, then place them in an airtight container or freezer bag to lock in moisture and protect against staleness.
- Step 3: Store the wrapped layers in the refrigerator for up to 2 days or in the freezer for up to 1 month. Thaw frozen layers overnight in the refrigerator before assembling to preserve the indulgent, velvety feel.
Making the Fudgy Frosting in Advance
Our fudgy frosting can be prepared ahead to enhance its smooth, decadent consistency without compromising flavor.
- Step 1: Whip up the frosting following the recipe instructions, then let it cool to room temperature for about 30 minutes to achieve a spreadable texture.
- Step 2: Transfer the frosting to an airtight container and refrigerate it for up to 3 days. Stir well before use to restore its creamy richness and deep chocolate aroma.
- Step 3: If the frosting firms up too much in the fridge, gently reheat it in the microwave for 10-15 seconds on low power, stirring until it regains its glossy sheen for effortless spreading.
Assembling the Cake on the Day
For the best presentation, we suggest assembling the full cake no more than 4 hours before serving to ensure the layers stay fresh and the frosting sets perfectly.
| Component | Make-Ahead Time Limit | Storage Method | Key Tip for Quality |
|---|---|---|---|
| Cake Layers | Up to 2 days (fridge) or 1 month (freezer) | Airtight wrap and container | Thaw slowly to avoid sogginess |
| Fudgy Frosting | Up to 3 days | Airtight container in fridge | Re-stir or gently warm for smooth application |
By following these make-ahead strategies, we guarantee your Killer Chocolate Cake will deliver its signature moist layers and irresistible cocoa intensity every time.
Conclusion
We’ve crafted this Killer Chocolate Cake recipe with care to make baking a breeze and the results unforgettable. It’s our go-to for creating moist layers and rich flavors that wow every time.
Try it soon and enjoy the satisfaction of sharing a homemade treat that’ll leave everyone craving more.
Frequently Asked Questions
What is the Killer Chocolate Cake Recipe?
This recipe is a decadent chocolate cake with rich cocoa flavors, perfect for any occasion. It’s designed for both novice and experienced bakers, featuring moist layers and fudgy frosting. Created with perfected techniques, it uses premium ingredients for a crowd-pleasing treat that’s simple to make.
What ingredients are needed for the Killer Chocolate Cake?
For the cake batter, you’ll need all-purpose flour, granulated sugar, unsweetened cocoa powder, baking powder, baking soda, salt, eggs, whole milk, vegetable oil, vanilla extract, and boiling water. The fudgy frosting requires unsalted butter, unsweetened cocoa powder, powdered sugar, whole milk, and vanilla extract. These ensure a moist, irresistible texture.
What tools are required to make the Killer Chocolate Cake?
You’ll need mixing bowls, measuring cups and spoons, an electric mixer or hand whisk, 9-inch round cake pans, a sieve, spatula, and oven thermometer for baking. Also, include a cooling rack and piping bag for finishing. These tools make preparation efficient and accessible for all skill levels.
How do I prepare the Killer Chocolate Cake batter?
Start by preheating the oven and preparing pans. Sift dry ingredients like flour, sugar, cocoa, baking powder, soda, and salt. Mix in wet ingredients—eggs, milk, oil, vanilla—then add boiling water for a smooth batter. Pour evenly into pans and bake for perfect results.
How long does it take to bake the Killer Chocolate Cake?
Bake the cake at the recommended temperature for about 30-35 minutes, depending on your oven. Cool the layers completely before frosting. The entire process, including prep and assembly, takes around 1-2 hours, plus cooling time, for a fresh, indulgent finish.
Can I make the Killer Chocolate Cake ahead of time?
Yes, bake the cake layers up to 2 days in advance and store them wrapped at room temperature. Prepare the frosting ahead and refrigerate it, but bring it to room temperature before use. Assemble no more than 4 hours before serving to keep it moist and fresh.
How should I store the Killer Chocolate Cake?
Store unfrosted layers in an airtight container at room temperature for up to 2 days. Once frosted, refrigerate for up to 3 days, but let it sit at room temperature for 30 minutes before serving to maintain moisture and flavor. Avoid freezing for best results.