
We’ve always been captivated by the bold buzz of an Espresso Martini, that iconic cocktail blending rich espresso with a spirited kick. Now we’re transforming it into a decadent cake that captures those same vibrant flavors in every moist, coffee-infused bite.
This recipe pays homage to the cocktail’s lively origins while adding our twist for home bakers. It’s the perfect fusion of cocktail culture and sweet indulgence, promising a treat that’ll wow your guests and satisfy your cravings.
Ingredients
In our Espresso Martini Cake recipe, we gather premium ingredients that blend the bold, aromatic essence of espresso with a subtle spirited twist, creating a moist, indulgent dessert that echoes the cocktail’s vibrant flavors. We organize these ingredients in the order they are used, from dry components to wet mixtures and finishing touches, ensuring precision for home bakers aiming for perfection.
Cake Batter Ingredients
- 2 cups all-purpose flour: Sifted to ensure a light, airy texture.
- 1 ½ cups granulated sugar: For a sweet base that balances the coffee’s bitterness.
- 3 large eggs: At room temperature for better incorporation and rise.
- ½ cup unsalted butter: Melted to add rich, creamy moisture.
- 1 cup strong brewed espresso: Freshly made and cooled, to infuse intense, robust coffee notes that define the cake’s core.
- ¼ cup vodka: For that spirited kick, evoking the Espresso Martini’s signature edge—use a high-quality brand for subtle flavor.
- 1 teaspoon baking powder: To promote a fluffy crumb.
- ½ teaspoon baking soda: For additional lift in this coffee-infused batter.
- ½ teaspoon salt: To enhance the overall depth of flavors.
Frosting Ingredients
- 8 ounces cream cheese: Softened for a smooth, velvety frosting base.
- ½ cup powdered sugar: Sifted to avoid lumps and create a silky finish.
- 2 tablespoons espresso powder: Dissolved in a splash of hot water for an amplified, earthy aroma that ties back to the cake.
- 2 tablespoons coffee liqueur: Such as Kahlúa, to mirror the cocktail’s complexity without overpowering.
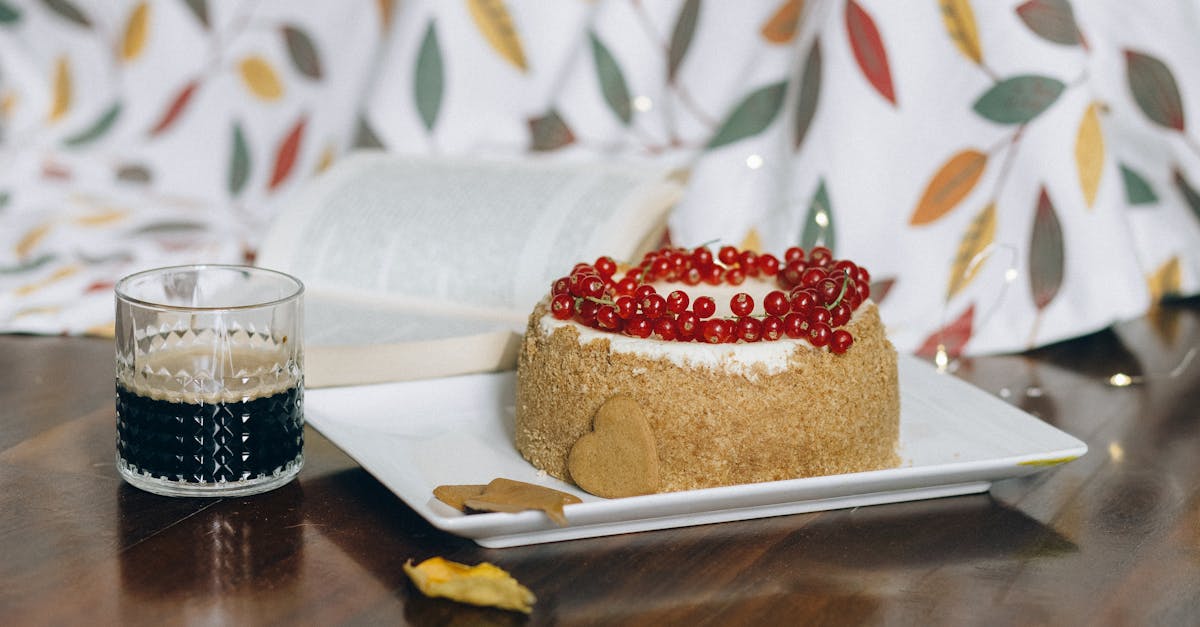
- Optional garnish: ¼ cup chocolate shavings: Finely grated for a decadent, visual appeal that adds a subtle crunch.
We emphasize using fresh, high-quality items like freshly ground espresso beans to maximize the cake’s sensory appeal—picture the warm, invigorating scent filling your kitchen as you mix. This selection ensures our Espresso Martini Cake delivers on both taste and texture, making it a standout treat.
Tools and Equipment
Having gathered our premium ingredients for the Espresso Martini Cake, we now turn to the essential tools and equipment that ensure a seamless baking process. From precise measurements to flawless assembly, selecting the right gear enhances accuracy and elevates the final texture and flavor of this coffee-infused dessert.
To prepare efficiently, we recommend the following key tools and equipment, organized by their role in the recipe:
- Measuring Tools:
- Standard measuring cups and spoons: These are crucial for accurately portioning ingredients like flour, sugar, and espresso to maintain the cake’s moist, balanced profile.
- Digital kitchen scale: Ideal for weighing items such as butter and eggs, ensuring consistency in our batter for optimal rise and texture.
- Mixing and Blending Tools:
- Electric stand mixer or hand mixer: We rely on this for creaming butter and sugar, as well as incorporating espresso and vodka, to achieve a smooth, airy batter that captures the spirited kick of the original cocktail.
- Large mixing bowls (at least 2-3): Stainless steel or glass varieties work best for combining wet and dry ingredients without transferring flavors.
- Baking and Cooking Tools:
- 9-inch round cake pans (2 pans): Non-stick options prevent sticking and promote even baking, resulting in layers that showcase the cake’s rich, espresso-infused crumb.
- Oven thermometer: This guarantees the oven reaches the precise temperature (e.g., 350°F) for even cooking, avoiding dry edges or underbaked centers.
- Espresso maker or strong coffee brewer: Essential for brewing fresh espresso, which infuses the cake with its bold, aromatic essence.
- Finishing and Decorating Tools:
- Offset spatula: Perfect for spreading frosting evenly, allowing the cream cheese and espresso layers to shine with a velvety finish.
- Cooling rack: Helps the cake cool uniformly, preserving its moist interior and preventing sogginess.
- Piping bag and tips (optional): For those looking to add professional touches, like garnishing with chocolate shavings, to enhance the dessert’s visual appeal.
In our experience, investing in high-quality, durable tools not only streamlines the process but also contributes to the Espresso Martini Cake’s impressive presentation and taste. Always ensure tools are clean and in good condition for the best results.
Instructions
Now that we have gathered our premium ingredients and essential tools, we guide you through creating our irresistible Espresso Martini Cake, step by step, to deliver a moist, coffee-infused delight with a spirited twist.
Prepare the Ingredients
Before we begin mixing, let’s organize and prep our ingredients for efficiency and accuracy. Start by measuring everything out to avoid any last-minute rushes.
- All-purpose flour: Sift 2 cups to ensure it’s light and lump-free, which helps achieve a tender crumb in our cake.
- Granulated sugar: Measure 1 ½ cups and set aside; this sweetens the batter and caramelizes beautifully for a golden finish.
- Eggs: Use 3 large eggs at room temperature to promote even blending and a fluffy texture.
- Unsalted butter: Soften 1 cup (2 sticks) by leaving it out for 30 minutes, ensuring it creams smoothly without overworking.
- Strong brewed espresso: Prepare 1 cup freshly brewed and cooled; its robust flavor is the heart of our Espresso Martini Cake‘s coffee notes.
- Vodka: Measure ¼ cup for that authentic cocktail kick, adding a subtle depth without overpowering.
- Baking powder and baking soda: Combine 1 teaspoon baking powder with ½ teaspoon baking soda to provide the perfect rise.
- Salt: Add ½ teaspoon to balance the sweetness and enhance overall flavors.
- For the frosting: Soften 8 ounces of cream cheese, sift 2 cups of powdered sugar, mix in 1 tablespoon of espresso powder, and measure 2 tablespoons of coffee liqueur for a creamy, boozy topping.
- Optional garnish: Finely chop or grate ¼ cup of chocolate shavings for an elegant, visual appeal that ties back to the cocktail’s sophistication.
Make the Cake Batter
With ingredients prepped, we now mix the batter to capture the rich, espresso-infused essence of our Espresso Martini Cake. Begin by creaming the butter and sugar in a large mixing bowl using an electric mixer on medium speed until light and fluffy, about 3-4 minutes, releasing a fragrant, buttery aroma that hints at the dessert’s indulgence.
- Add the 3 eggs one at a time, beating well after each to incorporate air and create a smooth, velvety base.
- In a separate bowl, whisk together the 2 cups of sifted all-purpose flour, 1 teaspoon baking powder, ½ teaspoon baking soda, and ½ teaspoon salt until evenly combined.
- Gradually alternate adding the dry mixture and 1 cup of cooled espresso to the wet ingredients, mixing on low speed to avoid overmixing and maintain a tender crumb.
- Finally, stir in the ¼ cup of vodka gently, infusing the batter with a spirited zing that evokes the cocktail’s lively vibe, resulting in a glossy, aromatic mixture ready for the pan.
Bake the Cake
Now we transform the batter into a golden, espresso-scented cake that fills your kitchen with an irresistible coffee aroma. Preheat your oven to 350°F and prepare two 9-inch non-stick round cake pans by greasing them lightly and lining with parchment paper for easy release.
- Divide the batter evenly between the pans, smoothing the tops with an offset spatula for uniform baking.
- Bake in the center of the oven for 25-30 minutes, or until a toothpick inserted in the center comes out clean, watching as the cakes rise and develop a deep, caramelized edge that promises a moist, flavorful bite.
- Remove from the oven and let cool in the pans for 10 minutes, then transfer to a cooling rack; the cakes will release a warm, intoxicating espresso scent as they rest.
Prepare the Espresso Martini Frosting
Let’s whip up a silky, boozy frosting that mirrors the creamy finish of an Espresso Martini, blending flavors for a decadent layer that elevates our cake’s appeal. In a clean mixing bowl, beat 8 ounces of softened cream cheese with an electric mixer on medium speed until smooth and creamy, about 2 minutes.
- Gradually add 2 cups of sifted powdered sugar, 1 tablespoon of espresso powder, and 2 tablespoons of coffee liqueur, beating until fully incorporated and the mixture reaches a fluffy, spreadable consistency with a rich, coffee-forward taste.
- Continue mixing for another 1-2 minutes to achieve peaks that hold their shape, ensuring the frosting delivers a velvety texture and subtle alcoholic warmth on the palate.
Assemble and Decorate
Finally, we bring it all together to showcase our Espresso Martini Cake as a stunning, flavor-packed centerpiece. Once the cakes have cooled completely, place one layer on a serving plate and spread a generous amount of frosting on top for a smooth, even coat.
- Stack the second cake layer on top and frost the entire exterior, using an offset spatula to create swirls that add visual texture and reveal the frosting’s glossy sheen.
- For the finishing touch, sprinkle or pipe on the optional ¼ cup of chocolate shavings around the edges, enhancing the cake’s elegant appearance and adding a crunchy contrast to its soft, moist interior.
- Chill the assembled cake in the refrigerator for 30 minutes to set the frosting, allowing the flavors to meld into a harmonious blend of coffee, cream, and spirit.
Make-Ahead Instructions
To help us streamline our baking process for the Espresso Martini Cake, we can prepare components in advance without compromising the dessert’s rich, coffee-infused flavors. This approach allows the Espresso Martini Cake to develop even deeper espresso notes over time, making it perfect for events or busy schedules.
Preparing the Cake Layers Ahead
We recommend baking the cake layers up to 2 days in advance for optimal freshness. Follow these steps to ensure the moist texture remains intact:
- Step 1: After baking the cake layers as outlined in the previous section, let them cool completely on a wire rack for at least 1 hour. This step prevents condensation and maintains the cake’s fluffy crumb.
- Step 2: Wrap each cooled layer tightly in plastic wrap to lock in moisture. For added protection, place the wrapped layers in an airtight container or resealable bag.
- Step 3: Store the wrapped layers in the refrigerator for up to 2 days or in the freezer for up to 1 month. If freezing, thaw them overnight in the refrigerator before assembly to preserve the espresso’s bold aroma and the cake’s tender structure.
Making the Frosting in Advance
The creamy Espresso Martini frosting can be prepared ahead to enhance its smooth, liqueur-infused taste. We suggest making it 1–2 days before assembly.
- Gather ingredients: Use the frosting recipe from earlier, ensuring you have cream cheese, powdered sugar, espresso powder, and coffee liqueur ready.
- Step 1: Whip the frosting as directed, then transfer it to an airtight container.
- Step 2: Cover the surface directly with plastic wrap to avoid a skin forming, then seal the container.
- Step 3: Refrigerate the frosting for up to 2 days. Before using, let it sit at room temperature for 30 minutes and re-whip briefly to restore its silky consistency and vibrant coffee flavor.
Assembling and Storing the Full Cake
For the complete Espresso Martini Cake, we can assemble it ahead and let the flavors meld, creating a more harmonious blend of espresso and spirits.
- Step 1: Assemble the cake as described, layering the components and adding chocolate shavings if desired.
- Step 2: Once assembled, cover the cake loosely with plastic wrap or place it in a cake dome to protect the frosting’s delicate texture.
- Step 3: Refrigerate the cake for up to 24 hours to allow the espresso and liqueur notes to intensify. For longer storage, freeze the assembled cake for up to 1 week—wrap it securely in plastic wrap and foil before freezing, then thaw in the refrigerator overnight.
Key Tips for Best Results
To maximize the Espresso Martini Cake‘s appeal, we emphasize these important guidelines:
- Always use high-quality espresso and liqueur, as they directly impact the cake’s sensory experience—think bold, invigorating flavors with a subtle kick.
- If storing in the freezer, note the following in the table below for quick reference:
| Storage Method | Duration | Thawing Instructions |
|---|---|---|
| Refrigerator | Up to 2 days | No thawing needed; use directly |
| Freezer (layers) | Up to 1 month | Thaw overnight in refrigerator |
| Freezer (full cake) | Up to 1 week | Thaw overnight in refrigerator |
By following these make-ahead strategies, we ensure our Espresso Martini Cake delivers a confident, show-stopping presentation every time.
Conclusion
We’ve loved sharing this Espresso Martini Cake recipe with you as it’s a fantastic way to blend cocktail vibes into your baking adventures. It’s sure to impress at any gathering with its bold flavors and elegant finish.
Remember we’re all about making desserts that excite so go ahead and tweak it to suit your style—your guests will thank you. Let’s raise a fork to more creative baking!
Frequently Asked Questions
What is an Espresso Martini Cake?
An Espresso Martini Cake is a decadent dessert inspired by the classic cocktail, featuring moist layers infused with rich espresso and a hint of vodka. It captures the drink’s bold coffee flavors in a baked form, perfect for coffee lovers and special occasions. This recipe adds a fun twist, making it an impressive treat that’s easy to bake at home.
What ingredients are needed for the Espresso Martini Cake?
You’ll need all-purpose flour, granulated sugar, eggs, unsalted butter, strong brewed espresso, vodka, baking powder, baking soda, and salt for the cake batter. For the frosting, gather cream cheese, powdered sugar, espresso powder, and coffee liqueur, plus optional chocolate shavings for garnish. Using fresh, high-quality ingredients ensures the best flavor and texture.
What tools are required to make this cake?
Essential tools include measuring cups and spoons, a digital kitchen scale, an electric mixer, large mixing bowls, non-stick 9-inch round cake pans, and an oven thermometer. An espresso maker is ideal for fresh coffee, while an offset spatula, cooling rack, and piping bags help with assembly and presentation. Quality tools make baking smoother and results more professional.
How do I prepare the Espresso Martini Cake batter?
Start by creaming butter and sugar until fluffy, then add eggs one at a time. Alternate adding dry ingredients (flour, baking powder, soda, and salt) with brewed espresso and vodka. Mix until just combined for a smooth batter. Preheat your oven and grease the pans before baking at the specified temperature for even results.
How do I make and assemble the Espresso Martini frosting?
Whip cream cheese with powdered sugar and espresso powder until smooth, then mix in coffee liqueur for a creamy finish. Once the cake layers are cooled, spread frosting between layers and over the top. Add chocolate shavings for decoration, then chill the cake to let flavors meld, creating a stunning, cocktail-inspired dessert.
Can I make the Espresso Martini Cake ahead of time?
Yes, bake the cake layers up to 2 days in advance. Wrap them tightly in plastic wrap and store at room temperature or refrigerate for moisture retention. Prepare the frosting a day ahead and refrigerate it. Assemble the full cake early, allowing flavors to blend in the fridge for easier entertaining without losing taste or texture.
How should I store the finished Espresso Martini Cake?
Store the assembled cake in an airtight container in the refrigerator for up to 3-4 days to keep it fresh. For longer storage, freeze individual layers or the whole cake (wrapped well) for up to 2 months—thaw in the fridge before serving. Always use high-quality ingredients to maintain the cake’s moistness and bold flavors.